
Hi again crafty people!
Today I've got a scrapbook page for you - simple and fun to do, perfect for someone who would like just add "a touch" of mixed-media feeling to the project!
This page was originally made for French scrapbooking magazine - Histoires de Pages where I had the pleasure to be featured as a guest artist. Enjoy!

As I said many times before - I can't help it – I'll put my finger on everything possible! I'll color not only the background and papers but I find deepest pleasure in altering the embellishments: I cut them, layer them, paint them – anything that will change their usual look into something more challenging, more matching the project and something closer to the image I have in my head.

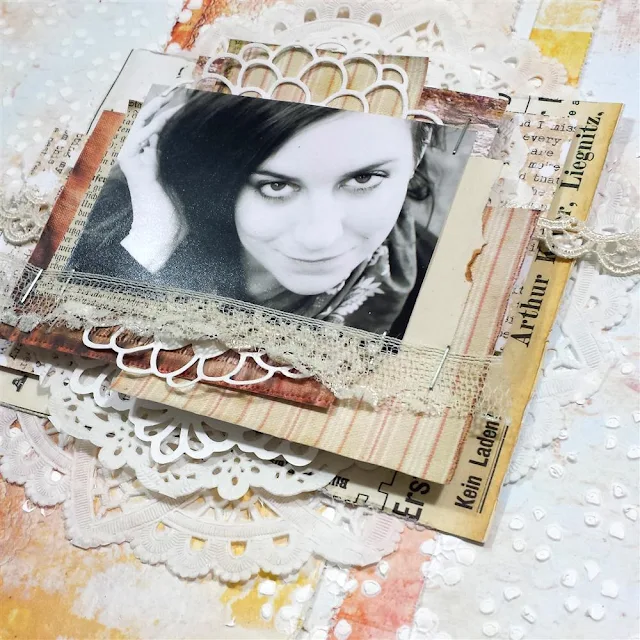
Here my first touches were done to the background papers - using Art Basics Heavy White Gesso and a stencil I was able to add interesting yet simple to do texture which corresponded beautifully with the mixed-media style of the paper. Extra stamping with similar motive only made the effect stronger!

Looking at my embellishments you will see I'm not very “girly” in my choices: I won't use many flowers or butterflies - I'll mix them with heavy, dark elements instead. I adore everything found, old, repurposed: metal, plastic, wood are all inspiring for me! Even my own line of embellishments – Mechanicals – was inspired by flea market findings and my love to mix, match and alter!

Here thy were grouped in nice, balanced composition and coloured using shimmering sprays - Primary Elements Pigments mixed with water and a bit of Black Ecoline. I love working this way - you can use ANY element you have and make it "yours"!

1. I started my project with creating nice white texture on my background – I used one of my stencils and Art Basics White Heavy Gesso - which works quite nicely with stencils too! I applied it through a stencil and dried with heating tool.

2. When the White Heavy Gesso was dry I started layering my doilies and papers – I used some 3D Foam Squares for extra dimension. I used plenty of paper scraps, some cut-outs and other leftovers in neutral colours which I could find on my table.

3. I continued with more papers craps, pieces of lace and photo, building dimension layer by layer – great technique when you want to get rid of the paper pieces from your desk! Some 3D foams were adding extra dimension too!
4. I attached the biggest elements of composition: paper vine which was cut in half. This is the beginning of the clusters.

5. I added some stamping on the top of my white texture – to focus the attention in the middle of the project. (I used permanent ink for that - always better choice with art mediums!) I continued embellishing adding metal and plastic embellishments: grouping and layering one on another. This time I used my Art Basics 3D Matte Gel instead of glue – it grabs faster and holds stronger.
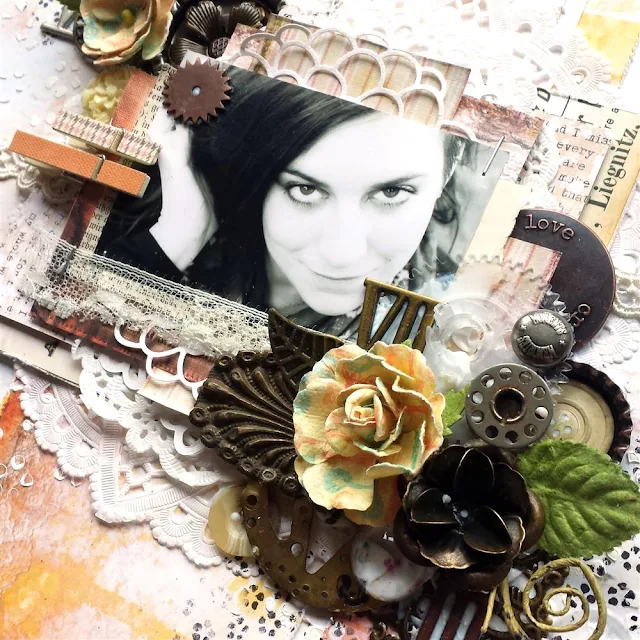
6. Using shimmering spray paints I repainted my embellishments, layers of paper and lace and a bit of background. To create the sprays I simply mixed a bit of Primary Elements Pigments with water in the spray bottles. For black colour I used similar solution: I mixed a bit of Ecoline - liquid Watercolour with water and sprayed on my embellishments. I tried to create nice, muted color palette with darker accents. After drying my project was ready!

So here it is - I hope you like the idea and you will try similar solutions in your projects too!
Before I'll say goodbye - there is one more super important news to share - this week Prima is releasing my new set of STAMPS!!! Have you seen them already?

To celebrate this big occasion I will be doing some Giveaways in my main social media in the coming days - Instagram, FB Page, Blog and in our new place - Finnabair & Friends - Open Studio Group - stay tuned to win some stamps!
Woo hoo!
Sending best wishes

Today I've got a scrapbook page for you - simple and fun to do, perfect for someone who would like just add "a touch" of mixed-media feeling to the project!
This page was originally made for French scrapbooking magazine - Histoires de Pages where I had the pleasure to be featured as a guest artist. Enjoy!

As I said many times before - I can't help it – I'll put my finger on everything possible! I'll color not only the background and papers but I find deepest pleasure in altering the embellishments: I cut them, layer them, paint them – anything that will change their usual look into something more challenging, more matching the project and something closer to the image I have in my head.

Here my first touches were done to the background papers - using Art Basics Heavy White Gesso and a stencil I was able to add interesting yet simple to do texture which corresponded beautifully with the mixed-media style of the paper. Extra stamping with similar motive only made the effect stronger!

Looking at my embellishments you will see I'm not very “girly” in my choices: I won't use many flowers or butterflies - I'll mix them with heavy, dark elements instead. I adore everything found, old, repurposed: metal, plastic, wood are all inspiring for me! Even my own line of embellishments – Mechanicals – was inspired by flea market findings and my love to mix, match and alter!

Here thy were grouped in nice, balanced composition and coloured using shimmering sprays - Primary Elements Pigments mixed with water and a bit of Black Ecoline. I love working this way - you can use ANY element you have and make it "yours"!
Ok, are you ready? it's Art Recipe Time!

Here is a simple step-by-step tutorial for you - enjoy!
1. I started my project with creating nice white texture on my background – I used one of my stencils and Art Basics White Heavy Gesso - which works quite nicely with stencils too! I applied it through a stencil and dried with heating tool.

2. When the White Heavy Gesso was dry I started layering my doilies and papers – I used some 3D Foam Squares for extra dimension. I used plenty of paper scraps, some cut-outs and other leftovers in neutral colours which I could find on my table.

3. I continued with more papers craps, pieces of lace and photo, building dimension layer by layer – great technique when you want to get rid of the paper pieces from your desk! Some 3D foams were adding extra dimension too!

4. I attached the biggest elements of composition: paper vine which was cut in half. This is the beginning of the clusters.

5. I added some stamping on the top of my white texture – to focus the attention in the middle of the project. (I used permanent ink for that - always better choice with art mediums!) I continued embellishing adding metal and plastic embellishments: grouping and layering one on another. This time I used my Art Basics 3D Matte Gel instead of glue – it grabs faster and holds stronger.

6. Using shimmering spray paints I repainted my embellishments, layers of paper and lace and a bit of background. To create the sprays I simply mixed a bit of Primary Elements Pigments with water in the spray bottles. For black colour I used similar solution: I mixed a bit of Ecoline - liquid Watercolour with water and sprayed on my embellishments. I tried to create nice, muted color palette with darker accents. After drying my project was ready!

So here it is - I hope you like the idea and you will try similar solutions in your projects too!
Here are the links to products used for this project - all from our Mixed Media Place Shop:
 |  |  |  |  |  |
 |  |  |  |  |  |
 |  |  |
Before I'll say goodbye - there is one more super important news to share - this week Prima is releasing my new set of STAMPS!!! Have you seen them already?

To celebrate this big occasion I will be doing some Giveaways in my main social media in the coming days - Instagram, FB Page, Blog and in our new place - Finnabair & Friends - Open Studio Group - stay tuned to win some stamps!
Woo hoo!
Sending best wishes


16 comments:
Gorgeous!!!!
Thank you so much for sharing your creativity and techniques! Lovely to see how you build a layout. It's become very beautiful.Can't wait to see the new stamps! I got my 'first' Finnabair products this week, so love them all!! Big second order is out already! I want all of it LOL.
I love everything everything everything wow I like all the beautiful colors.
Stunning, stunning, stunning, love it all xx GailT xx
I'm soooo soooo happy that you get great pleasure from altering embellishments and found objects Finn. The world would not be as happy for me - without your creations. It's true. Your "secrets" page is wonderful and so refreshing to see an altered scrapbook page. IT"S PERFECT. j.
Beautiful!!!! I love these colours!!!
Thank you are gorgeus!!
Hughs
Gorgeous layout and I really love the wonderful embellishments and colors.
Fabulous layout Finn!
Thanks for the step by step tutorial. I love your LO!
This is a gorgeous page. I love it. Thanks for sharing, Johanne Lacombe
Absolutely love the page. The ingredients look so amazing all together.
Perfeito!!!!
Wow! Would love to win!
Not only is this a beautiful photo of you, Finn, but the canvas is amazing! So beautiful. I love all of the embellishments, too.
Football News
Kylian Mbappé
Post a Comment