Friday 29 June 2018

Art Journal Freedom

Hello again!
I believe that art journals are a very special art form - this is where you can express yourselves without any limitations whatsoever, it's you who sets your own rules on your journal pages!
Today we meet with Tanyalee whose gorgeous new art journal spread is a perfect expression of this wonderful freedom. I'm sure you'll feel instantly inspired!

*   *   *   *

Hi everyone, Tanyalee here with an art journal spread tutorial.

My artworks are quite different to many you see using Finnabair products as I am predominantly an art journaler, and today’s tutorial is very true to my style.
I have created a floral spread using Impasto paints, image transfers and sketches.
First of all, I prepared my junk journal pages with Heavy Gesso as the paper is recycled cotton and soaks up way too much paint.

Next I chose a vintage botanical image and used it as an image transfer with Soft Matte Gel. The transfer worked beautifully, but as you will see, it didn’t end up suiting the spread so gets mostly covered with paint. It’s a wonderful technique to use in art journaling.

Once the transfer was completed and dry, I watered down some Art Alchemy Impasto paints to create a soft background. I also added some texture using Paper Paste and Finnabair's stamps.

My sketching skills aren’t the greatest, so I traced a picture of a model onto deli paper and glued that onto the background. The deli paper becomes transparent when glued using gel medium and it looks like I drew it directly onto the page.

Then I went to town with Impasto paints to create the floral crown on my girls head and face. I used layers of pink and white to create the petal appearance, and then highlighted with green and black for details.
Once the floral layer was completely dry, I went back in with a fountain pen and nib pen to add more details.
I also used a sentiment stamp and butterfly for some extra interest and finished everything off with some drawing ink splatters.
Please, enjoy my video tutorial!


I really like the soft finish to this spread, and hopefully my sketching skills will improve if I continue to use the tracing technique to draw faces. Only time will tell I guess.

I hope you have enjoyed this tutorial, and I look forward to sharing another project with you again next month.

Yours in messiness


Products used:

Wednesday 27 June 2018

Mixed Media Minutes - Vintage Gift Bag - Live Show Tutorial

Hi my loves...
I know, I know... I promised to upload this video on my YT as soon as possible but this REALLY took far too long this time. I know I should blame my travels and new release coming (have you seen the sneak peek yet???) and some backstage works on the new product, but anyway - my apologies.
I honestly hope you will forgive me and this short break will just give you more energy and your creative juices will flow even faster!

Let's have a look at the project then.
It's a lovely mix of careless stamping, crazy layering - fabrics, papers and embellishments - and finally final touches including my favourite Art Ingredients - Mica Powders and Micro Beads. I wanted to achieve the careless, freestyle and vintage look - so perfection and precision in this kind of project were not really necessary. As you can see, I could not resist and I've used new collection from 7 Dots Studio - Air Mail. Muted tones and vintage postcards inspired paper collection was a perfect choice for my altered paper bag!
If you will get a closer look at the details you may notice I added some found objects into the composition as well - there are some rusty pieces of wire and old nails included. I love to add elements like this into my projects - it is a touch of authenticity, getting closer to the real story, which these photos and elements could tell us all. I am a huge fan of everything vintage and you can find really a lot of unusual objects in my collection... some of them are just for decoration, but most of them is waiting for their turn to be used in the project!
Can you see these beautiful colour accents? These are new Prima Washi Tapes from Prima Travellers Journal collection (yes, I had to get them all). For or the extra sparkle I've used Micro Beads glued to the surfaces with my old faithful Art Basics 3D Gloss Gel. Do you know it is a perfect adhesive for any kind collage? It dries clear and it is easy to apply - with a palette knife or fingers!
Let me show you the whole process step-by-step now.
Here is the recorded and edited version of my FB Live tutorial - I hope you will get inspired and create a lot of beautiful, vintage and freestyle projects!


For your convenience here you can find most of the products I've used during the creating process - all linked to Mixed Media Place Online Store


Before I go, there is one more exciting thing happening now... the new release is coming! Have you seen the sneak peeks already? I can't barely stop myself and show you all... but I'm told to wait until next week. Sigh.
What do you think...any favourites so far?
Sending lots of love

SaveSaveSaveSaveSaveSaveSaveSaveSaveSave

Monday 25 June 2018

Mixed Media Surprises

Hello dear Friends!
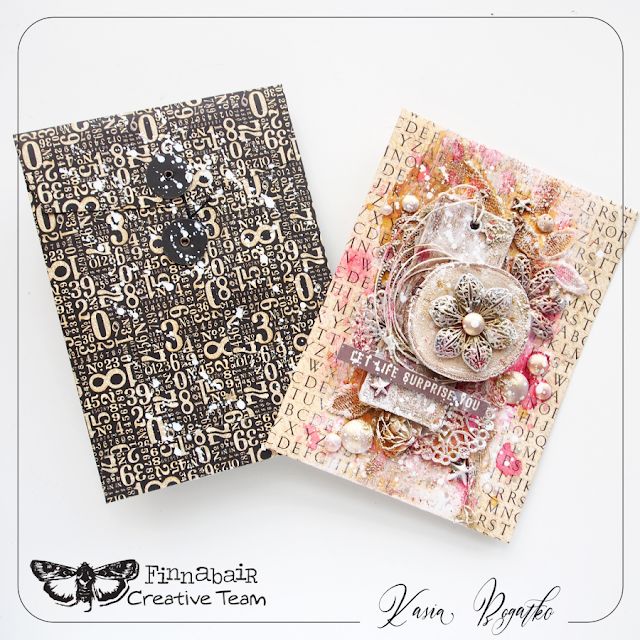
Kasia made for us the most adorable mixed media project! These cards + envelopes are so versatile, not complicated to make (when you follow Kasia's tips), look spectacuar and are bound to make someone special smile. :)

*   *   *   *
Hello,
today I'd like to show you a project that you can successfully use when you want to give someone a small gift, send wishes a gift card or just to make a sweet surprise for someone special on no occasion.  :)

I decorated two envelopes, each in a different color palette. You will see that the scheme is the same, only the choice of colors and embellishments makes us get two different artworks.
At the very beginning, I covered the surface with Clear Gesso to make it water resistant but not to cover the pretty paper pattern.
Only after that I started adhering all the embellishments.
I used fabric flowers, gauze, cardboard and a lot of Mechanicals. I wanted my envelopes to be rich and full of details.
To give this project more interesting textures, here and there I added a little bit of Stone Effect Paste and the Dusty paste from the Rust Effect Paste Camouflage set.

I used alcohol inks that gave strong, intense colors and covered my surfaces with a delicate layer of White Gesso to soften the colors and give the whole a uniform character.
At the end I decided to add some light and shine to the envelopes and for this I used Art Alchemy Opal Magic paints.
Their subtle colors beautifully highlighted clear Art Pebbles transforming them into beautiful pearls.
Here's my step by step video tutorial - feel inspired!


I hope you're feeling inspired and that you'll try creating such small gifts yourselves.

It's a huge joy to make such rich little forms and I'm sure your recipient will totally love and appreciate them! ;)


Products used:


Related Posts Plugin for WordPress, Blogger...