Hi all!
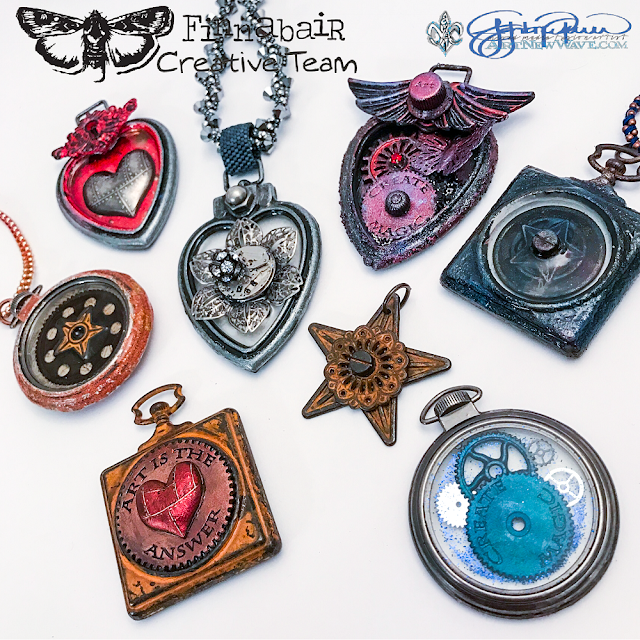
You are going to fall in love with John's new project for the Team!
When I was designing my Mechnicals line, I had in mind all the fabulously creative uses of these metal embellishments in jewelry making. Like John says, the possibilities here are endless and he's so wonderfully encouraging that I'm sure you will feel tempted to follow his helpful advice and tips and make some pretty pieces yourselves... I'd love to see your creations! :)
* * *
Besides creating larger mixed media pieces, I have been creating jewelry pieces for many years and when Finnabair's Mechanicals line was introduced, I was beyond excited to use them for creating jewelry!
I find that many people are intimidated about making jewelry and aren't sure where to begin, and often times with students in my jewelry classes this is the biggest hurdle to overcome.
I always tell people that creating jewelry is the same as making mixed media pieces, just on a smaller scale with a little more attention to detail.
Many of the pieces that I create use left over embellishments from other projects I've been working on and it's a great way to clean up your work space. :)
Today I'm going to share with you three different projects using the Mechanicals line of embellishments, along with your favorite Finnabair supplies.
I wanted to create very approachable projects that anyone could make, from beginner to the more advanced artist.
With the three projects I'm sharing today, almost all the supplies used are from the Finnabair line. The only exception is for doing some of the "detail" work of adhering your pieces together where a jewelers grade of adhesive is required. I almost exclusively use Liquid Fusion glue for my detail jewelry work because it has one of the strongest bonds for metal on metal.
Rusty Mechanicals Necklace and Earrings
Completion Time – 15 minutes or less
This by far is a very simple and quick project anyone can complete using your favorite Art Mechanicals embellishments and strong adhesive.
For the Star Necklace piece, I began by punching a hole into one of the points of the star using my EuroPunch 1.8mm hole punch which is specifically made for punching small holes through metal.
If you don't have a small punch like this, you can drill the hole with a Dremel tool.
Next I adhered the first layering piece (the fancy gear) onto the star using Liquid Fusion glue, then topped the piece with one of the rusty screw heads. Once the glue had set, I added a jump ring through the punched hole and the necklace is ready to be added to a chain.
For creating the earrings, I chose a smaller Mechanicals piece as my base and carefully punched a hole to add my earring hook.
When using the smaller embellishments, be sure that there is enough space to completely punch a hole.
I then glued one of the screw heads into the middle piece and once the glue had set added the earring hooks.
Art Is the Answer Locket
Before you begin with this project, take a small screwdriver and remove the screws from the back of the pocket watch locket. Revers the back cover so that the rust finish is facing outward, the replace the screws. Now your finished locket with have a uniform rust finish on the front and back!
I have to admit, the "Art Is The Answer" gear is probably one of my most favorite pieces to incorporate into my jewelry pieces so that's why I selected this piece to use with this locket.
Once dried, apply a quick layer of Metallique Black Berry paint over most of the surface and allow to dry.
To highlight this embellishment piece, I used my finger to apply Rich Copper Metallique Wax over the gear, then lightly highlighted with Black Berry.
 The other embellishment I used for this piece was the Rusty Heart from the set of Tin Hearts embellishments.
I first painted the heart completely with Heavy Black Gesso, then once it was dried, I applied Fire Ruby Antique Brilliance Wax over the entire heart.
To add more detail to the heart, I used a craft knife to GENTLY scrape away the wax and gesso over the embossed areas of the heart. This step is completely optional because I know that not everyone has the patience, nor attention to detail or good eyesight for this step. LOL :)
For assembling the locket, I used Liquid Fusion to glue the gear into the watch face opening on the front (mine fit perfectly!) and then adhered the heart into the center of the gear to complete the piece. To make this ready to wear, add a jump ring to the top of the locket and slide it onto a chain.
Create Magic Heart Locket
Completion Time – less than an hour
This jewelry piece takes your mixed media skills and simply reduces it to a smaller level!
One thing to remember when creating jewelry is that less is more – this includes how many embellishments used in the jewelry, how many colors are used, and the amount of texture added to the piece.
Keep in mind that when you're finished making a jewelry piece that you actually want to be able to wear it, so try to avoid using Glass Glitter on an area that may scrap your skin or snag your clothing for example. :)
Randomly apply Graphite Texture Paste along the sides of the heart locket and heat set.
Turn the locket over and apply a thin layer of Graphite Texture Paste over the entire back of the locket and heat set.
With a brush, paint the heart locket (front, back and inside) with Raven Black Sparks.
Repeat this process for all of the embellishment pieces, then add Amethyst Magic and Fire Ruby Antique Brilliance Waxes over the pieces.
To give a little more depth to the color of the waxes, I found that slightly heating the metal embellishments first and then adding the waxes makes the waxes melt upon contact and gives them a richer look on the metal embellishments.
For the inside of the heart locket, I applied a small amount of Graphite Texture Paste and then laid down the first gear (upper left) and then layered the "Create Magic" gear on top.
I then sprinkled Pitch Black Glass Glitter followed by Silver Micro Beads onto the exposed Graphite Texture Paste and then heat set.
Before adding the Butterfly, I gently bent the right wings so that I could glue it into place (with Liquid Fusion Glue) so that part of the butterfly stuck out from the heart bezel.
I then finished assembly by using the Liquid Fusion Glue to adhere the wings first onto the top of the heart bezel, then placed a mini Knob with the word "Art" bold on top.
To finish the piece, simply add a jump ring and it's ready to be made into a necklace!
If you want to add a little more bling, you can add a rhinestone like I did inside of the gear.
I hope that I've inspired you to begin creating your own jewelry pieces using the fabulous Finnabair line of products.
I'm sure that you'll soon discover after wearing one of these pieces that you'll definitely receive many compliments! :)
These three projects are just for inspiration for you to try your own techniques because the possibilities are endless – you can create necklaces, bracelets and rings using all your embellishments.
Not to mention that the Art Basics and Art Alchemy lines of paints and waxes work perfectly with many jewelry mediums including resins.
I'd love to see your ideas for Mechanicals Jewelry - make sure you share some photos in the Open Studio fb group!
xx John
Products used:


