Are you ready for a great new tutorial? Linda's holding a magical key to make you feel inspired! :)
Hi everyone! I am so thrilled to share with you my latest project for the Finnabair CT blog!
I had a wonderful time creating this piece and have fallen in love with altering keys.
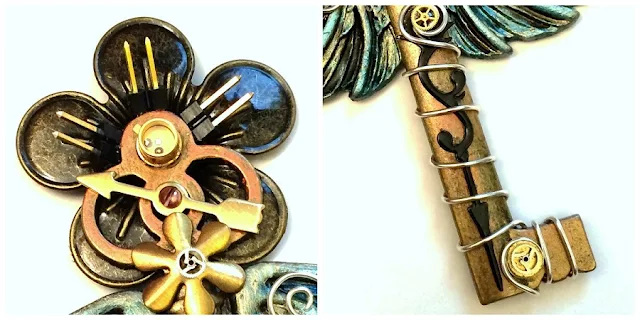
I have, like most of you I’m sure, a pretty sizable stash of older scrapbook products. Somewhere along the line of collecting these things, I found several large, flat keys. They were perfect here, but surely any key would do. The wire and watch parts are a fun addition to the key. So let’s get started.
1. I start with a wooden box I’ve also had for many years, to which I applied Clear Gesso to seal. Then I get out the pieces of ephemera that I want to alter and add.
Sadly I wish I had a dozen more of these flat keys from "I don't have a clue" where. If anybody knows where to get them, please let me know!!!
2. The large key is colored with Inka Gold waxes. The other objects are painted with Heavy Black Gesso first and then Mica Powders + Soft Gel made into a paint.
A second layer of Gold Opal Magic Mica Powder + Soft Gloss Gel is lightly added to create a shimmer. You see the difference in the other set of wing charms.
4. The top of the box was painted with several metallic dabbers in layers.
5. I wanted to create contrast on the lid edge, so after painting it with Black Gesso, I added a layer of Green Opal Magic + Soft Gloss Gel.
The bottom section was stamped first with Sepia Archival Ink + a Wire Net Cling Stamp, and then Black Archival Ink using the gorgeous Cling Stamp from Old Town. (I love this stamp)
I used 2 coats of Clear Gesso on the lower portion and it REALLY made it shine like varnish!
6. I punched a hole in the Mini Flower to add the Arrow and Key with a cold connection. (Thank you my Super-Talented friend Jen Crossley for teaching me this. Take her classes if you're lucky enough to get there!!!) Other pieces are added with E6000 and wrapped with silver Artistic Wire.
7. Then I added Computer parts, Wire, Watch Parts and other pieces of ephemera. I kept adding more Inka Gold waxes to create contrast.
8. This shows the side stamping with the Green Opal Magic over the Black Gesso. It turns out a rather Teal color. (Here it looks too blue, it is green, trust me.)
The Rhinestone trim, Mechanicals Plated Labels painted with Mica Powder + Soft Gloss Gel, and more watch parts fill in the spots.
Hope you enjoy.
Linda
Products used:


15 comments:
This is beautiful :)
Absolutely STUNNINGLY GORGEOUS. Bling jewels with gears, wires and texture - doesn't get any better than this - big WOW. And the colors - so lusciously rich and vibrant. Art work and creativity at it's best! j.
This is really awesome Linda! I love the colors, and that key is wonderful!
Beautiful box and your vision to altered them.
Linda, this is just awesome. I love your work so much! I would be happy to mail you some flat keys if you email me your mailing address: mannwielermaggie(at)gmail(dot)com
Fabulous transformation! Nicola x
Linda, I had a sheet of those flat-back keys but, trying to be more efficient, I decided to take them off the backing paper and put them in with all my other stash that would be good to use with Finnabair-inspired project. I THINK they were K & Co. but not sure. I do have a set of similar flat-back keys that I found more recently at Michaels - they are Recollections, their store brand. Hope this helps!
Omg this is just fabulous! Love it!
Linda - you transformed the nice, plain wooden box into a magical and beautiful little store container - love!
oh Linda, this is super cool!! =)
Linda your box turned into a true piece of art. I love what you did. You added such fabulous details.... Thank you for sharing the how-to and your art in generel.
Hugs from Monica... Spain
I love this box!! Thank you for sharing.
Yes it really helps. Thanks so much! 💜
This is fabulous, Linda!!!!!!!!!!!
Post a Comment