
Hi there creative people!
I'm back and of course a bit late - all because of very intense weekend: I was teaching and doing demos during Version Scrap 2015 in Paris and I have to admit it drained most of my energy... but it was surely worth it: I was able to to see so many familiar faces, teach classes to 4 groups of talented, friendly people and spend some time with my friends. Priceless!
Today I've got something unusual for you... when I was planning this project I realized it was a bit too time consuming to close it in one Art Recipe - so instead of making it smaller and shorter I decided to divide the project into 2 separate tutorials... and here it is - "Timeless Patina nr 1" - altered Clock Frame.

The wooden horse inside of the clock was added later, for decorative purposes - I wanted the photo to look really nice and didn't have the right size of the photo for this size of frame! In the end - the inside of the metal clock was decorate differently, but let's keep it in secret for now!
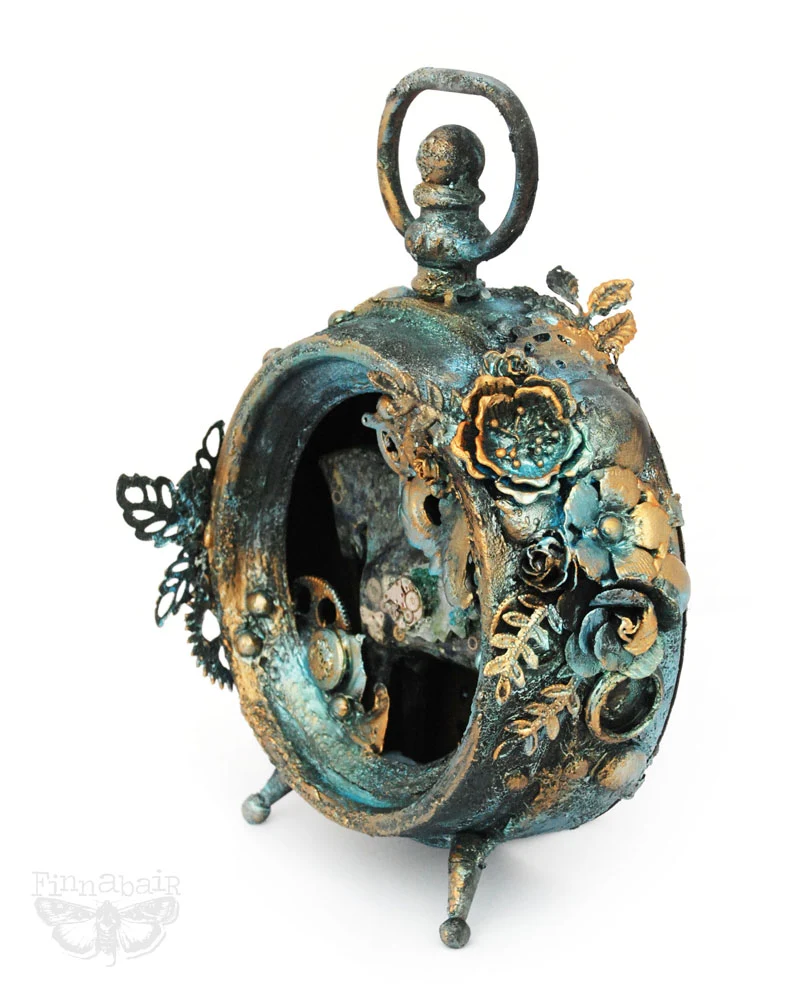
I wanted my metal clock to look really grungy and old - covered in rust and patina, so I focused on creating interesting, irregular textures - Art Extravagance Graphite Paste was a great choice!

All the embellishments were added after the Graphite Paste dried - I used one of my favorite adhesives: Art Basics Modeling Paste. It has great, heavy body and dries a bit quicker than 3D Gel, I think... but it remains white! Luckily I had some plans also for Art Basics Heavy Black Gesso!

All the colours are inspired by my new babies: Art Ingredients Mica Powders. I love their soft, a bit vintage colors which were just perfect for this kind of project!
I hope you like the final look of the Clock Frame - I have to admit I was pretty pleased with it myself!
Now time to share more details - below you will find not only the full Art Recipe but also detailed photos and step-by-step tutorial. Have fun!

Step-by-step:
1. I started the whole process with applying a coat of Art Extravagance Graphite Paste to the outside of the frame. It is black, a bit sparkly after drying and has beautiful, little sandy texture! Final effect is similar to black nail file or sanding paper! I dried the paste with heating tool and started adding first elements - this time using Art Basics Modeling Paste, but 3D Gels would be a great choice too!

2. I embellished both sides of the clock frame using a selection of Mechanicals - my Prima metal embellishments, buttons, acrylic pebbles and a generous amount of Art Basics Modeling Paste. I dried everything again with my heating tool.

3. I wanted to decorate inside of the frame too... but here is a tricky part! Clock Frame is empty inside and it is hard to glue any elements in using just Art Basics mediums - it would take forever to dry... My trick was using a bit of hot glue first to keep my elements in place: some cogs and flourish which I previously cut into 2 smaller pieces...

4. Hot glue is problematic though - it chips off! It won't stay permanently on any acrylic, glass, metal or plastic element, especially if there's a lot of water around it! My solution was securing my embellishment with the coat of Modeling Paste and adding even more embellishments. I put a nice amount of the paste both inside and outside of the frame. That gave me the feeling of security and some interesting texture too!

5. When the Modeling Paste was dry I took Art Basics Black Heavy Gesso and painted the whole frame. It took me a few minutes, but the effect was great - dramatic black grungy composition with amazing texture. I died it all with heating tool again and then I sprayed to add a bit of patina colours: my choice were Art Ingredients Mica Powders put into water bottles (I used Teal and Blue).

6. It was time to add some serious metallic shine! I took a palette and mixed 3 colours of my Mica Powders with Art Basics Soft Gel (Gloss or Matt - bot will be great) to create custom metallic paint : blue, teal and gold. After a moment I was ready to paint! I started with brushing one clour on the top of my textures and embellishments. The best effect you will get when your brush is soft, flat and just "dirty" in paint.

7. I continued "drybrushing" my custom made paints on the whole Clock Frame - making sure all the tones will be soft and using really minimum amount of paint on my brush. After a short moment my paints were dry and permanent - thanks to Soft Gel which was the body I used for the mixture! How cool is that?

This way my altered frame was fully decorated on the outside - and quite pretty I have to admit, even without any photo or item inside... but of course I couldn't resist and for the photos I had to add something inside - why not my old, faithful pegasus, Electrique?
Later I came with other ideas though... and I started decorating the inside to it right away! (but shhhhh... this is a story for the next blogpost!)
If you are wondering what I finally decided to put inside of the frame and learn some more inspiring techniques - make sure to visit this place next week, on Wednesday! I can't wait to share the second part of the tutorial!
In the meantime - check the fabulous posts from my super talented Creative Team - every Monday and Friday, here on the blog :)
See you soon - wishing you all a great week

I'm back and of course a bit late - all because of very intense weekend: I was teaching and doing demos during Version Scrap 2015 in Paris and I have to admit it drained most of my energy... but it was surely worth it: I was able to to see so many familiar faces, teach classes to 4 groups of talented, friendly people and spend some time with my friends. Priceless!
Today I've got something unusual for you... when I was planning this project I realized it was a bit too time consuming to close it in one Art Recipe - so instead of making it smaller and shorter I decided to divide the project into 2 separate tutorials... and here it is - "Timeless Patina nr 1" - altered Clock Frame.

The wooden horse inside of the clock was added later, for decorative purposes - I wanted the photo to look really nice and didn't have the right size of the photo for this size of frame! In the end - the inside of the metal clock was decorate differently, but let's keep it in secret for now!

I wanted my metal clock to look really grungy and old - covered in rust and patina, so I focused on creating interesting, irregular textures - Art Extravagance Graphite Paste was a great choice!

All the embellishments were added after the Graphite Paste dried - I used one of my favorite adhesives: Art Basics Modeling Paste. It has great, heavy body and dries a bit quicker than 3D Gel, I think... but it remains white! Luckily I had some plans also for Art Basics Heavy Black Gesso!

All the colours are inspired by my new babies: Art Ingredients Mica Powders. I love their soft, a bit vintage colors which were just perfect for this kind of project!
I hope you like the final look of the Clock Frame - I have to admit I was pretty pleased with it myself!
Now time to share more details - below you will find not only the full Art Recipe but also detailed photos and step-by-step tutorial. Have fun!

Step-by-step:
1. I started the whole process with applying a coat of Art Extravagance Graphite Paste to the outside of the frame. It is black, a bit sparkly after drying and has beautiful, little sandy texture! Final effect is similar to black nail file or sanding paper! I dried the paste with heating tool and started adding first elements - this time using Art Basics Modeling Paste, but 3D Gels would be a great choice too!

2. I embellished both sides of the clock frame using a selection of Mechanicals - my Prima metal embellishments, buttons, acrylic pebbles and a generous amount of Art Basics Modeling Paste. I dried everything again with my heating tool.

3. I wanted to decorate inside of the frame too... but here is a tricky part! Clock Frame is empty inside and it is hard to glue any elements in using just Art Basics mediums - it would take forever to dry... My trick was using a bit of hot glue first to keep my elements in place: some cogs and flourish which I previously cut into 2 smaller pieces...

4. Hot glue is problematic though - it chips off! It won't stay permanently on any acrylic, glass, metal or plastic element, especially if there's a lot of water around it! My solution was securing my embellishment with the coat of Modeling Paste and adding even more embellishments. I put a nice amount of the paste both inside and outside of the frame. That gave me the feeling of security and some interesting texture too!

5. When the Modeling Paste was dry I took Art Basics Black Heavy Gesso and painted the whole frame. It took me a few minutes, but the effect was great - dramatic black grungy composition with amazing texture. I died it all with heating tool again and then I sprayed to add a bit of patina colours: my choice were Art Ingredients Mica Powders put into water bottles (I used Teal and Blue).

6. It was time to add some serious metallic shine! I took a palette and mixed 3 colours of my Mica Powders with Art Basics Soft Gel (Gloss or Matt - bot will be great) to create custom metallic paint : blue, teal and gold. After a moment I was ready to paint! I started with brushing one clour on the top of my textures and embellishments. The best effect you will get when your brush is soft, flat and just "dirty" in paint.

7. I continued "drybrushing" my custom made paints on the whole Clock Frame - making sure all the tones will be soft and using really minimum amount of paint on my brush. After a short moment my paints were dry and permanent - thanks to Soft Gel which was the body I used for the mixture! How cool is that?

This way my altered frame was fully decorated on the outside - and quite pretty I have to admit, even without any photo or item inside... but of course I couldn't resist and for the photos I had to add something inside - why not my old, faithful pegasus, Electrique?
Later I came with other ideas though... and I started decorating the inside to it right away! (but shhhhh... this is a story for the next blogpost!)
Here is the list of used products - available in our Mixed Media Place Store:
 |  |  |  |  |  |
 |  |  |  |  |  |
 |  |
If you are wondering what I finally decided to put inside of the frame and learn some more inspiring techniques - make sure to visit this place next week, on Wednesday! I can't wait to share the second part of the tutorial!
In the meantime - check the fabulous posts from my super talented Creative Team - every Monday and Friday, here on the blog :)
See you soon - wishing you all a great week


13 comments:
This is such an adorable project. I didn´t really know where to look at first because of the richness in detail. Can´t wait to see the second part. Thanks for all the creativity and inspiration you always prepare and spread!
Gorgeous, love to see how youd did this!
What a wonderful clock! Love colors, mechanicals and texture.
Thank you for sharing this. Great tutorial
VERY COOL work! The colors ares o perfect!
Love,love,LOVE!!! Can't wait for part2!!!
Fantastica, bravissima!!!!!
SUCH AMAZING ART!
I love your products so much and that you continue to show us incredible ways to use them. WOW!!!!! Thank you for this post.
cudny!
That's gorgeous!!! Thank you for the inspiration.
Fabulous!! Glad you had a great if tiring, time at Version Scrap. I went last year and it was such fun.
What a lovely and beautiful clock!
As always, Ania, another beautiful project. TFS the step by step.
Post a Comment