Thursday, 31 December 2015

Art Venture 2016 - Heart of the Clock

Can you believe the beginning of 2016 is just around the corner?
Time flies and soon, just in a couple of days I'll be packing my bags again to see you in beautiful California... yes, it is time for new Art Venture and Winter CHA 2016!

As before Prima Art Venture classes are the great beginning of my new season of 2016 classes - if you are interested in my schedule I suggest checking Live Classes section of my blog - you may be surprised how close to you I am this time - check it out, more details will follow of course!!!

And now time for a little teaser - would you like to see the project I'm teaching during Art Venture 2016?
Here it goes - Art Basics, Art Extravagance and Art Alchemy (!!!) galore aka "Heart of the Clock" - altered metal clock frame... it is going to be messy and fun, I promise :) This will be not only great class to get familiar with Gesso and Texture Pastes but also play with my new Mechanicals and try Art Alchemy Metallique and Opal Magic Acrylic Paints - and let me tell you - they are simply to die for! (is it ok to be that excited about my own product? heheh)


Here are some more close-ups to give you a better look at this little beauty...


What is the best part - you can still register for the classes - HERE.
There are just very last seats left and there are the most exciting names in the line up: Sandra Evertson, Vicki Boutin, Sharon Laakkonen, Frank Garcia and John C. Petersen. You simply can't miss it!


You can learn more about the Art Venture Events here in our FB group too - it is the best source of information about what is coming and what to expect!

I hope to meet you in the classroom in 2016 - I hope it will be great, creative year for you all.
May all your plans and wishes come true. Fingers crossed - for you all and for myself.
Warmest hugs

Monday, 28 December 2015

Magical Mixed Media Tree

Hello Friends!
It's time for my Creative Team's last entry of 2015! What a great year this has been! Filled with art and so many beautiful inspirations - today is no different...
Irina - inspired by the season - made this most creative mixed media tree. It's so easy to make - don't you think it would look great in your house? :)


Hello! Irina Honcharyk here with you!
Happy New Year and Merry Christmas, dear readers! I wish you a happy New Year! As my December project I created a stylized Christmas / New Year mixed media tree!
I think generally December is a very inspiring month! I feel so inspired by all the holiday time and its magic. And I hope you will too!
So how about making a special New Year tree. Here's mine:


I created a simple base out of wire and attached it to a small piece of wooden. I picked the decorations - they are all from Meсhanicals series.


I attached the ornaments using hot glue and brads.


The ornaments look very interesting fixed to the wire. I already loved the effect even without any additional embellishing.
But I decided to add something more and I did it in 3 different ways:
I painted some ornaments and the wire using White Gesso.


I decorated improvised toys using Soft Matte Gel and Glitter from Abloom set.


I decorated the bottle caps and the rose using all the fantastic Art Ingredients: Glass Beads, Micro Beads, Mica Flakes, Art Sugar and Glitter (see below for all the links). I used Soft Matte Gel as my glue.
Everything sparkles and shines just as it should during this special time of the year! :)


I did an imitation of snow on my Christmas tree and some of the decorations using Snowflake Paste. This paste is incredible! It gives a very interesting effect.
I have also added a little bit of sisal fibre and fixed all the elements.


My special mixed media Christmas tree is ready. It might be a bit unusual but I really like it.
Here are some details:


Thank you for attention. Enjoy your creativity! Hugs!
Irina

Materials used:


Saturday, 26 December 2015

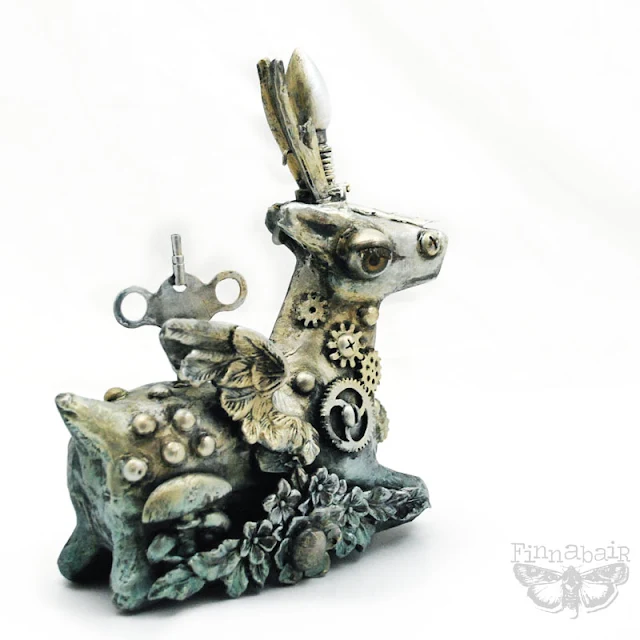
Cabinet of Curiosities or... Steampunk Deer

Hi again my friends, I hope your Holidays are the best and you have enough time to spend it with your loved ones doing the things you simply enjoy the most!
As I promised you in our Christmas Blogpost, today I'm back with my latest project, a bit quirky mix of steampunk and Christmas inspired home decor... in short words, let me introduce you to my Steampunk Deer and its little Cabinet of Curiosities!


I think I had this paper-mache deer for ages, it was never the right time to use it, I hadn't any idea how to decorate or paint it properly and then, one day the inspiration struck me: I needed something really fun to do, something special, a bit crazy, a bit quirky - something which I can put on display in my house with a real pleasure. I ran to my beloved rubbish boxes and started digging to find the right elements to put my vision together... luckily I've got quite a lot of elements to choose from, so there is no problem with mixing and matching! I pulled out my Art Basics, after a minute or two I added my Art Extravagance Black Sand Texture Paste and some Mica Powders and I was ready to create!


Are interested in some more details?
No problem! I was concious enough to take some photos for you...

First of all, I was sure I needed a box for my Steampunk Deer. I was really inspired by the look of cabinets and boxes of curios I ran onto somewhere in the net months ago and I was planning to do something similar to that! I haven't got any nice wooden or chipboard boxes, so I decided an old chocolate tin will do. Here is how it all started...


I've primed the chocolate tin with Art Basics Heavy Black Gesso. It took me just a moment to dry it and after that I was ready to add some texture and patina to it - Art Extravagance Black Sand Paste was a perfect choice for that!


Next I used my Art Basics 3D Gloss Gel to decorate the tin with a bunch of interested establishment and findings - I'm sure you can recognise some of my Mechanicals, some of my Art Ingredients Melange Art Pebbles, some of Sandra's Relics and Artefacts... but don't ask me where I got the other ones - I'm a real hoarder, remember? I checked with my deer where to place the elements of course - I needed space for this little guy too!


When my 3D Gel was dry I painted all the textures and elements with Art Basics Heavy Black Gesso again and dried it with heating gun. Next I used my Art Ingredients Mica Powders mixed with water to create some shimmering sprays and I added lovely shiny, sprayed coat on the top of everything.


Finally, to finish my Cabinet of Curiosities I added some Art Alchemy Metallique Paints on the details of my "collection" and sprayed the whole box with fixative to make sure the shimmer from my Mica powders will stay in place.

The little box was ready! I could focus on my deer now and let me tell you - I had tons of funt embellishing and painting this magical creature. The process of gluing the elements you know already - I used the same 3D Gloss Gel as in the tutorial above!


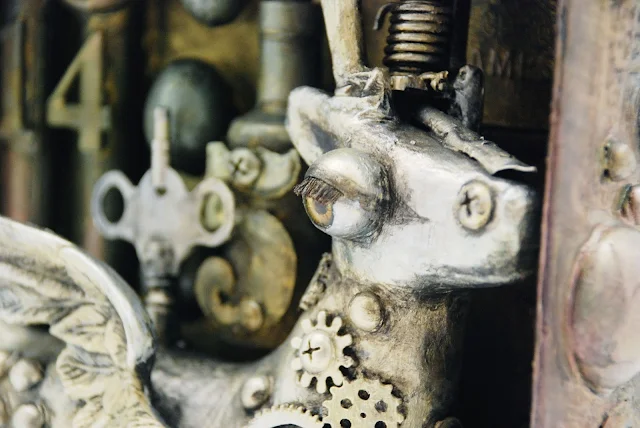
There is one element I'm particularly proud of: the beautiful, golden eye of my deer - just look at these lovely, long lashes! I knew I was keeping this doll's eye for a good reason!


The process of painting and adding shadows to this part of the project was slightly more complicated and time consuming and it included coats of Art Basics Heavy Black Gesso, my new Art Alchemy Opal Magic Paints, Art Ingredients Mica Powders and a bit of patience.
I absolutely loved every minute and I can't wait to create something similar in the future...
I hope you like it too!


If you are looking for the products from Art Basics, Art Ingredients and Art Extravagance lines, or my Mechanicals - try your local shops which carry Prima Marketing  or visit our Mixed Media Place Online Store. We've been on the move in the last weeks and we've experienced some serious difficulties with computer system but we should be in full operative mode very soon!
For new Art Alchemy Paints and more new products we still have to wait a bit...

I keep sending you the warmest possible hugs


Friday, 25 December 2015

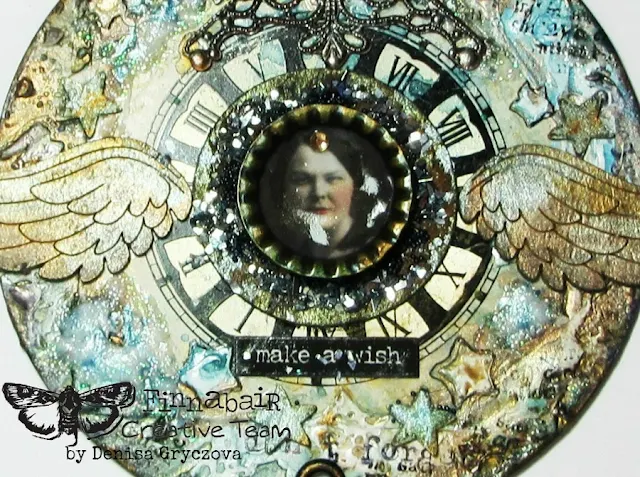
Make A Wish

Dear Friends... I hope you're having the most beautiful Christmas time!
I think it's still not too late to make one more ornament and today is Denisa's turn to inspire us all and spend these days creatively.


Hello, my dear Xmasholics! It´s Denisa here. Today I´d like to share with you my very last Xmas project this year and it´s an angel ornament. In fact, it´s a winged gift for a dear friend of mine. 


Here´s how I did it:
I used a thick paper coaster as the base. I glued on a vintage clock face. I covered the edges around the face with White Gesso and let it dry.
Next I used my fave star stencil with Light Paste and created a few stars all around the coaster. When it was dry I started to work with colours.

Since it´s a Xmas project I went for the sparkling and glittering look. I grabbed amazing Mica Powders in Rust, Blue and Teal. I mixed them with water and applied with a brush. I love how they shine. Next I did some random stamping using black waterproof ink.

In the centre of the coaster I glued on a round wooden circle. Then I created the very central part of my project. I used a small Mechanicals bottle cap in which I placed an old vintage pic of a lady. I  placed a little gem on the lady´s head and then everything was covered with 3D Gloss Gel.
I also glued down the chippie wings (they were covered with White Gesso and Mica Powders and the edges were inked).
I covered the area around the centre with Midnight Blue Glass Glitter and Black Micro Beads. I also emphasized the stars´ edges with a  black marker and watercolour pens in blue and gold tones.


Then I inked the edges of the coaster with Copper Crackle Texture Paste.
I made holes and put eyelets in them. I used turquoise wire as a handle. Next I attached down the trinket which was treated the same way as wings. I glued on the blue gem.
The final step was painting the reverse side of the coaster with Black Gesso. Voila! Here it is!


Hope you´re having the best Xmas ever!
Wishing you Holly Jolly Christmas and a Happy New Year!
Denisa

Products used:


Related Posts Plugin for WordPress, Blogger...