
Hi mixed media fans,
We are back! And we are so happy to be back!
Time for 'Spread Your Wings Academy vol.2'

As in the last month we hope to encourage you to try new techniques and take a step from your comfort zones.
We have some fantastic portion of tips for you today!
This month it's all about stencils.
We start with Monika today, enjoy!

Today I would like to show you three different ways to use stencil and Modeling Paste together for creating a special effects.
First - Modeling Paste is a perfect base for creating custom-made pastes.
It works great with Art Ingredients Line and this time I decided to use a black Micro Beads and stencil. While the modeling paste was still wet i sprinkle some micro beads on top of my tag.

Second - I mixed 3 colours of Mica Powder (teal, pink and lipstic) with Modeling Paste. Then I gently went through the stencil with my coloured paste. What can I say… it looks stunning! Modeling Paste is perfect for mixing with colored mediums and it's giving a lovely shine to your make.

Third – I started by covering my tag with a thick layer of Heavy White Gesso. After the gesso was dry I grabbed the Weaving stencil and Modeling Paste. After drying I added some colurs. It’s very easy but very impressive, you can get some artistic effects.
 Monika
Next up is Gayle and her tips using stencils with water colour pencils and pen.

Hello Academy friends. I’ve chosen water colour pencils and pen to play with using stencils. I’ve used 3 different stencils on a tag to create a colourful background.


No.13 The finished tag.

Play with your stencils and have some fun using them in different ways.
Elena will show you how to use sprays and stencils!
 Hello friends!


7. Then I sprinkle everything with gesso and watercolors. That's it! Our tag is ready!

Elena

Stencils are the best companions in relatively quick and easy decorating the background.
To start with this journal spread, I glued a starry paper and applied a generous coat of Texture Paste White Crackle through Stars Stencil.
We are back! And we are so happy to be back!
Time for 'Spread Your Wings Academy vol.2'

As in the last month we hope to encourage you to try new techniques and take a step from your comfort zones.
We have some fantastic portion of tips for you today!
This month it's all about stencils.
We start with Monika today, enjoy!

Today I would like to show you three different ways to use stencil and Modeling Paste together for creating a special effects.
First - Modeling Paste is a perfect base for creating custom-made pastes.
It works great with Art Ingredients Line and this time I decided to use a black Micro Beads and stencil. While the modeling paste was still wet i sprinkle some micro beads on top of my tag.

Second - I mixed 3 colours of Mica Powder (teal, pink and lipstic) with Modeling Paste. Then I gently went through the stencil with my coloured paste. What can I say… it looks stunning! Modeling Paste is perfect for mixing with colored mediums and it's giving a lovely shine to your make.

Third – I started by covering my tag with a thick layer of Heavy White Gesso. After the gesso was dry I grabbed the Weaving stencil and Modeling Paste. After drying I added some colurs. It’s very easy but very impressive, you can get some artistic effects.

Next up is Gayle and her tips using stencils with water colour pencils and pen.

Hello Academy friends. I’ve chosen water colour pencils and pen to play with using stencils. I’ve used 3 different stencils on a tag to create a colourful background.

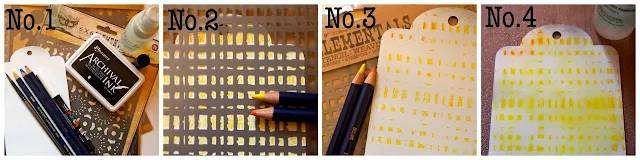
No.1 My 3 stencils…Elementals “Weaving”, Elementals “Mechanica”,
and Elementals “Doily”. A white gessoed tag, water colour pencils, paint
brush, Ranger waterproof ink, and a white Posca pen.
No.2 Weaving stencil on top of tag, quickly and roughly colour in the spaces.
No.3 Remove the stencil.
No.4 Mist over where you have coloured with water and let it run over the tag. Dry.
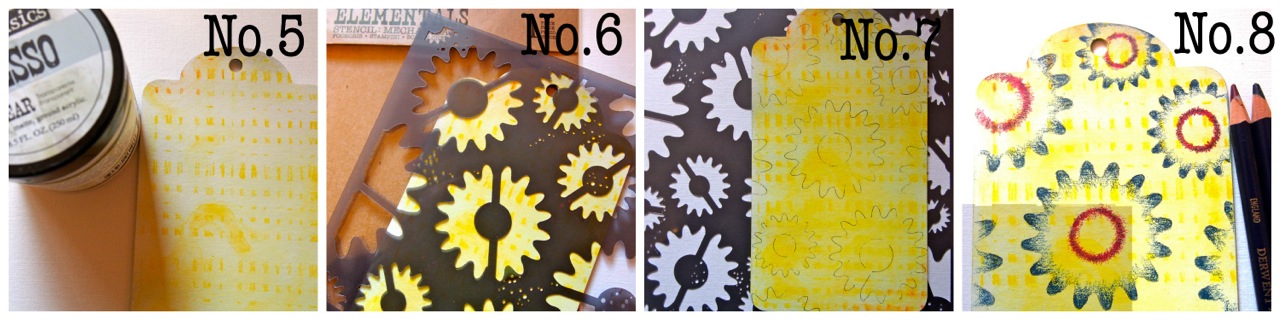
No.5 Give your tag a coat of Clear Gesso to stop these colours from running when you apply your next layers of colour.
No.6 Put Mechanica stencil on tag and use a lead pencil to lightly trace around shapes.
No.7 Shapes drawn on top of tag.
No.8
Use any two water colour pencils to colour in just around the edges of
your shapes. Use colours that are similar or next to each other on the
colour wheel to avoid colours going ‘muddy’ when they mix together after
you have used a wet paint brush to activate the dry pencil so turning
it into paint.

No.9 Here you can see the magic once a wet paint brush is applied
to the colour pencil. It will be imperfect and the colours will run, but
that is the beauty.
No.10 tag completely coloured with water colour shapes. Dry.
No.11
I used just the centre from the third stencil to add detail. Place the
stencil over the ‘flower’ shapes and using a small ‘dabber’ apply ink
just through the circular part of the stencil that you want. Dry
No.12
Final details. Go around the edge of the tag with some distress ink.
Add some little white circles to centre of the flowers with a white
Posca pen.

No.13 The finished tag.
No.14 Close up.
No.15
To finnish the tag off I’ve added a little bit of stamping and embossing
with some Finnabair stamps, some rub on words, some collaged tissue
birds and some flowers.
No.16 Close up details.

Play with your stencils and have some fun using them in different ways.
Gayle
Elena will show you how to use sprays and stencils!

Today I would like to inspire you to experiment with the blank paper, stencils and sprays.
I like trying out different techniques on the tags.Layer after layer using different products you can get a
fantastic result! Don't be afraid to experiment, use the favorite tools
and materials in a new way! This is always a very interesting process.
1. Spray the background through the stencil. Not much, one or two times.
1. Spray the background through the stencil. Not much, one or two times.

2. Now put your stencil onto the art-journal and spray the stencil itself. Now overturn your stencil and press in to the tag.
3. One more way to use sprays with the stencil is to spray it onto palette and then to use an applicator to color with it.
4. To enrich the background I add some stamping.
4. To enrich the background I add some stamping.

5. Then I distress the edges.
6. Adhering the embellishments.


Elena
Our last inspiration is coming from Olga!

Stencils are the best companions in relatively quick and easy decorating the background.
To start with this journal spread, I glued a starry paper and applied a generous coat of Texture Paste White Crackle through Stars Stencil.

Once it dried I put some Gelatos mixed with Mica Powders by rubbing them with my finger into porous patterns. I used handwritten and numeral stamps to create a horizontal line.

Finally, I put a bit of Matte Gel onto the stamped area to make it sticky for a pinch of Glitter and Art Sugar to come. It was easy-peasy, right?


If you think that you are not neat and careful enough and some paste has gone far beyond its proper place, you don’t have to worry about it as imperfections result in more unique and artistic effects.
Olga
That is all for today dear friends!
We hope that everyone had found something for themselves.
Don't be afraid to experiment, give it a go and explore. Have fun and enjoy the process as this matter the most. Pick up some stencils and spread your wings!

For those who missed Academy vol.1 here is the link :) with many inspirations and tips on background work.
You can also join our mixed media group on Facebook - Finnabair & Friends Open Studio.
You will find pleny of inspirations from mixed media artists from all around the word. Join us and share your creations, we want to hear from you!
Click here to join the group ;)


