Monday, 10 April 2017

Reach For The Stars

Hello Friends!
Let's start this week with an absolutely magical art journal spread created by Sanda!
Sanda is known for her amazing textures and today you will see her talent in full bloom...

Speaking of Sanda - don't miss her inspiring Designers' Faves facebook challenge!
You still have time to submit your creations 'till April 14th.

And now - will you try to throw around some stars with us? ;)

*   *   *   *
Hello wonderful people,
Do you get inspired by just looking at a wonderful painting?

This is exactly what happened to me when, browsing the internet one evening, trying to relax, I was admiring the marvels of Sistine Chapel and looking at Michelangelo’s 'Creation of Adam' (the famous fresco resting majestically on the Sistine Chapel’s ceiling and painted by the artist c. 1508–1512) I was hit by inspiration. In a split moment, I knew exactly how my page will look like. 😊
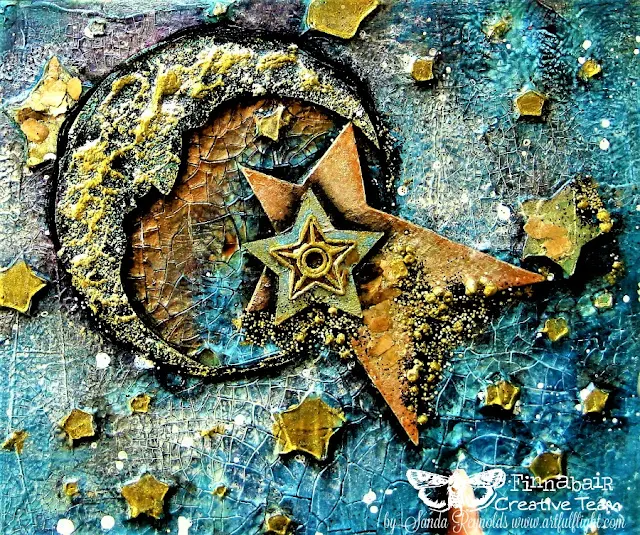
This page is about dreaming and daring, about believing in yourself and your dreams, about being brave…

The size of your dreams must always exceed your current capacity to achieve them.
If your dreams do not scare you, they are not big enough
.”
(
Ellen Johnson Sirleaf)
***
I started my page by spreading a generous coat of Heavy White Gesso with a Finnabair brush.
I dried the gesso with a heating gun and then I applied a layer of White Crackle Paste with a 2 inches silicone brush. I left the crackle paste to dry overnight (don’t try to hurry this process as you’ll not get the same results).

After spraying some inks on my pages, I dried everything and applied a coat of Clear Gesso.
When the gesso was dry, I spread a thick layer of 3D Gloss Gel through Finn’s Stars stencil - it dries completely clear and the stars are really puffed up and gorgeous.
For the next step, I pulled out my wonderful Art Alchemy Metallique paints and started to bring my pages to life.
I went from light to dark, mixing the colours directly on the page, adding depth and vibrancy. Layer after layer of creamy, luscious goodness. 😊

When I was pleased with the result and after everything was dry, I fussy cut the hand and collaged it with 3D Matte Gel.
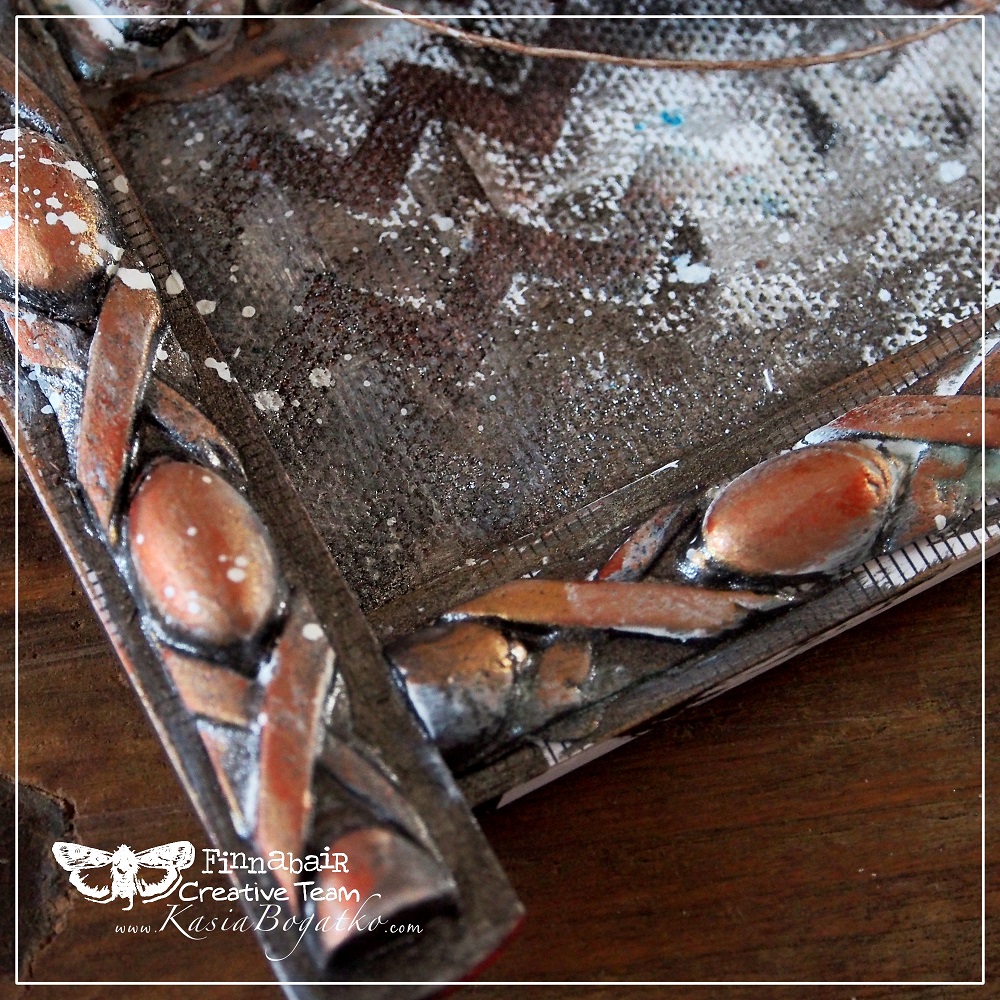
Then, I added my embellishments (chipboards and Mechanicals) glueing them down using Heavy Body Gel
I wanted to create some texture on my crescent Moon, so I mixed Graphite Texture Paste with Heavy Black Gesso and spread it with a brush creating an uneven surface.
After drying this layer, I highlighted the texture using Art Alchemy Opal Magic paints and added a glowing light around the Moon using Patina Effect Paste (Brass).

Next, I did some shadowing with Art Alchemy Metallique (Dark Velvet) and painted my chipboards and Mechanicals with Brass Patina Effect Paste and Art Alchemy Sparks.

To enhance even more the Moon’s texture and to give my pages more depth and an ethereal glow using my Art Alchemy Waxes. They add a layer of subtle, delicate and luminous beauty over the Art Alchemy paints, complementing and deepening the colours underneath. Pure magic, my friends! 😊
I lit all the stars in my sky with Art Alchemy Sparks, they are amazing!!!
You know me already and my love for texture, so I couldn’t finish today’s project without using one of my favourite Finn’s products – the Art Stones and Mini Art Stones, along with her Glass Beads, Glitter and Mica Flakes, all glued down with 3D Matte Gel and highlighted with Art Alchemy Sparks.

To finish my pages I added a touch of Mica Powder and some white splatters using watered down Heavy White Gesso.
Here is my video where you can watch my creative process and see all the products I used.
Enjoy and have fun!


I hope you enjoyed and got inspired by my new project and you are ready to create some magic of your own.

Have a wonderful day and a fabulous and Happy Easter, my friends,
xoxo
Sanda


Products used:


Friday, 7 April 2017

Time Flies

Hello Friends!
This Friday Kasia is presenting this absolutely unique frame she created.
You will love Kasia's creative ideas and the nostalgic feel of this stunning piece!

*   *   *   *
Hello friends,
I realy love to find new ways to use ordinary things. This time a folding wooden ruler caught my eye. I'm sure you can easily find something like that in a local store or maybe in your toolbox.

I used this wooden measuring tape to shape a frame and have a great base for my whole project.
You can watch the entire creative process in my video below. 
I painted the mould elements with Art Alchemy Sparks and rubbed with Art Alchemy Waxes.
This combination gives an extraordinary effect and ordinary paper clay magically turns into a beautiful relief.
I wanted this project to be rich, full of details and layers. I wanted my piece to be complex and make the viewers discover something new at every glance.
Before I started to work, I prepared a lot of items I liked and set myself a task of putting them all in that frame. And I made it. :)
Why I chose "Time Flies" for the title of my project?
Because I see here a little girl, but her look is very serious. And this reminds me of how fast this time flies... How fast we grow up and leave childhood and childhood dreams behind.
Please enjoy my video and have a good time.


Maybe my canvas will inspire you to create along and express your long forgotten dreams with paints and paper.

Or perhaps you may even return to your childhood dreams and try to fulfill them...

I wish you that with all my heArt. :)
Kasia


Products used:

Thursday, 6 April 2017

Mechanical Jellyfish... or Joys of Rust Painting!

Hi again, great to see you here!
I'm back for a short moment, jumping in to show you one of my newest projects: one of my favorite sizes, long 20x60 cm collage in blues and all possible shades of rust!

When I was working on it I had a lot of air, bubbles and water-like movements on my mind... but somehow - as always, I soon started drifting into the darker and heavier side, so in the end I finished with tons of layers, textures and a slightly steampunk feel to it... then the water drips came... or maybe tentacles? Maybe it is some mysterious, underwater creature then? A Mechanical Jellyfish? Who knows...?
I love how it all came together - the pearls and pebbles, Mechanicals and all the other metal elements, lace and paper - all  surrounded by delicate splatters - almost like water bubbles indeed!

I used a lot of Art Basics Heavy Body Gel to put the composition together  - this is the best solution for heavy duty gluing, with any found objects or embellishments.

The colors are a combination of sprays, Art Basics Gesso and finally - Rust Pastes to create the effect of drips and old rust eating all the elements up. How cool is this? I'm absolutely in love in this look and I'd love to put it almost on everything!

And can you see this amazing shine on the Art Pebbles? I used one of my new Art Alchemy Sparks Paint - Unicorn's Hair. I love how beautiful it looks here!
I hope you like the look of this project... because I made it having new in person classes in my mind! Soon you will be able to see it on my offer - I'm very excited to have a chance to work on it with you in a classroom!

Sending hugs from beautiful Santa Rosa - from the one and only Art Is You!

Monday, 3 April 2017

Oxygen: A Contradiction

Hello on Monday Dear Friends!
Gayle - a true Artist - will move your hearts and souls today...
Get ready for a mixed media feast of textures, tones and magical patina and rust effects. All this and more - this collage is also beautiful food for thought and surely an inspiration to us all...

*   *   *   *
Hello again lovely Finnabair friends. I tend to “overthink” and this often leads me, as I’m sure it does many of you, to ideas that can be expressed through creativity - writing, art journaling, painting, song writing, poetry etc.

My creation this month comes from the idea of oxygen - how it sustains life but also destroys it. How the air that we breathe, so vital for life, can be at the same time so destructive. How it corrodes metal, dries and destroys skin cells, how, over time, things that were once soft and delicate become brittle and sharp.
No.1 As always, the surface is gessoed. The surface in this case is a square of chipboard.
All the flowers in this project, except for one, are paper so the supporting background does not need to be as rigid or strong as if the embellishments were metal.

No.2 I drew in an outline of where the face would be and then using a stencil and Art Basics Modeling Paste created a textured and patterned background.
No.3 The face is photocopied onto plain copy paper and then collaged onto the background chipboard using Soft Matte Gel.
It is then given a coat of Clear Gesso and the bottom section of the image (where the muslin cloth will be attached) is coated with Heavy White Gesso to create a whiter background.

No.4 The rusty pipe representing the mechanical action of breathing, is a plastic dripper connector used for irrigating gardens.
Given a coat of Heavy White Gesso first, it is turned into an old metal rusty pipe with Art Extravagance Rust Effect Paste and a little Patina Effect Paste.
No.5 I love flowers, especially white paper ones that can be coloured.
No.6 Using mists is a quick and easy way to colour your flowers any shade you want.
No.7 Once the flowers have dried, I have added a little shimmer with Sparks Acrylic Paint in Mermaid Sparkles and coppery highlights with Acrylic Paint in Metallique Brass Hardware.

No.8 I added some extra pattern to the face with some collaged tissue flowers (sorry, forgot to photograph this step, but you can just see them under the crackle paste).
I then coated the whole face with a thick layer of Clear Crackle Texture Paste. This step was a little risky, as sometimes texture paste can be unpredictable in how it dries and the end results.
I love the way it dried with very fine crackles where it was applied more thinly around the mouth and eyes. I left it to dry naturally overnight and did not use a heat tool; I think this gives better results.
 
No.9 I then started the “ageing process”, rusting up the pipe and the face with Rust Effect Pastes and a little of the Blue Patina Effect Paste, by just applying the pastes in layers using a small, stiff paint brush.

No.10 Finally, using acrylic paint I added colour, highlights and depth to the eyes, face and lips.
Cracked and rusty detail using amazing Finnabair Clear Crackle Texture Paste and Rust Effect Pastes.
Tiny cracks where the Clear Crackle Texture Paste has been applied more thinly; wider where the paste was thicker.
Background detail and falling, rusted petals.
Contrasts… the dull, crusty look of corrosion and decay next to the clear sparkle, shimmer and shine of life...


The very element that keeps us alive is the same one that ages us.

We cannot live without oxygen, so it’s maybe better to embrace the process of ageing and see the beauty in it.

I like the Japanese concept of Wabi-sabi - a view centred on the acceptance of transience and imperfection;
the idea that beauty can be impermanent, imperfect and incomplete...
Gayle xx


Materials used:

Related Posts Plugin for WordPress, Blogger...