Hello Friends!
Are you ready to start a new week with fresh art inspirations? I hope you are!
I have to tell you that one of (many) things that I love about my Creative Team is that they are always ready to experiment and try out new artistic paths. Remember the last project from Athanasia and her inventive use of Alchemy paints and vaseline? :)
Today Kassa keeps on playing and thinking creatively. She uses her magic and somehow charms my acrylic paints to look like watercolors. Curious how she did it? :) Keep reading!
Today Kassa keeps on playing and thinking creatively. She uses her magic and somehow charms my acrylic paints to look like watercolors. Curious how she did it? :) Keep reading!
Hi there lovelies
Kassa here with another colourful tutorial in my journal.
Kassa here with another colourful tutorial in my journal.
I'm a little obsessed with the Art Alchemy Acrylic Paints at the moment - I keep experimenting and practicing various techniques, so I thought I'd share a few of my tips with you and create a background that could lend itself to soooo many different projects.
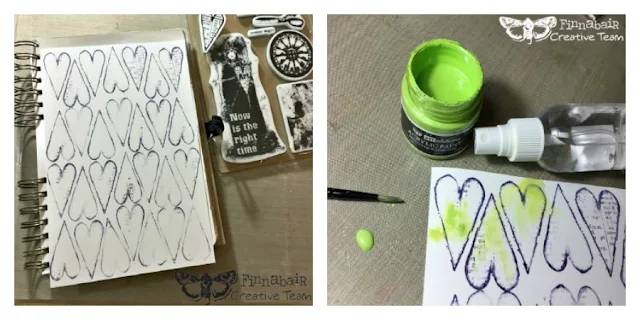
Hearts are so one of my fave shapes especially this cling stamp beauty by Finnabair - elegant whilst being edgy, perfect perfect perfect...
Stamp out the hearts on the smooth watercolour paper with Hydrangea Archival Ink. Take some water and spritz one of hearts 2 to 3 times with a small headed paintbrush, pick up a little watered down Lime Peel paint and dab into the spritzed hearts.
The more you have spritzed the hearts, the more the colour will bleed out and the colour dilutes down becoming almost translucent.
As your hearts dry, spritz again directing the nozzle away from previously painted hearts. Mop up (kitchen roll) any excess paint or parts you are not happy with (only when still wet). Don't worry about spritzing too much - 300gsm watercolour paper is forgiving.
The colour used next - Rich Turquoise - mixes beautifully with the Lime Peel so start to add that into the hearts in exactly the same way, or if you don't want the colours to mix, simply wait for the Lime Peel to dry NATURALLY. I say naturally as this drying method gives the best results as ace watermark patterns appear this way...
Dropping droplets of the paint undiluted straight from the pot into the wet paint looks kool too.
The Wild Fuchsia is a warm and contrast colour, so let the blue and green paint dry before applying.
When applying spritz with water, dab in the watered down paint and let the magic begin... Simply repeat the above processes.
As you finish each heart, you can pop a little rock salt into the wet pools of colour and leave to dry (overnight) whilst first drying any excesses (corner of kitchen roll ace for getting between rock salt).
The following day carefully rub off the salt to reveal the amazing patterns from the chemical reaction between the salt and Art Alchemy paints.
Now add droplets from your paintbrush of Pure Sunshine paint straight from the pot to your page.
Apply Art Alchemy paints on the watercolour paper in the same way as above.
This time when all is dry, while adding the yellow as the final watercolour wash, leave a small space for the face.
I stamp an extra girlie so I can gauge where the colours will sit when I finally stamp her over the dry watercolors.
Also stamp out, spritz and paint each segment of the 'Wheels' (from the same "Now Is The Right Time" set) with each of the colours.
When dry, trim out and doodle with a black fine tipped waterproof marker-pen to add depth and enhance various features.
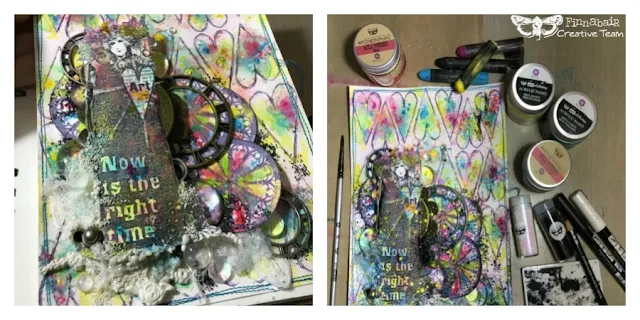
Assemblage is sooo much fun, just take your time, have a few things out in front of you, experiment with your layering, shaping and textures.
3D and Soft Matte Gels are amazing for adhering all the elements, giving a little move time, so you can add or take away pieces.
Eventually I opted for some of Finnabair's larger and smaller Mechanicals, the beautiful glassy Melange Art Pebbles and I moulded a beautiful shape using Prima/Iron Orchids Paper Clay and Moulds (I adhered whilst wet with wood glue no problems).
A little black cotton thread, truquoise thread sewn haphazardly around the edges of the page 3 times, cheesecloth and for all those tiny spaces that need filling and for that little something extra Art Stones, Glass Glitter, Micro Beads, Glass Beads and Glitter - they always hit the spot and soooo many yummy colours to choose from!
My fav at the moment are the Splash Micro Beads, they look like tiny beads of water that catch and hold the light, like little beads of magic! And I always go for all the blacks in all the bead/glitter range adhering them behind/under pieces helps to push out and create PoPs!
A top tip for adhering the Art Stones is to pop a little of the Soft Gel on your worktop, have a few of the Art Stones on your worktop too, dab your brush in the gel, then the stones and apply to your art. Sprinkle in a few extra stones and dab over more adhesive with your brush.
Finally in this order and letting each step dry here are the finishing touches, apply paint randomly to the Mechanicals, Art Stones, Clay, helping to merge them altogether. Spritzing the cheesecloth with a little water before adding paint, helps the paint blend out giving a dusty subtle look.
Stamp some extra detail around the bottom/left corners with black ink, add scribbles with black and white marker-pens and with the the Oil Pastels too within and around the hearts and the edges of the page too!
Lightly sprinkle with more Glitter here and there and when everything is dry, dust various places with the Mica Powders!
Tah Dah! Time to adhere this colourful page in my journal.I love that it has a little of my soul in it and a whole lot of my love... :)
Before I go, with the festive season around the corner for many of us, I'd love to wish each and everyone of you Happy Holidays, Happy Christmas and a Wonderful New Year
(ps. I know I'll see you over in the warm and friendly Finnabair and Friends Open Studio Facebook group sharing our art and thoughts - sharing is such fun...)
Products used:


2 comments:
This is amazing kazza thank you for the tutorial. The colours pop off the page xxxx
Stunning oxoxo
Post a Comment