Monday, 30 May 2016

What About Hugs?!

Hello, Dear Friends!
We're here with brand new Monday inspiration by Irina whose scrapbooking style I've admired for a long time.
Her new layout looks really fun and easy to make. Watch the video tutorial and join in the fun! :)


Hello! Irina Honcharyk here with my new project!
This time I decided to create a scrapbooking layout focused around a very charming girl that I know. :)
As my base I used one of Finnabair's resist canvas. It`s so amazing! You can do anything with it - it's very versatile and can be used in countless ways. You must have seen it many times, usually torn into bits and pieces serving as embellishments. I took the whole square and treated it as my base.


I prepared a video tutorial so you will see step by step how I created this layout.


The color in the background comes from Mica Powders and it is the focal point of my composition. You will see in the video how easy and fun it was to play with the Powders on canvas. :)

Every word I calligraphed was cut out separately and glued on the layout using little pieces of cardboard to create some interesting depth. I also thought Art Stones and Pebbles would be an interesting touch here.


I also used the lovely Finnabair stamps and added many layers under my photo.


I hope you feel inspired to play along!
Enjoy the video!


Feel free to leave any questions in the comments, I'll be happy to answer.
Happy creating!
Irina

Materials used:


Friday, 27 May 2016

All About Rust Paste - Instant Vintage: Altered Camera Tutorial

Hi again my dear ones!
I heard a couple of times that you have some questions about my Art Extravagance Rust Paste Set - you were wondering how to use it, how to apply it... so here I am coming with the answers for you!

First of all - Rust Paste Set is really fun and easy to use.
This set of coarse, water-based pastes is made to imitate the rust effect and it works instantly, so it is perfect for these projects in which you can't wait for the real rusting reaction. Of course it is only an imitation, but in reality it is perfect for creating matte, rust-like texture and adding dimension, great for steampunk, grunge and masculine project - can be applied on all surfaces, especially if it is primed with gesso.
To get the best effect you should apply 3 colors of the paste on one project with a sponge, palette knife, texture tool or paintbrush to create multi-tone effect.

To make it all easier I decided to create a tutorial for you - I hope it will show you how simple it is to use and how great effect you can get in almost no time!

Here is the effect: 


How it all happened?
I took one of my vintage cameras - a very plain and simple "Ami 66" - and started the rusty makeover adding a coat of Art Basics Heavy Black Gesso on top of all the plastic and metal elements. This helps with gluing elements and adding paints and pastes.


Next, I used my favorite Art Basics Heavy Body Gel to alter the camera - I used Mechanicals, pieces of chipboard, Art Pebbles and more - finally I dried everything with a heating gun and added a bit of texture gluing some of my Art Ingredients Mini Art Stones in the selected places. I dried the camera and put a coat of gesso again.


Now it  was time to apply the Rust Paste - you can see the whole process with comments and tips in the video below - enjoy!


Here is the list of the products I used:


And here it is - an absolutely rustic and weathered old camera in less than few hours :) Instant vintage - how cool is that? Just think about all the possibilities and creative options...


I hope everything is clear now and you are inspired to experiment with your own projects. If you have any questions, don't hesitate to leave them in the comments.

If you feel encouraged and would like to see more ideas and projects how to use the Rust Pastes, hit {this link} - you will find there some really amazing works & tutorials by my Creative Team - all featuring my magical Pastes. ;)

Have a great, creative weekend!
sending hugs

Wednesday, 25 May 2016

Explore. Dream. Discover. - mixed-media assemblage

Hi, good to see you all here again :)
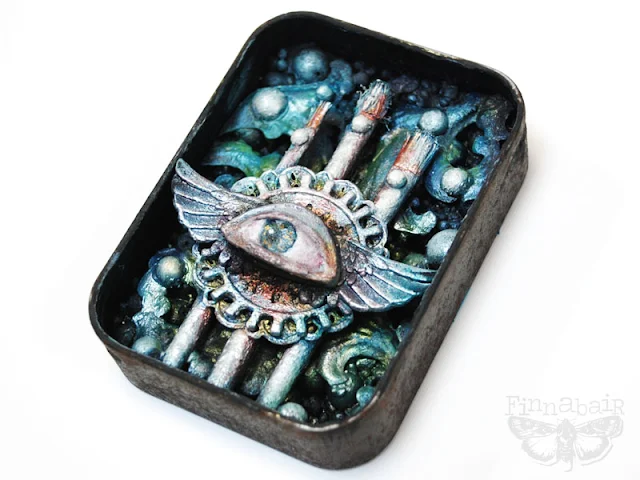
Today I'm coming back to this blogpost - where together with Prima we were celebrating our creativity on International Scrapbooking Day. Each of my super talented Creative Team Member prepared a project inspired by a quote - and I even if my plan was to made a Periscope session I wanted to have a chance to create something too... so here it is, my assemblage in the tin, ready, proudly standing on the shelf in my studio.


I you would like to come back to my videos here and here you would be able to listen bit about my inspiration - quote by Mark Twain you can see below - and know a bit more about my creative path too. In fact, when I found this quote I felt it was saying out loud what I had in my heart for many years. I do believe it is true.


Explore. Dream. Discover.
3 important words which I have always somewhere in the back of my head. Those of you who know me a bit better will know how much of a dreamer I am and how much my sense of adventure is a drive that pushes me forward. I believe that changes are important in life, challenges and a bit of unknown are good for you and there is no need to be afraid of the new things coming... fear won't help, just paralyse you instead - so the best way to deal which changes is to adjust the sails and go through the storms...


This little assemblage in an old tin represents these 3 important words for me - there are brushes - to explore my creativity and new art paths, there are wings for dreaming and finally - an eye for discovering new, exciting things. I had the best time ever putting it together - it was a bit challenging to do something quite small  - but I had a real blast when I started painting. I put my Art Alchemy Metallique paints on my table and simply painted away...


As usual I used my Art Basics Heavy Body Gel for gluing all the elements together - seriously this stuff just does the job! There was also a layer on Heavy Black Gesso for depth and a bit of Heavy White Gesso - for highlights. I enjoyed the process very much so it is possible there will be more similar smaller - or bigger - projects coming in the future!


Here is the list of product I used - for your reference. 
All linked from our Mixed Media Place Store:


And now it is time for important announcement - we have a WINNER!
After Creative Team voting for the project inspired by a quote -
our  prize will go to Sari Hanninen!
Congratulations Sari, please contact me with your shipping address at: finnabair.contact@gmail.com!

Huge thanks to all of the participants - your projects were beautiful and inspirational - we had a very hard time picking just one!

Sending hugs to you all - see you again soon!

Related Posts Plugin for WordPress, Blogger...