Hello dear Friends!
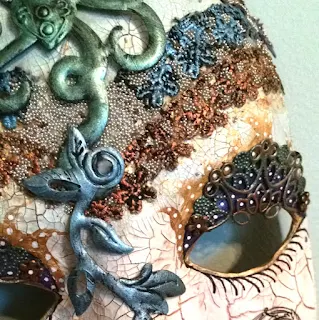
For all those of you who love baroque & glitter, Linda created an amazing new project transporting us to a magical world of carnival and opera....
Enjoy!
Hi everyone, Linda Cain here to share a project that just makes me smile.
I’ve long admired the beautiful masks created for Mardi Gras and Masquerade Balls. They have such a creative mystique about them.
So, in my travels, I picked up a fairly rough looking paper mache one and promptly whisked it away to a drawer in my studio to rarely think about again. (sigh) Every now and then when you have the urge to purge, you go to these wonderful places of organized products... out of sight is organized for me….and it’s almost like Christmas when you find these lovely things you’ve totally forgotten about!
This Mask had now been found again, and was about to be put to the test of paint, and glitter, and beads, OH MY! So here we go.
1. I started with the paper mache mask and Heavy Black Gesso. As you can see, it's got a LOT of imperfections especially around the nose and mouth.
2. I gave it a nice heavy coat of White Crackle Texture Paste.
3. I LOVE the crackle! Next I started to spray it with various Mica Powder + Water mixtures letting them get into the cracks. I used Pink, Gold and Blue in spray bottles with water.
4. A permanent black pen and paints were used to add her eye lashes, nose, and lips.
Two rub-ons were added on the cheeks.
5. I started painting with Mica Powders and Soft Gloss Gel adding Purple and Gold around the eyes.
6. Then I used 3D Matte Gel to add 2 layers of trim.
7. I took out several pieces of chipboard and some Mechanicals and gave them a base coating of Black Gesso. Then I sprayed them and added Inka Golds.
8. These Mechanicals were cut in half and trimmed, painted black, and then painted with Teal Mica Powder + Soft Gel. The Gold is added using Inka Gold.
9. The chipboard is now sprayed and colored with a couple of Inka Golds.
10. I used a chipboard crown and painted it with Purple Mica Powder + Soft Gel.
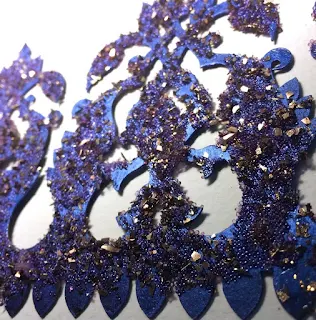
Then I added Copper Glass Glitter and Berry Micro Beads. I later decided this needed something more, so I filled it in with lots of Silver Micro Beads.
11. This shows the Mechanicals Leaves painted with Mica Powder, as well as the Blue on the trim. After painting it black, I added Copper Inka Gold to the other row of trim. Now more filling in with Silver Micro Beads.
12. These little leaves were painted with Copper Mica Powder + Soft Gel and then had some Purple Glitter added.
13. After painting these Flourishes gold, I used Soft Gloss Gel to add 2 shades of Gold Luminous Glitter. I love mixing the colors up for contrast.
14. More Micro Beads, Mica Powder paint, and Glass Glitter are used on the leaves. Turquoise Glass Beads and several sprays are added to the large flower. And last, I accented the piece with white pen dots. The 3D Matte Gel puts it all together.
I hope you find some tips and inspiration here to get you going to create a mask of your own.
It really is fun to make these and they don’t have to be elaborate or complicated to be gorgeous.
Give it a shot and let us hear about what you do on the Finnabair & Friends - Open Studio on Facebook.
Linda
Materials used:


13 comments:
A beautiful transformation! Love it!
WOW Linda, this is fabulous!!!!!
Great idea!!!!!! Love it!
Linda, this is incredible!!! Thanks for the step-by-step. I have a niece who collects Mardi Gras masks - guess what she might be getting for Christmas!!
Fantastic piece of art , I love the colours , reminds me of all the colours you get at a carnival. Adore,the crackle too. This would be a perfect headdress for a carnival. Tracy x X
Perfect! She will love it.
Holy moly - what a gorgeous mask - I love the colors and the awesome details. You surely took it a long way from its original state - to an amazingly beautiful place. Thanks for sharing your step-by-step!
Linda your paper mache mask is AWESOME... I love all the work you did on this. The glitter, the micro beads, the sprays, your soft gel paints with Mica powders. Fabulous and inspiring to read how you created it. You are so creative and VERY talented.
Can I ask if it was Dusty Attick chipboards or which brand ???
Thank you for sharing your gorgeous ART..
Hugs from Monica.... Spain
Wow what a fabulous mask, just reminds me of Venice!
Great work.
They are Retro Cafe Art Gallery Monica.
This is stunning and a real inspiration. I've had a mask sitting in my drawer for nearly a year and didn't know how to start decorating it - now I have some great ideas.
This is really inspirational! I have a small paper mache mask stored somewhere in this craftroom (purchased months ago) If I achieve anything near to as glorious as this, I will be happy!
Such a really helpful article. terribly fascinating to scan this text. I would wish to thanks for the efforts you had created for putting this on ink awe-inspiring article.
Post a Comment