
Hello my Friends!
Do I have a treat for you to start the week! :)
A special Guest Post by my Brand Ambassador Louise Nelson whose creative imagination never stops amazing me. I just adore how Louise is thinking - completely outside the box; her Art always makes my own creative cogs move a little bit faster. ;)
Enjoy!!
* * * *
I have to confess that the new release Art Alchemy Waxes were so not on my ‘must get’ list when I saw them...
In fact, I struggled to think how I could possibly use them with my creative style! I am a subtle texture and pretty much a monochromatic [shades of grey] type creative, so I was ‘head over heals’ for Finnabair’s Texture pastes; [and still am] LOL. :)
In fact, I struggled to think how I could possibly use them with my creative style! I am a subtle texture and pretty much a monochromatic [shades of grey] type creative, so I was ‘head over heals’ for Finnabair’s Texture pastes; [and still am] LOL. :)
I need to share this with you so that you can appreciate how wonderfully surprised I was, when I started to create and experiment with the waxes.
THEY ARE AMAZING!!!!! I SO LOVE THEM!!! Oh and I so love how they smell too. :)
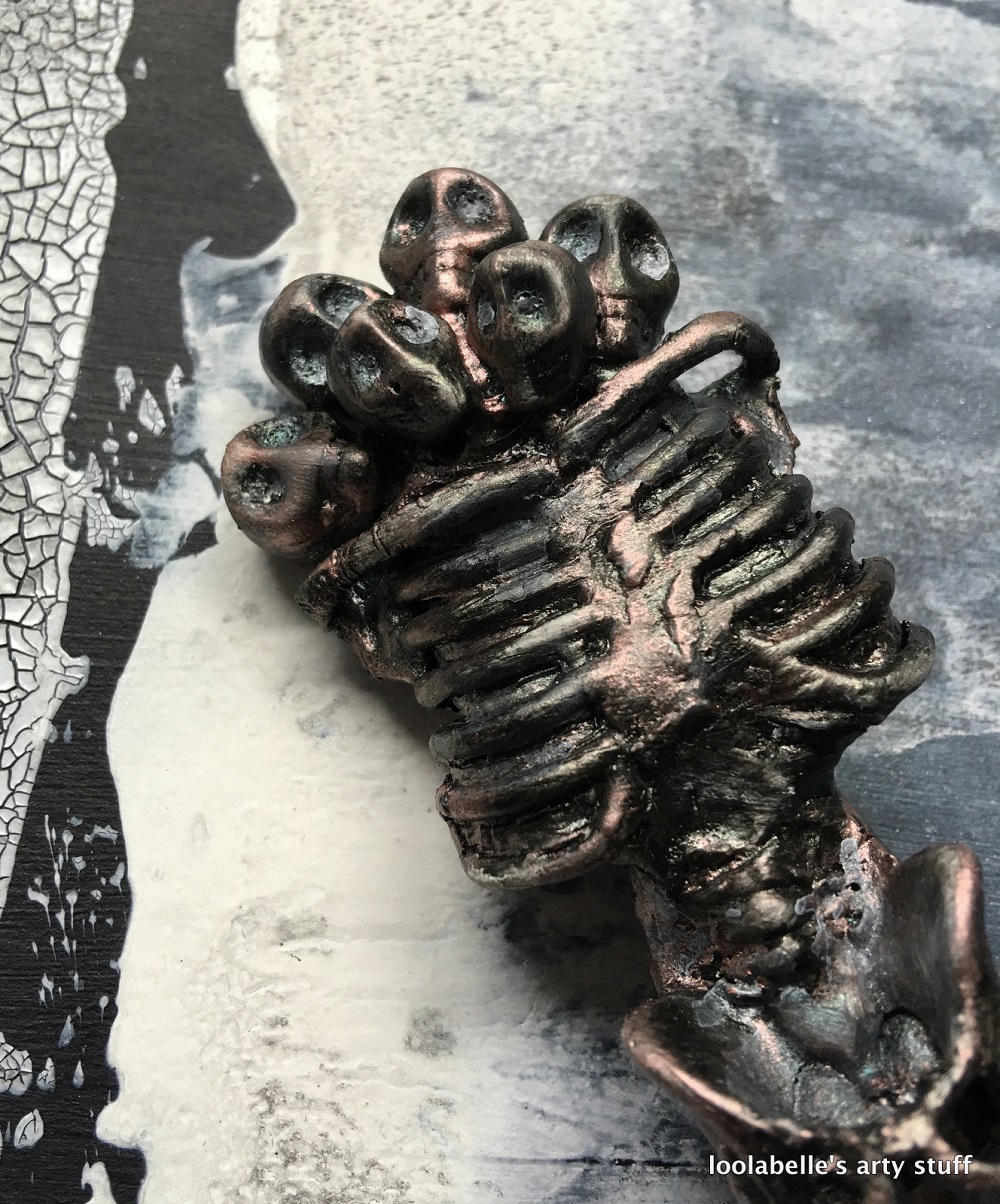
As I began to play and experiment with them I thought a lot about what I like to create and how I like to emulate vintage and aged metal patinas.
So with that in mind, I played around and came up with what I like to call the ‘Dirty Bronze’ look; and I love it!
I tend not to use a lot of products, I very much like to keep the creative process simple, and as a result I tend not to use a lot of products in combination to get ‘the look’ that I want. So with this project I used just one of the waxes - a beautiful Metallique Rose Gold. It completed the look I was going for Perfectly!!!
To show you how I created the dirty bronze look I would like to share with you my Mumma, Pappa, and Baby ‘Freaky Peep’ dolls; and no, they aren’t your typical dolls...


I first began by constructing my dolls using wooden twigs, ceramic skull beads, and Halloween skeleton decorations. To form the bodies I have used Mont Marte air-dry clay. These can take about 24-48 hours to dry completely [depending on the environmental temperature].
Once they are completely dry, I seal them with Art Basics Heavy White Gesso; it is applied just using a paint brush.
 To get the desired interaction of mediums I found that I need to create a smooth surface that was somewhat fluid repellent, so I then sprayed them with spray gesso.
 When the gesso was dry, I literally drenched the dolls with Vintage Coal Color Bloom spray mist; then dried it quickly using a heat tool.


I do hope that you have enjoyed this process share and my 'Dirty Bronze' art experiment.


I first began by constructing my dolls using wooden twigs, ceramic skull beads, and Halloween skeleton decorations. To form the bodies I have used Mont Marte air-dry clay. These can take about 24-48 hours to dry completely [depending on the environmental temperature].
Once they are completely dry, I seal them with Art Basics Heavy White Gesso; it is applied just using a paint brush.


The final step is the application of the Metallique wax. This can be a little fiddly and take a bit of time as it requires a visual appreciation of what dirty bronze looks like.
I literally played until it looked right and after I practiced for a bit, I eventually achieved the look I wanted.
With
the creative experimenting that I have been doing I found that I prefer
to use very stiff bristle brushes to apply the wax, plus or minus my
finger and/or a wet wipe.
The image below shows my 2 ‘go to’ brushes for
applying the waxes.

I started out applying only very small amounts of wax to prominent parts of the anatomy and keeping the recessed parts dark with the mist.

You may notice that the mumma and baby doll appear a little softer and less dark, and that is on purpose - to help create the gender and generation differences.


I do hope that you have enjoyed this process share and my 'Dirty Bronze' art experiment.
Here are the products I used:
 |  |  |  |

11 comments:
Brilliant!!!
OMG !! It's stunning ❤️❤️
These are stunning Louise!
Wow!!!!!
Your projects are amazing. I love them.
Wow....amazing!!!
Much Much Mwah Linda xxx
Thank you so very much Torsa xx
Thank you so very much! :) xx
Thank you so very much Walkiria :) xx
Thank you :)
Post a Comment