
Hi there my dearests!
I'm back on track with most of my things now - and I hope it will stay this way as there is a lot of things waiting to be done! I appreciate all the support, positive vibes and crossed fingers I'm getting from you - it does really help! For me probably the hardest task is finding the balance between travelling, working on new products, new classes, and creating - just for myself (I should also mention family and social life, right?)
Believe me - there are moments when I'm simply missing this freedom of creating "just whatever" without pressure of deadlines and expectations. I do miss the time when I had my friends around me, when we could sit, laugh and journal long in the night, not thinking what is waiting to be done in the morning... Moving away made it almost impossible now - as well as my super tight schedule... but I'm a very stubborn girl, you know? I decided I'll find my ways of creative "breathing" - and taking part in a good challenge is one of them.
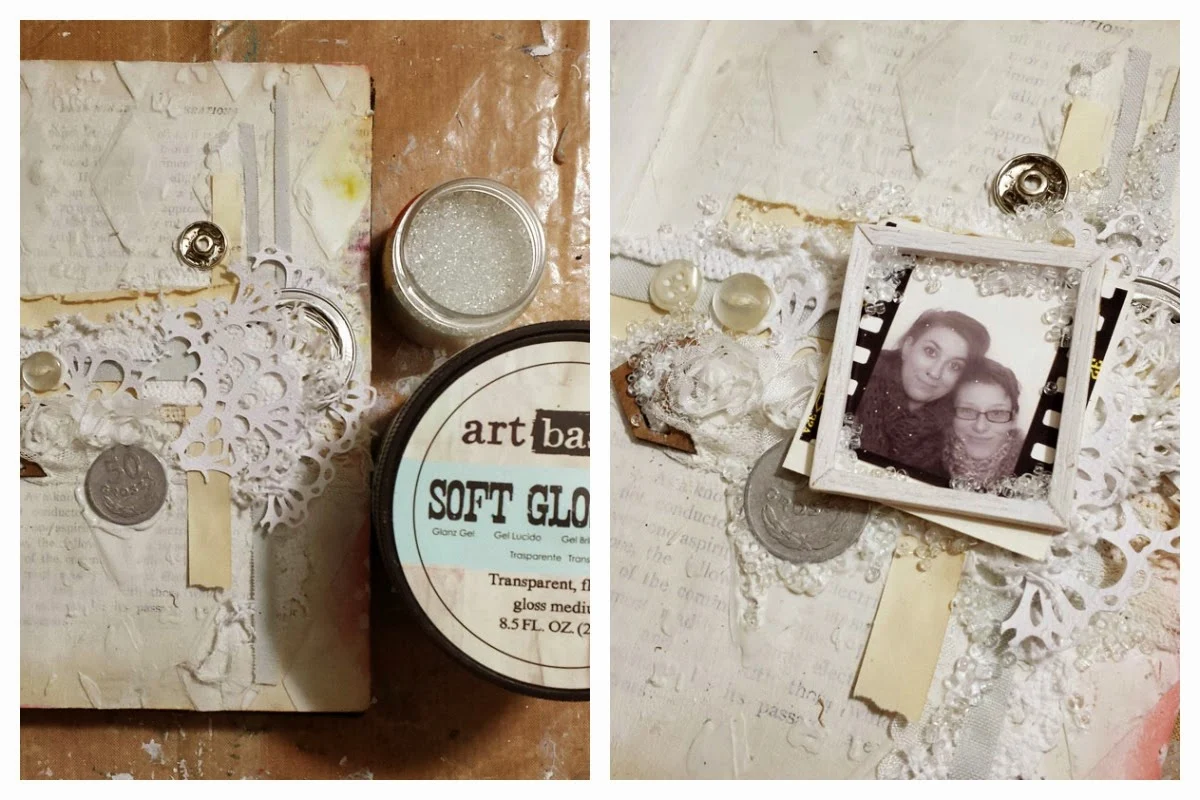
You can see the result below - journal spread I've made following the guideline from Polish Artistic Blog - "Kawa i Nożyczki" (Coffee and Scissors): self-portrait page including scrapbooking techniques and obligatory object - photo.

It should be super easy, right? In fact, 99% of my projects are ind of self-portraits, many of them include scrapbooking techniques, and I love using photos. But I didn't want to make it easy for me!
I decided to focus of the very basic, primal version of scrapbboking - and use mostly scraps, found objects and text which was cut out from the old book.

I was hoping to make my page almost with no "brand name" embellishments, expensive elements and focusing on building everything from scratch... which is the thing I love the most.
Also the photo I've chosen is a very special one - I took it in a photo booth with my dear friend Eliza last year when I was visiting Warsaw. Together with the text it makes this page very special... and one of the main purposes of scrapbooking is capturing special moments, right?

I focused mostly on textures, which I built with Art Basics Modeling Paste, stencil and a lot of paper and fabric scraps. My embellishments were buttons, old coin, pressed Nespresso capsule and couple of small chipboard pieces.

Also the color selection was rather moderate: splashes of tea stain, a bit of pigments and mica powder with water, watercolor pencils - it's a set you can easily take with you anywhere and create with your friends. (I wish I could do that again...)

1. First step is very easy (ok, all of the steps are!). I covered pages of my book with 2 coats of Art Basics White Heavy Gesso to prime the background and avoid the problem of ink soaking into my vintage paper. When gesso was dry I picked one of my stencils (Harlequin) and added nice texture on the top - Art Basics Modeling Paste was my choice for this step!

2. I dried the pages just a bit and started adding layers of paper scraps, fabric tapes, lace using my Art Basics Modeling Paste as my adhesive. When I was happy with the amount of fabric and paper elements I also added some metal findings and chipboard embellishments.

3. To add some extra depth and sparkle I applied my Art Basics Soft Gloss Gel in selected places of the composition and sprinkled Art Ingredients Glass Beads (Crystal) on the top of them. In this step I also added a small resin frame to my photo and repeated the same step with Soft Gel and Glass Beads to decorate my mini frame, which I kept in safe place until I'll be done with painting the project. I dried my journal pages completely using heating tool.
4. When the pages were dry it was high time for splashing some color! I started with my favorite homemade tea stain (black tea+ water) which gives the most beautiful vintage brown color and I continued with Primary Elements Pigments mixed with water in spray bottles: Iris Petal and Evening Primrose. I dried everything a bit...

5. ... and continued spraying with 2 colors of Art Ingredients Mica Powder - Gold and Purple to add more shine to my pages. I added also a bit of black spray in 3 points of the composition to add some natural shadow. When all the paints were dry I picked 3 watercolour pencils: purple, gold and deep gray and added finishing touches of color to my pages.

Ready - I love the final look of it: it's dimensional, full of texture with a delicate vintage feeling in it. I hope you liked this idea too - it is very relaxing, freestyle way of creating!
Below you will find a short list of products I've used
- all of them are available in our Mixed Media Place Store:
And now... off to my next plans and projects!
I'm constantly working on the new classes proposals which I hope to have ready in the last days of February and beginning of March... I'm also getting ready now to teach and doing demos during Craft Hobby and Stitch Show in Birmingham, which starts this weekend! If you are coming - you can find me at Notions Marketing Booth (J20) between 11.00 am and 4.00 pm. I hope to see you there!


Thanks again for visiting me... see you very soon and don't forget to check us on Friday - new beautiful tutorial is coming!

I'm back on track with most of my things now - and I hope it will stay this way as there is a lot of things waiting to be done! I appreciate all the support, positive vibes and crossed fingers I'm getting from you - it does really help! For me probably the hardest task is finding the balance between travelling, working on new products, new classes, and creating - just for myself (I should also mention family and social life, right?)
Believe me - there are moments when I'm simply missing this freedom of creating "just whatever" without pressure of deadlines and expectations. I do miss the time when I had my friends around me, when we could sit, laugh and journal long in the night, not thinking what is waiting to be done in the morning... Moving away made it almost impossible now - as well as my super tight schedule... but I'm a very stubborn girl, you know? I decided I'll find my ways of creative "breathing" - and taking part in a good challenge is one of them.
You can see the result below - journal spread I've made following the guideline from Polish Artistic Blog - "Kawa i Nożyczki" (Coffee and Scissors): self-portrait page including scrapbooking techniques and obligatory object - photo.

It should be super easy, right? In fact, 99% of my projects are ind of self-portraits, many of them include scrapbooking techniques, and I love using photos. But I didn't want to make it easy for me!
I decided to focus of the very basic, primal version of scrapbboking - and use mostly scraps, found objects and text which was cut out from the old book.

I was hoping to make my page almost with no "brand name" embellishments, expensive elements and focusing on building everything from scratch... which is the thing I love the most.
Also the photo I've chosen is a very special one - I took it in a photo booth with my dear friend Eliza last year when I was visiting Warsaw. Together with the text it makes this page very special... and one of the main purposes of scrapbooking is capturing special moments, right?

I focused mostly on textures, which I built with Art Basics Modeling Paste, stencil and a lot of paper and fabric scraps. My embellishments were buttons, old coin, pressed Nespresso capsule and couple of small chipboard pieces.

Also the color selection was rather moderate: splashes of tea stain, a bit of pigments and mica powder with water, watercolor pencils - it's a set you can easily take with you anywhere and create with your friends. (I wish I could do that again...)
Are you curious how was it all done? Here is the answer!

1. First step is very easy (ok, all of the steps are!). I covered pages of my book with 2 coats of Art Basics White Heavy Gesso to prime the background and avoid the problem of ink soaking into my vintage paper. When gesso was dry I picked one of my stencils (Harlequin) and added nice texture on the top - Art Basics Modeling Paste was my choice for this step!

2. I dried the pages just a bit and started adding layers of paper scraps, fabric tapes, lace using my Art Basics Modeling Paste as my adhesive. When I was happy with the amount of fabric and paper elements I also added some metal findings and chipboard embellishments.

3. To add some extra depth and sparkle I applied my Art Basics Soft Gloss Gel in selected places of the composition and sprinkled Art Ingredients Glass Beads (Crystal) on the top of them. In this step I also added a small resin frame to my photo and repeated the same step with Soft Gel and Glass Beads to decorate my mini frame, which I kept in safe place until I'll be done with painting the project. I dried my journal pages completely using heating tool.

4. When the pages were dry it was high time for splashing some color! I started with my favorite homemade tea stain (black tea+ water) which gives the most beautiful vintage brown color and I continued with Primary Elements Pigments mixed with water in spray bottles: Iris Petal and Evening Primrose. I dried everything a bit...

5. ... and continued spraying with 2 colors of Art Ingredients Mica Powder - Gold and Purple to add more shine to my pages. I added also a bit of black spray in 3 points of the composition to add some natural shadow. When all the paints were dry I picked 3 watercolour pencils: purple, gold and deep gray and added finishing touches of color to my pages.

Ready - I love the final look of it: it's dimensional, full of texture with a delicate vintage feeling in it. I hope you liked this idea too - it is very relaxing, freestyle way of creating!
Below you will find a short list of products I've used
- all of them are available in our Mixed Media Place Store:
 |  |  |  |  |  |
 |  |  |  |
And now... off to my next plans and projects!
I'm constantly working on the new classes proposals which I hope to have ready in the last days of February and beginning of March... I'm also getting ready now to teach and doing demos during Craft Hobby and Stitch Show in Birmingham, which starts this weekend! If you are coming - you can find me at Notions Marketing Booth (J20) between 11.00 am and 4.00 pm. I hope to see you there!

And before I finish, there is one very important announcement: we have a Winner!!!
Both me and my Creative Team were totally overwhelmed and surprised with so many beautiful (and sparkly!) projects sent for our "Sparkle and Shine" Challenge. It took as a long time to vote as all of your entries were checked and admired... finally we made a decision! Here is the winning project:

Huge congrats to super talented Ilana Polakiewicz!
Please email me at: finnabair.contact@gmail.com with your address to get your prize!
Thanks again for visiting me... see you very soon and don't forget to check us on Friday - new beautiful tutorial is coming!


26 comments:
Congratulations Ilana that is stunning work :o)
Hello! I want to thank everyone, specially Finnabair and the amazing artists from her design team. I am super happy to win the prize. Thank you very very much. : )
Congratulations to the winner - what a gorgeous layout! And, what a beautiful set of journal pages - thank you for the step-by-step!
Congrats -- with so many beautiful projects, the judges had an impossible task -- but this is gorgeous!!
Well done Ilana, what a gorgeous work of art. Great journal pages too. Have fun at the trade show!
Your blog is so inspiring...I love seeing your work come alive...it's so beautiful. Well done to the lucky winner...a lovely creation. Enjoy your art and thanks for sharing x
Congratulations to the winner...what an amazing project!!!
wow!!!! It is really amazing!!! Congratulations Ilana!!!xxx
Congratulations Ilana, this is such a beautiful piece of art xx
wonderful! congrats!
Congrats girl. Amazing project.
Love the journal page. Very subtle colors.
jak pięknie!
...klasyka gatunku
(a sprytna Eliza nie musi robić wpisu, oto jest już sportretowana i zeskrapowana... i to najlepiej jak tylko można!)
Bozinku... no niby wszystko jasne, krok po kroku opisane i podane... a jednak efekt końcowy ponad wszelkie oczekiwania i wyobrażenia - magia się dzieje... dziękuję
Congrats my friend Ilana!!!! UHUHHUH É nóissssssssssss! Vai Brazillllllllll
Fantastic recipe!!! Lived the end result! I lived participating in the sparkle challenge it sparked my creativity and gave me a piece I can live and treasure. Well done with the winner such a beautiful creation! I hope you will challenge us again !!!
awesome pages! congrats winner!!!
Wspanialy wpis, świetna kolorystyka! I 50 gr. - rewelka! :)
Congrats Ilana!
Absolutely fabulous !
Corrie x
Great journal page and art recipe! TFS!
Congrats to Ilana! Awesome project!
Love your journal page.
Thank you for the tutorial.
Congrats to Ilana. Her project is just beautiful.
Amazing work!!! Cudeńko :)
Incredible work! Thank you for your help ->diy :-)!
piękny wpis :) przez Ciebie zachorowałam na to połączenie kolorów :)
wpis oczywiście rewelacyjny, i na dodatek uchyliłaś rąbka tajemnicy :)
bossski, jak zwykle. uwielbiam Cię podglądać!
Ech, no tutaj nie można się nie zachwycać
Post a Comment