Hello, my Friends!
I know I've probably told you that a thousand times but there I go one more time - I love my job! :)
You may follow all my creating art and teaching adventures on my instagram and facebook page - and you'll get the idea of how blessed I'm feeling.
Not so long ago I had the chance to finally meet in person one very special Lady - super talented - my Creative Team member - my Friend in Art - Linda Cain ! And here's the proof. :) Am I lucky or what?!
And today we have Linda presenting a new one among her stunning artworks. Enjoy!
Hi everyone! Linda
here, and I’m back to share a vintage project with you that I
loved making.
It’s small, but packed with ephemera that will have you looking closely to see the details.
It’s small, but packed with ephemera that will have you looking closely to see the details.
1. I’m using a
small shrine for this, but you can apply this idea to many different
objects.
I like to lay things out and get some idea of the project.
The Mechanical flower at the top is trimmed with shears removing 2 sections. The
other pieces will be the bottom section.
2. I painted the
shrine and several Mechanicals with Heavy White Gesso so they will
take paints and inks. I left the leaves and top section unpainted for
contrast.
3. These pieces
were painted and put together with 3 tiny brads. Sand off and polish
the “CREATE” plate to expose the word.
4. This laser-cut
shrine comes flat, so I added vintage German-English dictionary pages
to the inside sections with Soft Matte Gel. Then I sponged on Archival Inks to age even more and sealed with the same Gel.
5. The outsides
were painted with acrylic paints using either a sponge paint dabber
or foam square.
6. The text clearstamp “Messy” is used with black Archival Ink. Now glue the
shrine together. When dry, I added Clear Crackle Texture Paste to
areas that created an “aged” look to the surface.
7. This wooden
candlestick is base-coated with Heavy White Gesso first and then a
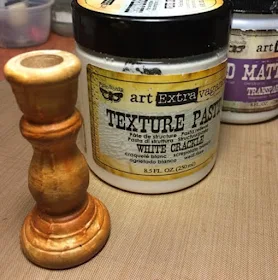
layer of White Crackle Paste is slathered on. When it's dry, add Archival Inks in orange and sepia and some wax patinas.
8. Assemble the
shrine and add the Mechanicals with 3D Matte Gel. The Vintage Lady is
glued to a small wooden block and two Mechanicals. Let it dry
overnight.
When it was completely dry, I added more Inka Gold waxes to
areas creating more contrast. The candlestick was too bright for me,
so I added a blue Patina wax and toned it down with more Archival Inks.
9. The finishing
touches were to add some Gloss Gel with a brush to different places
and sprinkle Copper, Silver and Black Micro Beads as filler. I also
added some Gold Mica Flakes.
The paper Flower was
sprayed with several colors of ink, and Micro Beads, plus some
Luminous Gold Glitter was added. A bit of Charcoal Art Sugar and
black Micro Beads are layered around the candlestick rims. A black
bow completes the base.
I hope you’ve
enjoyed this project and found the inspiration to make an Assemblage
of your own. You can use little gift boxes, jewelry boxes, mint tins,
or make one using chipboard.
The possibilities and the fun are endless!!!
The possibilities and the fun are endless!!!
Materials used:


Linda you are simply amazing in everything you do, but this is amazing ❤️
ReplyDeleteSuch an amazing project!! I love the shrine itself. And the colors are perfect.
ReplyDeleteAnother project on my to do list - which is really lengthy! Your shrine is gorgeous!
ReplyDeleteGreat shrine by a most talented lady:)
ReplyDeleteProjeto fantástico, Linda!
ReplyDeleteLinda your project today is AWESOME... Stunning result !! You always share the most fabulous ART with us. You are a fantastic ressource for inspiration. You are clever and very talented !! Thank you for sharing !! Hugs from Monica... Spain
ReplyDeleteFabulous! I have been a fan of Linda's for quite some time!!
ReplyDeleteLinda! What an awesome shrine! Love the coloring and the assemblage on it!!! Great job!!!☺️☺️☺️
ReplyDeleteLinda - you always inspire! This is soooo FABULOUS. j.
ReplyDeleteFabulous artwork Linda !! really great !!! I love these colours. Big hugs. Caty
ReplyDeletethis is soooo cool Linda!! I love it. =)
ReplyDeleteLove this Linda! I always enjoy your assemblages and the details are stupendous.
ReplyDelete