Strony

Friday, 29 May 2015

Collect moments

Hello everyone,
Heading towards the weekend we are coming back to you with another special piece of art. 
Saying I like Monika's make would not be enough. I simpy love her journal spread... rich in colour, texture and fabulous touch of vintage. Enjoy !

Probably, you know, that I love pink… do you know why? In color psychology, pink is a sign of hope. It is a positive color inspiring warm and comforting feelings, a sense that everything will be okay. So today I would like to show you my newest pink project. It's for someone special, that leaves a beautiful mark on my mind. 


I created a journal page starting with simple craft envelope.


1. First – as always – I reached for Heavy White Gesso. 2 and 3. After that, I added a new stamps from the Net and Wire set. I used black and red Archival Ink. 4. My next layer was Opaque Matte Modeling Paste and Weaving stencil. 
  

Then, I added some paper tapes from Tim Holtz, my favorite die cut Prima doilies and some more papers. I glued everything using Soft Matte Gel and when it dried, I covered the whole project with a layer of White Gesso to get it ready for all the paints and sprays. 


Then, it was time for Glimmer Mists - delicious combination of  Pink Taffy, Viva Pink, Cosmos and white ecoline. I'm always very spontaneous with the mists never trying to be super precise. And I simply let my imagination run free! When everything dried, I reached for all the metal embellishments that I love so much. 


For my final touches, without being too precise, I stamped the senitments from Messy stamp and Tea on the deck, background from cheese stamp. I also used a butterfly stamp from Don't forget to fly set. 


I hope I inspired you to create your own art journal page.
Hugs!
Monika 

Products from Mixed Media Place:


Thursday, 28 May 2015

The ARTifact - for the love of texture, light and shine... and a challenge!

Hi again! Great to see you back on the blog!
Not so long ago I was sharing one of the inspirational projects I've made for one of the new classes - "Beauty and the Beads" and I'm really proud and happy to see all the wonderful response I've got from you!
This time I'm back with one more project - the one which is the closest to my heart, I think - and I hope you will like it as much as the last one! Fingers crossed, deep breath and...


"The ARTifact" was created for pleasure. I now it is very selfish and maybe I should keep my mouth shut, but this is the truth... I wanted to make  something which will be fun to create, a bit different to my previous projects, something which will make me happy every single time I'll be teaching this class... and here it is! Pure madness of texture, detail, light and metallic effects.


As you can see it is another project which is focused on the object instead of a photo - I'm trying to find the way to make my projects and classes more inspiring for people and I found that for some of you it is easier to work with "real, existing element" instead of an image. For me - this was a great chance to try a bit different style and approach...


To create this kind of collage project you need a range of texture pastes and adhesives as well as some metallic paint or mica. I've focused on Art Extravagance White Sand Texture Paste, Graphite Texture Paste and Art Basics Modeling Paste to create interesting textures and effects.
My colour choices were Art Basics Black Gesso and a whole range of  Art Ingredients Mica Powders combined with Art Basics Soft Gel.
Putting it all together is exciting and inspiring process - this product combination is just perfect to give you a variety of different effects and options!

If you'd like to take this class - check out my schedule in Live Classes Tab on the top of the page!


But this is not all!
To provide you even more inspiration and start some serious, creative fun I've just launched our first ever Mixed-Media Academy Open Studio Challenge


Here are the details:
- In this post my wonderful, talented Creative Team was sharing with you some of their favorite background techniques - simple ideas to start a beautiful mixed-media project.
- Your challenge is to pick one or more of the techniques and use it to inspire your own project - no matter how big or small, simple or complicated it is!
- Sharing the link to your artwork in our Finnabair & Friends - Open Studio Facebook Group will give you a chance to win a PRIZE - I will make a random giveaway drawing among all the participants - so all of you have a chance to win!
- Deadline for this challenge is 11th June - so you have 2 full weeks to take part and share it with others! Simply leave a link in a comment in the Mixed-Media Academy Open Studio Challenge post and spread some love - we all like comments and words of encouragement!


And finally - time to announce our BLOG GIVEAWAY WINNER!
Huge congrats to Caroleanne Wright!


Please send your address to: store@mixedmediaplace.com to get your prize!


Wishing you all a fantastic week!
(and packing fore classes in UK - Harrogate, here I come!)


Tuesday, 26 May 2015

Spread Your Wings Academy vol.1

Hi everyone,

With a big excitement we wish to welcome you in our new monthly project 'Spread Your Wings Academy vol.1'

 
Sounds mysterious?
Myself and my Creative Team we would love to invite you to our mixed media world.
In the months to come we hope to show you some great ideas and techniques, our favorite tips and tricks. From small to big, from basic to advance - we would like to encourage everyone to try and experiment.
Don't be afraid, don't be shy! We are here to encourage you, we are here to help.
Fasten your seat belts and join our creative journey.

Today our amazing team will share with you their own favorite backgrounds.
Grab some tea and coffee as you are about to experience explosion of creativity.


This is just a simple tag sitting on my work table. Does intimidate you? 


No, it's just a piece of paper, right? So why don't we try playing by making just a background today as a starting point for making a tag. 
If you don't like how it turns out, toss it. It's just a piece of paper! Seriously. 
Then start again with another tag aka piece of paper. Try it a bit differently this time. 
Not everything has to be a masterpiece. Play, practice, have some fun. Just try taking a few minutes to tap into your creativity without expecting a whole project. No pressure. 
By using colourful inks you can achieve amazing backgrounds.

Se, here we go !


Another great background is created with a stencil, some Modeling Paste, and Mica Powder to tint the paste. I mix it up on my craft sheet – a glob of paste and a dip of my palette knife into the Blue Mica Powder to pick up some color.


These are just a couple of ways to get you started in your creative process to begin to Spread Your Wings. Just jump in and take a few minutes to play. You can always come back later and add some metal elements, or a family member’s picture, a stamped image, etc. Give it a go, and let me hear about what you’ve done!


Your Friend in ART,
Linda


My biggest revelation in scrapbooking was when I realized one thing – it’s only paper. If I happen to ruin a 12x12” sheet while playing, so what? The memory I want to preserve is in my head, it doesn’t get thrown away.


Don’t hold back – play, try, experiment and occasionally fail as well, it’s all part of the process!
Here’s a simple and easy background tutorial to get you started. Just three steps and one of a kind background is done! 


  1. First choose your color scheme and mist a few colors to your background paper. Let air-dry or use a heat tool to dry.
  2. Next take a stencil and a pencil. Trace the pattern to your page a few times and mix some doodled circles in as well. You can also add bigger hand drawn pieces if you want.
  3. Finnish your background with stamping. Use one or a few stamps and mix different patterns.

Another word of advice, too. When you add something to your piece and think that now you’ve ruined it, give it another change. Don’t give up on it right away but add another layer and see what happens. There’s numerous times I’ve thought that a project is beyond any repair or will never be anything but I’ve been keeping pushing and working on it and usually that piece ends up being a personal favorite. So be a bit thick headed and see where it takes you.

Happy creating,
Riikka


Let's face it, a blank canvas is scary, it is simply staring at you and saying 'C'mon, do something with me, paint me, decorate me!!!'. But, what do you do? where do you start? I have a guilty secret to share, when I am stuck I usually start my projects the exact same way, each and every single time. Following these simple steps has produced exactly the same background in all sample projects you will see below.


1 - Paper Strips, as I am always adding color later it doesn't matter what paper I use here. More often it is scraps that I find on my desk.

2 - A fabulous and cheap way to add texture to your project

3 - Also a fabulous way to add cheap and interesting texture

4 - Either modeling or texture paste through a stencil will add the finishing touch to your background.

To finish off your background you can apply a light coat of gesso and then add colour (paints, spray mists, gelatos, the options are endless!).

Look closely at the below projects you will see the common theme followed through in the backgrounds.


Enjoy the journey,
Rebecca


Hi there :) 
I love journals. I love creating textured backgrounds. Today's make is definitely my starting point of many of my journal spreads. It is easy, fast and simple.

Always gesso the page, then add some texture - stencil + modeling paste.


After your base is dry add some colour... one after another one, play and have fun !


Here is my background and sneak peak of finished page. I hope I encoured you to create some journal background. Believe me it is easier than you think.


Hugs, Marta x

We hope that you will grab your tools right away and begin exploring mixed media by starting to create your background. We will be sharing tips and advice every month in our Academy. You can also join our mixed media group on Facebook - Finnabair & Friends Open Studio. You will meet there all kinds of mixed media artists, fellow crafters and my Creative Team. Join us today for more inspirations - link to the group click here :)

Happy creating.


Sunday, 24 May 2015

Finnabair Giveaway Time !

Hi everyone,
I hope you like giveaways?
We had one already on Instagram... time for a Blog Giveaway, don't you agree?
All the fun is to celebrate the release of my new Stamps and Altered Frame with Prima Marketing - you can check them below - and tell me which one you are the most curious about!


And here is the set of goodies which will go to one of you, my dear followers!


How to participate? It's very easy!
1. Check my new stamps and frame!
2. Leave me comment below telling: what do you think about them? Which do you like most?
3. Spread the news in your favorite social media: Facebook, Instagram, Twitter, Pinterest - anything goes!
The giveaway closes at Wednesday (27th of May) - midnight of my local time (GMT)
4. Keep your fingers crossed - the winner will be announced on Thursday
Good Luck!

And guess what... We have a special treat for you. Myself and my super talented team have prepared some stunning projects with my new stamps. We hope you will enjoy them!
If you haven'e seen my altered phone yet, here it is.


I had a background I’d already done on a tag using several colors of Distress Inks. So I was all
ready to go when the New Stamps arrived from Finnabair and Prima. So much fun!


Rebecca here with you to share a card which I created using the brand new 'Never Too Late' set of cling stamps from Finnabair. I wanted to create something a little different and unique here - loving a bronze star and gold threads radiating from the head piece on the stamped image, quite an effective look isn't it?


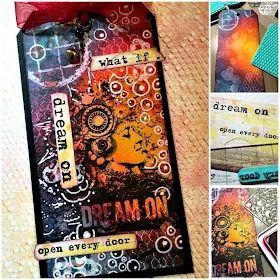
It’s always so exciting when Finnabair releases new products, and this time she has out done herself with a range of beautiful new stamps. I have made a tag using two stamps from the Dirty Walls set and two from the Dream On set.


The “Net and Wire” set turned my thoughts to sea and waves. I created two little ATCs using many stamps from the new collection. I used the thin netting stamp in the set as detail in the background. The waves I made with stamps from the “Dirty Walls” set using inks in different shades. I also added white embossing as sea foam using white embossing powder and another stamp from the “Dirty Walls” set.


As huge fan of visual journals I enjoyed creating my pages using new stamps. If you are not good at drawing stamps are just perfect.  I used mica powders to colour the images, I loved it!


Good luck!