Hello friends,
Spring is taking over our days :) Colourful flowers start to appear here and there, the days are longer and brighter. So is our April moodboard.
We hope to inspire you today with gorgeous project created by our Guest Designer and our Team! The moodboard and all details of our Art Recipe are available below.
____________________________________________________________________________
Our new visual moodboards consists of:
- 4 products to choose from - they are shown on the right
- colour palette - right next to the products and each colour has their own circle
- and visual inspiration in a form of several beautiful images.
It is easy to remember - things in circles are the core of the challenge (colours and products) and things in squares/rectangles are only a visual inspiration to help you get creative juices flowing.
Just to make sure, you are all well informed, we would like to let you know, that challenges will be going live each second Sunday of the month. So please do not be surprised, that Inlinkz is closed the day before. Please keep that in mind planning your entering the challenge :) because we love your projects so much and we do not want to lose any of them!
____________________________________________________________________________
The rules are very simple. Each challenge consists of colour palette and products. You need to stick to the colour palette and use at least 2 of the products listed in a challenge.
Products to choose from:
Icing Paste
Jewel Effect Paste
Impasto Paint
ArtAlchemy Metallique Paint
The colours: pastel pink, pastel blue, lilac
If the products on your project are not easy to recognize, please add in description information, where exactly we can see them.
Challenge is open till May, 8th. The winner will be invited to be Guest Designer on our blog.
________________________________________________________________________
This month Guest Designer is Veena Chowdhry
instagram
facebook
youtube
pinterest
blog
Hello all,
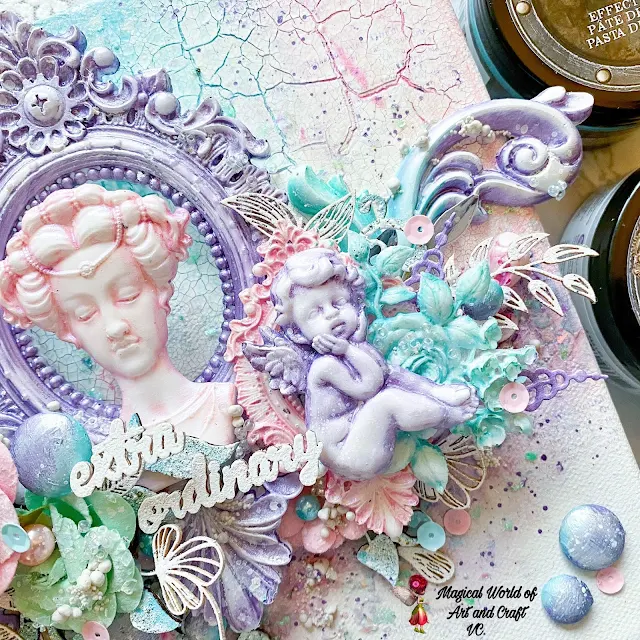
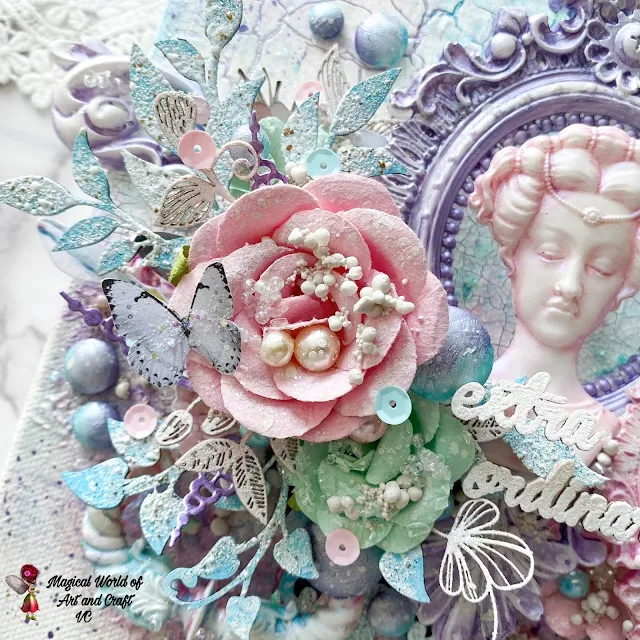
I am so happy to be a Finnabair Guest Designer for this month's Challenge. I really loved the pastel shades of the current month mood board. I have created a mixed media project on a canvas and used newly launched moulds from Finnabair to create the composition.
To start with, I prepped my canvas with white gesso and applied crackle paste on the top half of the canvas. I then applied metallique acrylic paints - “Light Patina” and “Pink-Blue”(opal magic) on the canvas and watered the paints down by spraying water and I let the colors flow naturally.
Then, I selected few thick leaves and ornament chipboards, applied “Mediterranean” impasto paint on them. Once dried, I randomly embossed the chipboards with shabby white EP. I also white embossed few more chipboards and sprinkled glitter on them.
I added the chipboards under the flowers and resin embellishments. Then I colored some art pebbles and added them to the composition.
To adorn the project, I added art stones, glass beads, sequins and pearls. To finish the project, I added Mermaid effect paste around the composition and added “French Lavender” metallique paint splatters.
I hope you like my project and feel inspired to participate.
Happy Crafting!
-Veena
Inspiration from our team:
Hello crafty friends!
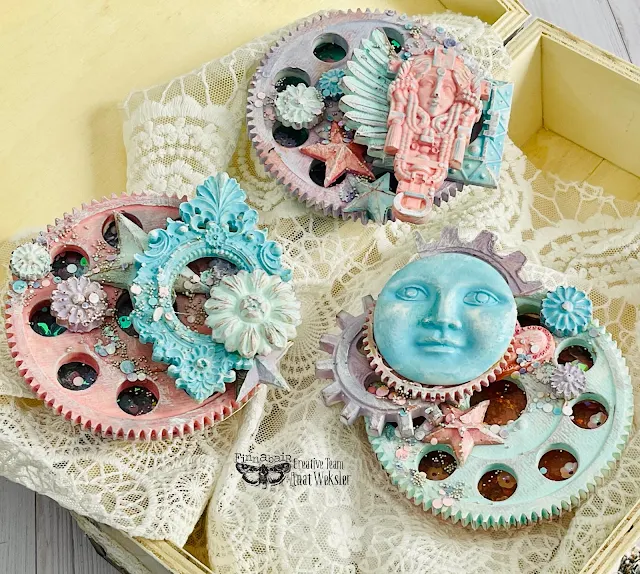
The first thing that came into my mind, when looking at the beautiful Moodboard, was a Shaker, this filled with sweet shiny sequins.
So I decided to give it a go for the first time ever using, as my usual, recycled objects.
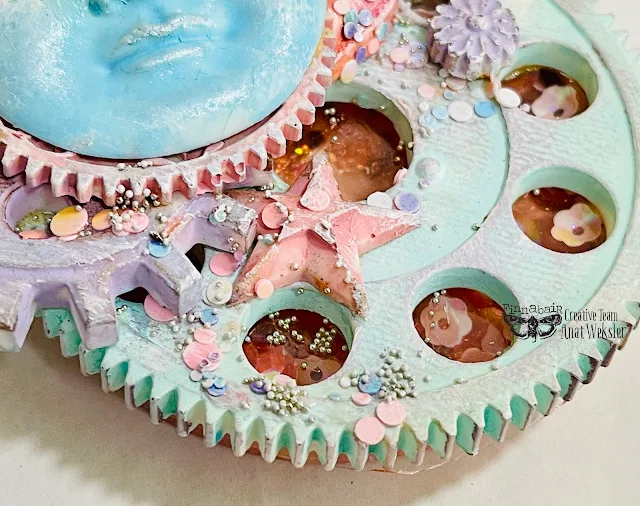
For the base of the shaker I grabbed Granulated Coffee jar lids, painted them with Metalique Paints and spread Effect pastes in the inside. When it was dry, I added the sequins and closed with a piece of transparency sheet.
I was going to give each one a totally different look but after painting the big Cog with Soft impasto paint I like it so much and decided to use the Cog in all compositions. You will find below all products I have used here.
Looking forward to seeing your creations for this month!
Xoxo
 |  |  |  |  |  |
 |  |  |  |  |  |
 |  |  |  |  |
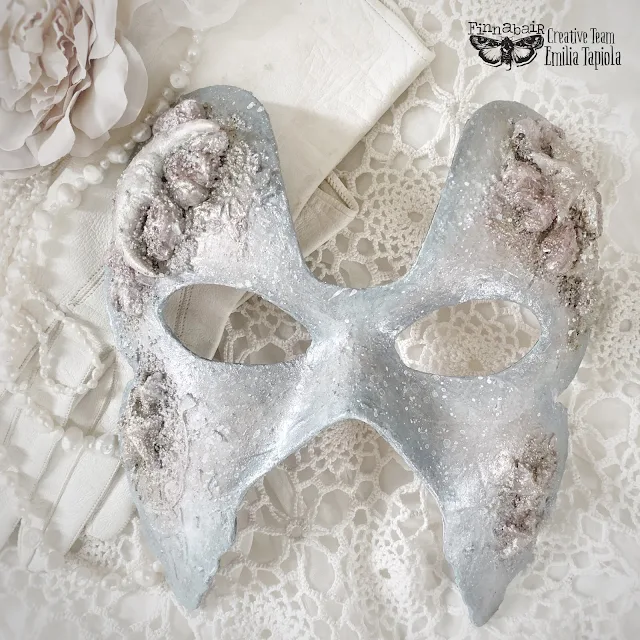
In an blink of an eye, it’s the first of May, so I thought creating some pretty pastel coloured masks would be a lovely way to welcome spring, May, and light nights coming.
I wanted to be the idea simple, so incredibly simple that this would be a project easily done, even with children. I had a couple of paper mâché half masks, so I did two different shapes just to show that the idea is versatile of pretty much any kind of masks.
The masks had a bit rough surface so, using scraps of Finnabair Flutter tissue paper and Soft matte Gel, I covered the masks, making sure that I had all the edges and eye holes neatly covered, too. Then, I primed the masks with white Heavy Gesso and then painted them with a mix of Impastos Lavender and Snow White.
Next, using Finnabair stencil Passiflora and Frosty Pearl Icing Paste, I created some flowery depth, following the outline and edges of my masks. The intricate pattern made so beautiful lacey outlook onto the masks it was really a shame to put anything on top, but as I had moulds in my mind, moulds it was. (Adding moulds is the part you could easily skip if you do this with kids and want an instant result!) I wanted to create masks looking like clear spring morning sunrise, filled with sparkling hope.
Using Art Noveau, Flower Queen, and Nocturnal Elements moulds by Finnabair, I made some lovely flowers and stars with air dry clay and let them dry overnight. Next day, I attached them with Heavy Body Gel and let dry again. I also added a bit of Soft Matte Gel around the clay motifs and sprinkled Mini Art Stones to kind of tie the flowers and stars and the mask together.
After I was sure the masks were completely dry and safe to start painting over with, I continued. (This is why I told you that if you want to create masks with children or you are in a hurry, you can easily skip the mould part and stick to some beautiful stencil pattern – or add paper flowers etc.)
First, I used Metallique Opal Magic Aqua Rose for painting the clay motifs and around them, next I painted the edges of the masks with Opal Magic Pink-Blue. I highlighted the paints here and there with a hint of Vintage Rose for the pink parts and Light Patina for the blue parts and blended the two colours a bit with Liquid Acrylic Titanium White in the middle of the masks.
To add some structure and depth, I mixed Impastos Dark Chocolate, Pitch Black, and Linen for some shadowing and gently painted the edges of the masks, including eye holes, and blended the shadowing with baby wipes so that the dark shadowing was as delicate as possible. I did the same with and around the clay motifs.
As the finishing touch, I highlighted the pink parts with Jewel Paste Rose Quartz and blue parts with Jewel Paste Diamond Rings and added a hint of Golden Dust Jewel Paste here and there for warmth. I only used Jewel Pastes a little, with wet brush and sprayed water to blend them even more, as I wanted soft glimmer not instantly visible. And after the Jewel Pastes were dry, I sprinkled some white paint splashes all over the masks using Impasto Snow White and very wet brush. These matte sprinkles balanced the shiny metallic paints and Jewel pastes and made the masks look like they were hundreds of stars shining gently in the morning sky, welcoming a new day.
Wishing you beautiful moments in soft, dreamy colours,
Emilia
Products I have used - all the images linked to Mixed Media Place online store:
 |  |  |  |  |  |
 |  |  |  |  |  |
 |  |  |  |  |  |
 |  |  |  |  |
Hello my friends!
I would like to share this little project I made inspired by April Art Recipe Moodboard.
I was sooo excited to create something in this colour scheme!
I don’t usually go for such delicate colours, so this was one of the biggest steps out of my comfort zone that I have ever taken!
I decided to use this old photo frame as a sort of tray as it had nice deep edges and plenty of surface to work on, then I put some music on, grabbed my tea and wen to town on it! :D
I used a lot of mechanicals, opal magic paints (because they have that lovely iridescent colour to them), glass beads, glitter and literally anything and everything that I could think of to try and achieve that Unicorn/Candy floss look!
One of my favourite things to use were the Art pebbles that Look like little water droplets! They fit in so perfectly in to this project!
As you can see, I am very excited to have created something in a style/colour scheme that I’ve never dabbled in so I hope that my excitement will catch on to you too and you’ll create something amazing inspired by this mood board!
You can also see the video I made showing the process below, so I hope it will give you some ideas!
Lots of love,
Iveta xxx
Products I have used - all the images linked to Mixed Media Place online store:
 |  |  |  |  |  |
 |  |  |  |  |  |
 |  |  |  |  |











No comments:
Post a Comment
Please note: leaving a comment on this website means you agree for us to store and process your data (such as user ID) for communication, education and marketing purposes. More information on our Privacy Policy is listed on the blog.