Hello Dear Readers!
We are starting the beautiful month of May with Kasia who's sharing her gorgeous new artwork together with a really great Rust Pastes story and a step-by-step video tutorial.
As always we are encouraging you to experiment, keep looking for creative discoveries and have a lot of art fun. :) Please, enjoy today's post!
* * * *
Today I wanted to show you a project that I had in mind for a long
time. I must admit that when Rust Effect Pastes were released, I reached for them with great
enthusiasm, but something didn't work, somehow I didn't feel them.
I kept using them from time to time, but usually just as an accent of color, not to create the actual faux rust effect. However, I didn't give up
and I finally created this project that I really like! :)
I
wanted the background of my artwork to be rough and to create the impression
of an old, time-worn surface covered with tiny pebbles and some kind of weathered organic forms.
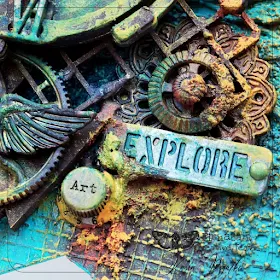
To achieve such effect, I mixed Modeling Paste
with Mini Art Stones and spread them on my surface. Then I applied paints and pastes on these tiny stones which only enriched and highlighted their effect.
I painted my background with Impasto paints which are completely permanent when they dry. This is their great advantage as they didn't blend or mix with other colors when I added more
media and sprays later on in the process.

In this piece I used a lot of embellishments. You can use ready-made elements like for example the beautiful Mechanicals, but you will certainly find lots of treasures in your drawers.
Old buttons, jewelry, watches parts,
even uninteresting or ordinary shapes will become unique after being treated with
paints and different kinds of pastes. Add some chipboards and their leftovers and your artwork
will be even more interesting.
Please,
enjoy my video tutorial and I hope you'll feel encouraged to reach for media, embellishments and techniques that have been
difficult for you so far.
Maybe this time it will be the day when everything will go much easier and you'll discover a new favorite of yours? :)
Maybe this time it will be the day when everything will go much easier and you'll discover a new favorite of yours? :)
I'm really happy that I didn't give up on these gorgeous Rust Pastes! :)
If you're ever not sure how to use any of Finnabair's products, you can always look for inspirations from us here on the blog or go for more information straight to Anna's you tube channel or the Creative Team's one.
There are plenty of great tutorials to follow!
Wishing you many exciting art discoveries! :)
xx
Kasia
Products used:


Great video , I love how treasures around the house can be put into our art pieces and look like they were made for just that spot ! I like how you went from dark to light with the rust effects much better than me using them light to dark. Thank you for sharing !
ReplyDeleteThank you Kasia for an amazing video. It was such a pleasure to watch how you created this gorgeous steampunk projectł. I love the result. You are right the rust pastes are fabulous.
ReplyDeleteThank you so MUCH for sharing.
Hugs from Monica
Spain