Hi there Friends!
Ever since my very first Creative Team I've been blessed to be surrounded by amazing people with huge hearts and talents. Today I'd like to say thank you to another one of them.
John is here today with his last crowd stopping project created especially for the Team.
Don't forget to re-visit all of John's fabulous projects - each of them is a real art treat and a beautiful inspiration! Make sure you leave John some love in the comments and bookmark all the links to his social media!
* * * *
Hello Finnabair Fans!
Next week Anna will be announcing the new Creative Team for 2018, and I can’t wait like the rest of you to find out WHO will be on next years team. =)
I can remember this time last year, the anxious waiting of knowing whether my art work was good enough to make the cut to be part of this group of amazing artists who have inspired me and my own artwork.
This made me a little nostalgic about my Finnabair journey so I started going through my past projects and realized that I’d never shared with all of you one of my favorite projects - my Art Ingredients loaded canvases!
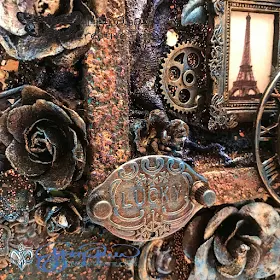
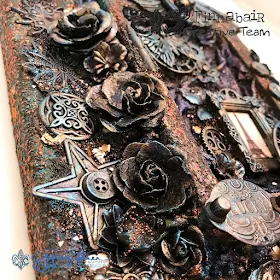
I always have so much fun creating one of my smaller sized canvases, and for that reason I wanted to share with you my latest creation, My Nostalgic Canvas…
I like to use 8" x 10" canvases for these types of projects, simply because of the size and that you can usually purchase this size of canvas in value packs at most art stores inexpensively.
To add more dimension to my canvases, I like to add "windows" onto the canvas and for this project I added a basic wood frame.
For more texture, I used muslin fabric with Clear Sculpture Medium and heat set with a heat tool. Although most of the time I like to "eyeball" the placement of my elements on my projects, you’ll notice that I drew lines on the canvas to center the wood frame onto the canvas.
For the base layer of the canvas, I stipple brushed Brown Rust Paste onto the canvas and sides of the wood frame, and then brushed the paste onto the fabric.
With a palette knife, I then added the paste around the frame and sprinkled Mega Art Stones around the frame followed with the small (regular sized) Art Stones to fill in the gaps.
While the Brown Rust Paste was still wet, I began to stipple brush Blue Patina Effects Paste onto the canvas, stones and edge of the frame to create a moss color and then heat set.
Once the background was dry, I stippled another layer of Blue Patina Effects Paste to add the blue color onto the background and then heat set this layer.
For more added color, I used my finger tip to highlight the background with Red Rust Effects Paste and heat set to avoid blending colors. Next I highlighted with Yellow Rust Effects Paste, again just using my finger tip for a light touch.
Once dried, I finished the background with a touch of Brass Patina Effects Paste.
With the background complete, it was now time to start working on coloring the embellishments.
I used a base coat of Heavy Black Gesso for all of the embellishments because I love how it makes the Metallique paint colors more dramatic!
I then highlighted the embellishments with the following Metallique paints (in order): Blackberry, Steampunk Copper, Midnight Blue, Deep Waters (you'll find all the links below).
For a true metallic highlight I then dry brushed Brass Patina Effects Paste onto the embellishments.
I often tell people that creating beautiful layers of metallic color that it’s like making spaghetti sauce from scratch – it takes time and patience, but the results are absolutely stunning and create subtle layers of color that can’t be created any other way.
I wanted to share with you some of the techniques I use for creating my embellishments, many of which you can incorporate into making jewelry also!
For the pocket watch, I first placed down the Vintage Watch Face onto the frame.
Fill the bottom of the Pocket Watch with Brown Rust Effects Paste, then generously sprinkle with Copper Micro Beads to create the background of the watch.
With clear glue, I layered a Mechanical Flower with a fleur de lys and allowed to set while working on placing the other embellishments.
You can use this same process for creating other layers of Mechanicals embellishments.
For example, along the top of the wooden frame I used a large Mechanicals Wing as the base and then adhered a small Heart Locket onto the wing.
Using the same technique as with the pocket watch, I filled the background with Copper Micro Beads and then placed a Lotus Flower with a Mechanicals Bolt Top inside.
Sometimes the best part of working on a mixed media canvas is layering and adding all of the embellishments into place.
I like to add my embellishments to my projects last because I enjoy having the freedom to move embellishments as I work.
Using Brown Rust Paste as my adhesive for holding down all of my embellishments, I placed them in sections so that while the paste was still wet I could add my inclusions.
When adding my inclusions, I typically start with the "chunkier" inclusions and use the smaller ones to fill in the gaps.
After placing the embellishments, I sprinkled Gold Leaf Mica Flakes into the wet paste and then added Pitch Black and Copper Glass Glitter, followed with a variety of Micro Beads for color: Pitch Black, Copper and Splash.


Beautiful!!!! A video tutorial for the next one!!!! Thanks for sharing
ReplyDeleteWOW!
ReplyDeleteThis is stunning John. Thank you for sharing how you brought your art to life. 😊
ReplyDeleteAbsolutely stunning! I sure enjoyed looking at John's projects this past year, thank you for featuring him.
ReplyDeleteOmg it's super stunning beautifully made superb texture n awesome details loved it so much
ReplyDeleteVery nice work John Sorry to see you go.
ReplyDeleteGorgeous project! Love all the metallics and layered embellishments!
ReplyDeleteThis looks awesome.
ReplyDeleteHugs Miranda
wow....so rich....
ReplyDeleteAmazing work John!! Xx
ReplyDeleteAMAZING stuff as always, John! You will be missed but looking forward to hearing about your next adventure. Thanks for all your inspiration you shared while on the Finnabair team <3
ReplyDeleteThis is really spectacular....I love the deep, deep color with pops!!
ReplyDelete