Hi everyone!
Don't we have just the perfect summer project for you!
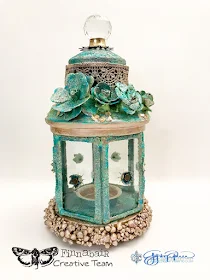
John used his magic and with the help of my Art Ingredients turned this popular store bought lantern into a special object that will make your porches or studios look really unique!
John explains how he made this little cutie so don't hesitate and add some summer mixed media charm to your surroundings! :)
John explains how he made this little cutie so don't hesitate and add some summer mixed media charm to your surroundings! :)
* * * *
I absolutely love the summer time – enjoying the warm weather, having friends over for dinner and enjoying evenings outside.
I was recently at a friend's for dinner and noticed her 'store bought' lanterns that were hanging around us and I asked where she bought them and she told me that they were from Ikea.
The longer I looked at them, the urge to transform them into a work of art became almost obsessive and the next day I found myself at Ikea buying one with BIG plans in mind!
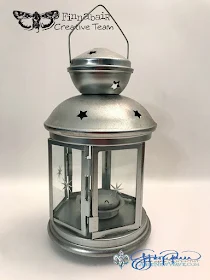
The before look:
Before starting the transformation, I used tape to cover up the star shaped holes that were around the lid in various places. If you’re wanting to make your own and use a candle or a tealight (instead of an
LED faux candle), you’ll want to leave these holes – they allow
for ventilation and if you cover them up, the candle won’t have
enough air and will burn out pretty quickly.
1. My first step was to paint the entire lantern with Heavy White Gesso to give a nice base coat for adding color and texture.
2. I’ve been obsessed with the new Metallique Soft Satin paint and used this for my base coat and later for my highlights.
2. I’ve been obsessed with the new Metallique Soft Satin paint and used this for my base coat and later for my highlights.
3. Next I randomly spread Mint Green Patina Effects Paste, followed by the Blue Patine that I blended slightly with the Mint Green.
Once dry, I highlighted the Patina Pastes with the Metallique Soft Satin using a dry brush technique. If you haven’t tried using different colors of the Metallique paints with the Patina Pastes, I urge you to give it a try, it gives the Patina finish a completely different look!
4. I repeated this process for the rest of the lantern, along with the flower embellishments that I added along the top rim of the lantern.
I used Soft Gloss Gel to adhere the flowers into place and to also hold down the Gold Leaf Mica Flakes along with Micro Beads in Splash and Grass.
For a little more decoration along the top, I pained a piece of lace ribbon with Metallique Soft Satin.
Although I had summertime on my mind making this project, I used one of the snowflakes from the new Vintage Snowflakes Mechanicals to go underneath the antique crystal drawer pull as the topper to the lantern.
Although I had summertime on my mind making this project, I used one of the snowflakes from the new Vintage Snowflakes Mechanicals to go underneath the antique crystal drawer pull as the topper to the lantern.
After all this decorating at the top of the lantern, I decided that I’d better do the same to the bottom and a quick and easy solution for almost any project is to add Art Stones!
I applied Soft Gloss Gel along the bottom edge of the lantern, then first sprinkled Mega Art Stones along the edge and gently pushed into place. To fill in the gaps, I then sprinkled the 'regular' size Art Stones to fill in the gaps and heat set into place.
A quick brushing of Metallique Soft Satin colored the stones to match the highlights on the lantern!
In the center of each glass panel, I adhered the smallest flower from the Mechanicals Metal Lotus pack and filled them Splash Micro Beads, topped with a small metal brad.
This added just a little bit of an embellishment to the glass panels while still allowing light from the inside to shine!
So next time you’re sitting outside enjoying the beautiful weather with family and friends, don’t forget to take a look around you – there’s inspiration to be found everywhere!
Products used:


I LOVE this!!!
ReplyDeleteAwesome. I can see using these techniques for other projects.
ReplyDeleteWhat a fabulous transformation !!! Love what you created. You are so talented and creative. Thank you for sharing this awesome idea.
ReplyDeleteHugs from Monica
Spain
Wow what a stunning alternation. Love the colors and techniques.
ReplyDeleteGreetings Miranda
GORGEOUS, John!
ReplyDelete