Strony

Monday, 31 July 2017

Art Ingredients Lantern

Hi everyone!
Don't we have just the perfect summer project for you!
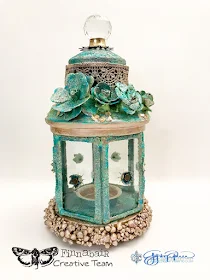
John used his magic and with the help of my Art Ingredients turned this popular store bought lantern into a special object that will make your porches or studios look really unique!
John explains how he made this little cutie so don't hesitate and add some summer mixed media charm to your surroundings! :)

*  *  *  *
I absolutely love the summer time – enjoying the warm weather, having friends over for dinner and enjoying evenings outside.
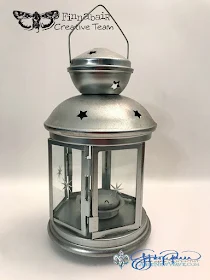
I was recently at a friend's for dinner and noticed her 'store bought' lanterns that were hanging around us and I asked where she bought them and she told me that they were from Ikea.
The longer I looked at them, the urge to transform them into a work of art became almost obsessive and the next day I found myself at Ikea buying one with BIG plans in mind!
The before look:
Before starting the transformation, I used tape to cover up the star shaped holes that were around the lid in various places. If you’re wanting to make your own and use a candle or a tealight (instead of an LED faux candle), you’ll want to leave these holes – they allow for ventilation and if you cover them up, the candle won’t have enough air and will burn out pretty quickly.

1. My first step was to paint the entire lantern with Heavy White Gesso to give a nice base coat for adding color and texture.

2. I’ve been obsessed with the new Metallique Soft Satin paint and used this for my base coat and later for my highlights.

3. Next I randomly spread Mint Green Patina Effects Paste, followed by the Blue Patine that I blended slightly with the Mint Green.
Once dry, I highlighted the Patina Pastes with the Metallique Soft Satin using a dry brush technique. If you haven’t tried using different colors of the Metallique paints with the Patina Pastes, I urge you to give it a try, it gives the Patina finish a completely different look!
4. I repeated this process for the rest of the lantern, along with the flower embellishments that I added along the top rim of the lantern.
I used Soft Gloss Gel to adhere the flowers into place and to also hold down the Gold Leaf Mica Flakes along with Micro Beads in Splash and Grass.

For a little more decoration along the top, I pained a piece of lace ribbon with Metallique Soft Satin.
Although I had summertime on my mind making this project, I used one of the snowflakes from the new Vintage Snowflakes Mechanicals to go underneath the antique crystal drawer pull as the topper to the lantern.
After all this decorating at the top of the lantern, I decided that I’d better do the same to the bottom and a quick and easy solution for almost any project is to add Art Stones!

I applied Soft Gloss Gel along the bottom edge of the lantern, then first sprinkled Mega Art Stones along the edge and gently pushed into place. To fill in the gaps, I then sprinkled the 'regular' size Art Stones to fill in the gaps and heat set into place.
A quick brushing of Metallique Soft Satin colored the stones to match the highlights on the lantern! 
In the center of each glass panel, I adhered the smallest flower from the Mechanicals Metal Lotus pack and filled them Splash Micro Beads, topped with a small metal brad.
This added just a little bit of an embellishment to the glass panels while still allowing light from the inside to shine!


So next time you’re sitting outside enjoying the beautiful weather with family and friends, don’t forget to take a look around you – there’s inspiration to be found everywhere!


Products used:

Friday, 28 July 2017

Ambassadors' Art Journeys,Travels & T(r)ips

Hello Lovely Friends.
This month is particularly interesting as inspired by the summer holiday season, this group of superbly talented Artists decided to present their Art illustrating the 'My Journey' theme.
Each of them treated it differently - either sharing their preferences when it comes to creating on the go or telling us their own personal art journey. I'm telling you - this post is an absolute treat (isn't it always?! ;) )!

Please enjoy the stories of
Ambassadors' Journeys, Travels and T(r)ips! ;)

P.S. And if you're still hungry for inspiration, don't miss the brand new Art Recipe on Prima blog!

*   *   *   *

 
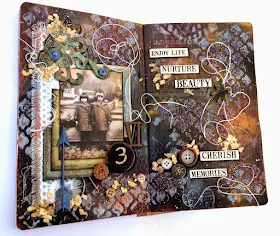
I never make art while traveling. I prefer to enjoy the experience and absorb all around me to the fullest.
The most inspired creative time for me is the time right after I come back.
On the waves of inspiration and memories I create albums, minies and other artworks which help me to preserve the wonderful moments I have experienced.

This particular art album is filled with happy memories after a trip with my family to Turkey. We had a real blast exploring the country and bonding!
Such album is very easy to make - just take some large tags and add paint, embellishments, photos and ephemera collected on your journeys.


We all have life journeys, but here I’d like to share my Artistic Journey with you.
 
I dropped out of college and gave up a grant to study art. Years later after my 2nd child was born, I decided to go back to Art and study with a local watercolor artist.


This is one of my 1st pieces. Pretty primitive, but I liked it.


Again, years later, I found stamping through a friend of mine, and jumped in. I loved it!
 
Much easier than watercolors for me.
 
But still I explored more… inks and tags!


Then I tried journaling in a watercolor paper journal with inks and stamps. Colorful for sure.
Always using what I’d learned in other mediums.
Next I tried collage and mixed media art by adding dimensional elements.
I discovered a new love for metal objects in my work.
I loved to layer, so I ventured into journaling again with vintage photos and trims.
Vintage will always be my first genre.


Most recently I fell in love with using all kinds of found objects, glue, paints and sprays to create mixed-media collages that can be hung on the wall or sit on a shelf.
I am not one to put projects in a book to be lost from view.
 
I like to have things around me in my bookcases and looking down from the walls to display my journey in art.
 
They remind me of where I’ve been and how far I’ve come, and the many Friends in ART that I’ve made.


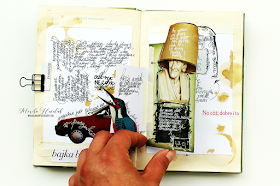
My first thought when I heard 'My Journey' theme was instant: art journal.
But different from all the ones made in the studio. Simpler. Less demanding. Definitely more personal.
What's inside? All sorts of things: cutouts, images, quotes, thoughts, words out of context.
In my travel bags you will also find paper tape, glue, scissors and different kinds of pens.
I also started adding interesting ephemera that are a great way to add some additional journaling surface.

I really recommend this kind of art experience - journaling on the go. Make it quick and simple and personal at the same time and you'll end up with really unique pages...

Creating away from your usual environment (in a cafe or surrounded by nature) might be an inspiring change for you and help you find brand new ways of expression.


For this month's theme I thought I would share a journal page I created that reflects how I feel/believe about my 'Creative Journey'.

I created this page using a quote that explains my feelings, a personal creative philosophy:
 "I will not trade my Authenticity for your approval."

I also used the image of an owl, as it is a perfect representation of me [solitary and nocturnal], and from a modern Western perspective, is a symbol of Wisdom.


Oh boy, this topic is a mammoth! I guess I'll save my personal journey for another time and concentrate to something that goes well with the season and our upcoming trip to London - creating on the go

Funnily enough, I don't create that much when I'm on a vacation. If I'm travelling for a workshop, I naturally create the class sample and sometimes even something extra, but if I'm on vacation with the family, I rarely have even any craft supplies with me. I guess if I'd be on the go for weeks and weeks I would need something to let the creativity flow. Then an art journal would be something to have with me.

 
What I do pack with to a vacation is an album or even a paper bag to gather the ephemera from that trip. My favorite thing nowadays is a box styled mini album, like the one I made for London and this I used when attending Finnabair's classes for the first time. The box allows me to add all the things to one place and the album catches the impressions I have the moment I have them - during the trip.

I've been reading Nathalie Kalbach's new book "Artful Adventures in Mixed Media" and what I have noticed in the book that many of the artists featured highly recommend a sketchbook or a journal for travelling. Something to gather the inspiration while on the go.
 
This little book I made could be used as such, to make notes and drawings while experiencing the new and different from the everyday life. But I need to be honest, this notebook connects to another kind of journey altogether... If you want to know more, please check my blog for the story!

*   *   *   *
 
Happy Journeys (Artistic and otherwise), Everyone!
We hope you're feeling inspired and share your thoughts and Art either in the comments section below or in our super friendly Finnabair & Friends Open Studio facebook group.
We'd love to hear from you!
xxx
Finn & The Team

Wednesday, 26 July 2017

Poetry of Patina

Hi guys!
I'm right in the middle of my July-August US Tour - crazy busy and so thrilled to be meeting fantastic creative people during my live classes making lots of mixed media art together.
I'm sharing my adventures (and some great art) on my Instagram and facebook accounts so you can always take a peek there to see what I'm up to. :)

Today I'd like to share one of the canvases that I made for my brand new Poetry of Patina class that had its debut during this beautiful retreat in India a couple of months ago.
This piece is so much fun to make and you can still join me and create a canvas like this in one of the places I visit during my tour! Simply check the dates & venues {here}.
Curious fact: there is not a single touch of paint on this project!
So now you're probably wondering how did it all come about, right? :)
The answer is: the magic of my two sets of media from the Art Extravagance line: Rust and Patina Pastes. The whole look is completed by Art Alchemy Metallique Waxes.
This large collage on canvas is all about the rust, paint and metallic look! It's a great chance to try out a variety of techniques at once while building this dimensional, intriguing composition.

If you feel like making a bold Rust & Patina statement on a canvas and play with a range of great products and fun mixed media techniques - Poetry of Patina is the place to be! ;)
You can then use the same ways in all kinds of art projects you make - paper based creations like art journals, altered art, home decor, the possibilities are endless...
Check out the magical Pastes (and the whole Art Extravagance line) in our Mixed Media Place online store where you will also find the Pastes in jars that come in two sizes so you don't have to worry you will run out too quickly. ;)

When you follow this 'classes' thread on my blog, you will see all my posts presenting the artworks I created for my different live classes. All of these works came straight from my heart and I can't tell you enough how gratifying it is to be sharing my passion with others...

I'm wondering which of the classes I offer looks the most tempting for you? Or maybe you have already taken some - which one particularly moved your creativity?
Don't feel shy and leave a comment - I'd love to hear from you! :)

Hugs
xx


Monday, 24 July 2017

Go Off The Grid

Hi and Happy Creative Monday, everyone!
Our lovely Athanasia is here today to share some art journal summer joy. ;)
Her expressive textural new spread will surely inspire you to make more art this summer!
Enjoy!
Hello dear friends!
Here in Greece we are in the middle of the Summertime and I'm really in a relaxed summery 'fishy' bluish mood! ;) You can tell from all my last art journal pages... :)
Today I want to share with you my last art journal page I created with lots of textures, blue shades and doodling.
I had so much fun creating this page, I hope you will enjoy the process in my video below :)
To create an interesting background I glued with the Soft Matte Gel some pieces from the Ephemera Melange package and other scraps I had in my stash.
Then I painted the whole surface with a thin coat of Heavy White Gesso as I didn't want to cover the patterns completely.
I used the 3D Gloss Gel to glue the embellishments I wanted to use, like the chipboard pieces, thread and Art Stones.
I also used the Mechanicals Screws and Stars Brads to secure the chipboard gear and the tag with the quote I wrote by hand.
I think they look so cute, especially the tag as thanks to the brad, you can turn it upwords every time you want to read the quote and then you can turn it downwards to store the mini journal.
To create more texture I used the blue shades of the Impasto Paints with the 'Cobblestone' Stencil and one of the Double Sided Texture Brushes.
I simply applied the Impasto Paints with the Silicone Brush and then with the silicone texture tool from the other side of the brush, I created the waves.
You will see how easy and fun this technique is in my video below.

To add some more color and interest, I spread some Mica Powders here and there; I used Rust, Gold and Blue from the Mica Powder Set.

Here is my video, I hope you will feel inspired and get into a summer mood just like I did!


I hope you got inspired by my art journal page and got the summery feeling and my little message written on the tag...

'Sometimes you just need to go off the grid and get your soul right'... Right? ;)

Hugs,
Athanasia


Products used: