Hi there Friends!
Before I'll leave you with Kassa's brand new art inspiration, I have a special piece of news for you!
It's such an exciting week for me as the time has finally come to show you what I was working on for a while now - a little something that makes me feel butterflies in my stomach. ;)
It's such an exciting week for me as the time has finally come to show you what I was working on for a while now - a little something that makes me feel butterflies in my stomach. ;)
It's time for the new products reveal!!!
Be patient, more will come on Wednesday May 10th but here is just a little sneak peek:
How do you like that?! :)If you'd like to see more, stay tuned and keep an eye on Prima blog on Wednesday - I hope you're as excited as I am!!! :)
And now back to Kassa and her incredible ability to infuse every artwork she creates with limitless energy and a cheerful vibe - enjoy!
* * *
Hi lovelies x
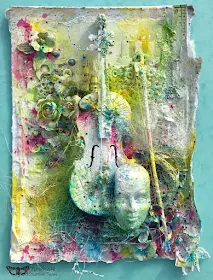
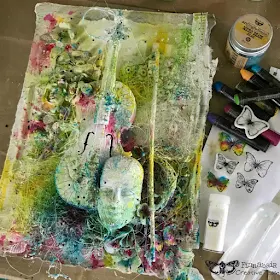
I'm back in this month creating oodles of texture and lush color for this rather dramatic and theatrical piece of art.
Recently I picked up the most adorable miniature violin (9 inches long in total) from my local antique centre, it was love at first sight and I had a million thoughts on how I wanted to alter it.
All I did know was Finnabair's White Crackle Texture Paste was going to play a big roll and I finally got to use a masked face I was kindly given and been desperate to play with (thanks Donna!).
Finnabair does spoil us with her huge and brilliant range of media, so sit back with a cuppa as I take you through my various layers of lucious lovely texture...
Firstly I gessoed the violin and bow thus giving any future layers a great surface to adhere to.
When dry, I coated the violin and bow with a thick layer of White Crackle Texture Paste using the Silicone Brush and whilst wet, I sprinkled a few Art Stones and I let this dry over night.
When dry, I coated the violin and bow with a thick layer of White Crackle Texture Paste using the Silicone Brush and whilst wet, I sprinkled a few Art Stones and I let this dry over night.
Once the magic of the Crackle Paste has worked and the lush crackles appeared, I added more Art Stones with the translucent adhesive Soft Matte Gel.
Step 3
For my background I created a collage using a couple of sheets of Finnabair's Sunrise Sunset patterned paper which are perfectly distressed/aged and ready to use.
I dug out some old music paper and used a little fabric from the Art Basic Fabric Pack plus a little cheesecloth.
I dug out some old music paper and used a little fabric from the Art Basic Fabric Pack plus a little cheesecloth.
I applied the Soft Matte Gel to both surfaces when adhering paper together, this helps to stop any air bubbles forming - just slide your hand over the surface once adhered to smooth out the bubbles.
I leave the edges loose for a soft worn look and I love to overlap the perimeters of my art.
I leave the edges loose for a soft worn look and I love to overlap the perimeters of my art.
Step 5
The lightweight fabrics are easily adhered with the Soft Matte Gel - simply ruffle them up as you press them into the gel and sprinkle in a few of the Art Stones - a simple and lush background ready in minutes.
I adhered my violin and mask in position using the thicker 3D Matte Gel - the thicker adhesive helps keep the larger, heavier pieces in place whilst they dry.
The Prima flowers and Finnabair Mechanicals simply slot into place. 3D Gel dries slowly so it gives you time to position your embellishments and move them around until you're happy with your composition.
The Prima flowers and Finnabair Mechanicals simply slot into place. 3D Gel dries slowly so it gives you time to position your embellishments and move them around until you're happy with your composition.
Step 7
I give everything a blast with my heat gun before coating a couple of times with White Gesso.
Again I blast dry then I add a coat of the White Crackle Texture Paste to the mask so it will blend into the crackles of the violin.
This time though, I only popped a thin coat of the Crackle paste on as the crackles formed would differ to those of the Violins (a thinner coat of crackle paste gives smaller crackles).
I colored my background using Finnabair's Art Alchemy Paints and Mica Powders.
I used the Mica Powders as spray mists which are simple to mix up and of course they perfectly match the Art Alchemy paints.
All I did was take an empty misting bottle, add a little warm water and a couple of scoops of the various Mica Powders. I mixed and concocted my own color combos to get the dreamy colors, e.g. to get a lime green I used Green, Sunny Yellow and a touch of Blue - such fun!
Step 9
Firstly I spritz my background with the Mica sprays, just covering anything I don't want colorised with a wet wipe.
I spritz in quite close to where I want a certain color to be dominant and also this creates the wonderful watercolor effect puddles on my background as the spray drips off the ephemera.
I start with the lighter colors first and I let each color spray dry before introducing the next color so they don't contaminate each other and I kept the green away from the pink so that I didn't create the color of mud!
Step 10
Once all the Mica sprays and paints were dry, I then added more layers of the Metallique paints starting with the Light Patina color and then I gradually introduced the other shades.
I only used a very little of the paints and just added a dab or a splatter here and there. I like to dab opposite colors on top of each other so there is a little pop/explosion of color, a treat for the eyes!
I only used a very little of the paints and just added a dab or a splatter here and there. I like to dab opposite colors on top of each other so there is a little pop/explosion of color, a treat for the eyes!
Step 12
The violin and mask still needed that extra Va Va Voom, they were somehow not blending into the background - until I got out the Patina Paste System!
A few dabs with mint, topped up with the blue and a squirt with water so the colors blended into one another and yey! BINGO!
Step 13
For my fav and final bit, the yummy finishing touches - I added 3 butterflies from the 'Don't Forget To Fly' stamp collection, stamped out with Archival ink.
Then I scribbled colors in the wings with the Prima Water Soluble Oil Pastels and spritzed with water so the colors blended, then lightly dabbed with kitchen roll. I also added a few doodles in my background with the Oil Pastels.
Using a wet brush I picked up a little of the Sparks Fairy Wings Paint and painted it in various places in the background where I wanted the magical touch of a golden color-wash.
I don't seem able to create anything these days without the Splash Micro Beads, nothing catches the light like these little priceless gems and I throw Glitter into the mix for sparkle too! I ended with black and white splatters of course!
I think it's because I've had Phantom Of The Opera and Madame Butterfly tunes running through my head all the way through my creative process! :)
And here are some pretty details:
I'm sure many of you often feel inspired by music and I hope my piece today will give you some new ideas.
I'm off to do a BIG tidy up now, but not too much as I need a few thing out as I'm going to create a little inspiration for this month's Designer's Faves Challenge, are you going to join in the fun this month I wonder? Please do. We'd love to see you there!
Don't forget to check Karolina's challenge in our fb group - you still have time to join in till May 15th!


wow this is just stunning!!
ReplyDeleteAwe Helen thanks soooo much xoxoxo
DeleteBreathtaking!!
ReplyDeleteTorsa thanks a million sweets- mwah xoxoxo
DeleteI wish my brain worked like this!
ReplyDeleteAwe Jean sweets thanks so much - mwah xoxoxo
DeleteA truly stunning piece of art Kassa, no one quite uses colour the way you do, it is amazing!!
ReplyDeleteAwe Anne thank you soooooo much for your beautiful words- you are always so very kind my lovely friend- mwah xoxoxo have a beautiful day sweets 💋
DeleteAwe Arron thank you so much, so happy you were glad to read my post - mwah xoxoxo 💋
ReplyDeleteWhere did you find the mask? Just curious this looks awesome!!
ReplyDelete