Hello Dears!
What a beautiful post title, wouldn't you say? :)
Today Linda's presenting her latest collage creation - so poetic and touching, just like its title. And you will love Linda's creative ideas how to use quite a lot of my products. I'm sure you'll feel inspired. Happy creating!
Hi everyone, it's my turn again to share a fun project with all of you for the Finnabair Creative Team on Finnabair's Blog.
I really added lots of color here and love how this turned out. I see the Universe as the background and the Resin Flower symbolizing me trying to bloom where I've been planted.
1. I like to start with a 6x6 inch canvas boards. I made 2 decorative pieces using paper clay and an Iron Orchid Mould and glued them to the sides of the board. I used the Mechanica stencil with Modeling Paste to add a background.
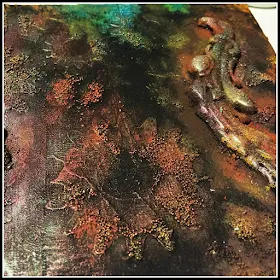
Before it dried, I added Mini Art Stones in several areas. When it was dry, I painted everything with Heavy Black Gesso. Here you can see the beginning of the layers of texture of Rust Paste and Art Alchemy Paints.
2. The Rust Paste adds the color and tiny granular texture to the stenciled area.
The Opal Magics and Metalliques add more color.
3. Each time you add the Opal Magics to the Black Gesso, you get an amazing metallic color.
Darker Metalliques can be added to break up the edges.
4. This close-up lets you see the lightly brushed on paints.
5. I wanted to break up the darkness by adding white heavy body acrylic paint using a couple of small circular cups.
6. I coiled up some rusty wire as a base, but it needed to be painted in spots to make it stand out better on the darker background.
7. I gave the Art Pebbles 2 coats of Heavy White Gesso and the 3 different colors of gold Art Alchemy paints (see links below).
9. The Prima Flower with Resin Face was completely painted with Heavy White Gesso and the Art Alchemy Paints. A mixture of Copper Glass Glitter and Copper Micro Beads are glued on with Soft Gloss Gel.
I added more Mechanicals, the coiled wire, and some gauze under the Resin Face.
A few more Mini Art Stones and a several more colors of paint were lightly brushed onto many areas of the collage.
10. Just a note: I burned my fingerprint off when I foolishly tried to move the gauze I'd laid down into hot glue, then pulled the hot glue off my finger along with all the layers of skin... so heed my warning and use the glue gun carefully. Or just use Heavy Body Gel!
The Industrial Strength glue gun has been banished to the garage. The fingerprint is coming back, but I will never use that gun again. Low-temp is a bit safer. I need all the help I can get.
Your Friend in ART,
Linda
Products used:


Linda, this is absolutely STUNNING!!! Love all the texure you've created and the colours are wonderful!!! <3 xoxo
ReplyDeleteThank you, Linda for the excellent tutorial. This project is waaaaay out of my comfort zone of stamping greeting cards! I've been creeping up on mixed media, ordered several Finnabair kits, and am amazed looking at the creativity by others. Thank you for your inspiration.
ReplyDeleteIts really magical !! Loved every details of it !! 💖
ReplyDeleteOhh !! Hope your finger is doing well now !! Take care !!