Hello Friends!
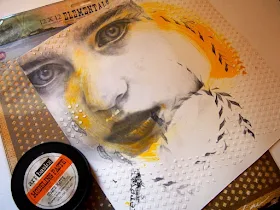
We can always count on Gayle to amaze us with her new collages... I'll bet you will love this one too!
What's more, the idea behind this piece is also very inspiring - as Gayle says - "From 'rejected' to 'recycled'... it is never too late, we can always find a way."
These words always so close to my heart, the sentiments that I just had to have among my stamps.
I hope we'll inspire you to act and to create and never to give up!
Hello lovely Finnabair friends.
I’m sure you have a few of them lying
around... You know, those pages that you made a start on, had a great
idea but it just wasn’t working; it wasn’t going to plan, so you
rejected it, tossed it into a corner and started on a new piece of card
or paper. It didn’t actually get thrown away because it was a nice big
piece of paper and perhaps you could do something on the back. It was
just left and forgotten.
In our Finn Team Spread Your Wings Academy we talked about “blank pages” and how difficult it is
sometimes to start a page. My lovely Creative Team mate Marta has recently made a video on How To Break The Blank Page - check these two links out and you will find a LOT of encouragement and fantastic inspirations.
But sometimes it’s worth re evaluating those “rejected “ pages. They
already have some marks and some colour on them; maybe it’s possible
they can be re worked; maybe you can find a way to bring the rejected
page to life; it is never too late... )
Here is my “reject” page. A piece of thin cardstock, not heavy enough
to put a lot of embellishment on, not even gessoed, so will not support a
lot of wet mixed media, but it does have a beautiful yellow/orange
swish of acrylic paint and a few random stamps on it (I think I was trying
out one of those stamp rollers). It’s perfect for collage (my
favourite thing to do).
1. The first thing I did was an image transfer; just collage in reverse really. I love how the swish of
yellow colour still shows through. Art Basics Soft Matte Gel works
perfectly every time for this technique.
Here's what my page looked like with the transfer in place.
2. A little bit of texture through a Finnabair Elementals Halftone Stencil using Modeling Paste.
3. Now framing the face with collaged paper and paper napkins. Again, Soft Matte Gel works perfectly for collage.
4. Final details - some stamping with Finnabair stamps: cling stamp “Never Too Late” and clear stamp “Messy”. A bit more colour with Gelatos and
some watercolour paint and some flowers (which I didn’t end up using).
The black “blob” on the lip has been covered with some lettering. The
page is not perfect but it has been given a second chance.
From “rejected” to “recycled”... it is never too late, we can always find a way.
Here's my completed collage:
Revamp your rejects, you might be surprised where they take you.
Have fun and thanks for looking.
Gayle xx
Materials used:


Gayle's page is gorgeous!
ReplyDeleteWow!! Beautiful mixed media��
ReplyDeleteThank you for sharing details.
I'm almost new in mixed media and like to learn a lot! (..sorry my bad english..����)
Stunning! Every thing deserves a second chance in life! I'll start using those little oopsies and give it another go.
ReplyDeleteStunning! I cannot stop looking at this piece! In love!
ReplyDeleteWow love it thank you for the inspiration! x
ReplyDeleteMany thanks for your Tuto, love your color combination, so bright and friendly, really beautiful and optimistic!!
ReplyDeleteThis is just so beautiful and inspiring to use up those unfinished pieces of paper etc.
ReplyDeleteLovely way to resurrect a work. I love this image transfer.
ReplyDeleteSo gorgeous page !!! Love the photo transfer.... wonderful! :D
ReplyDeleteLOVE LOVE LOVE - wow. This is just the most INCREDIBLE transformation Gayle. BEAUTIFULLY DONE... LUSCIOUSLY LOVELY. XXj.
ReplyDeleteLove how you "saved" your page! Beautiful...
ReplyDeleteThis is absolutely gorgeous & thank you for sharing your process.
ReplyDeleteJust perfect!
ReplyDeletethis page is totally amazing!! i would love to try this image transfer thank you for sharing
ReplyDeleteStunning!
ReplyDeleteStunning!!!! xoxo
ReplyDeleteFantastic page! Love how it turned out. I`m wondering about the picture you have used for the transfer technique... is it a private pic, or is it possible to buy it somewhere? I`ve seen it used in other projects (or at least a similar one, lol) and i love it so much. So i was hoping it is possible to buy. Thanks for sharing your tutorial. Hugs...Mona
ReplyDeleteHi Mona, thank you for your lovely comments. I found the image on the Internet , but I do not know from where. I type in " Pinterest faces" and then just search through them. xx
Delete