

You will find an idea like this and some more - from me and fellow bloggers - everyday on Sizzix blog, so if you are not familiar with this place - be sure to visit us :)
And now - something I was working on secretly, especially for you - new "Shortie"!
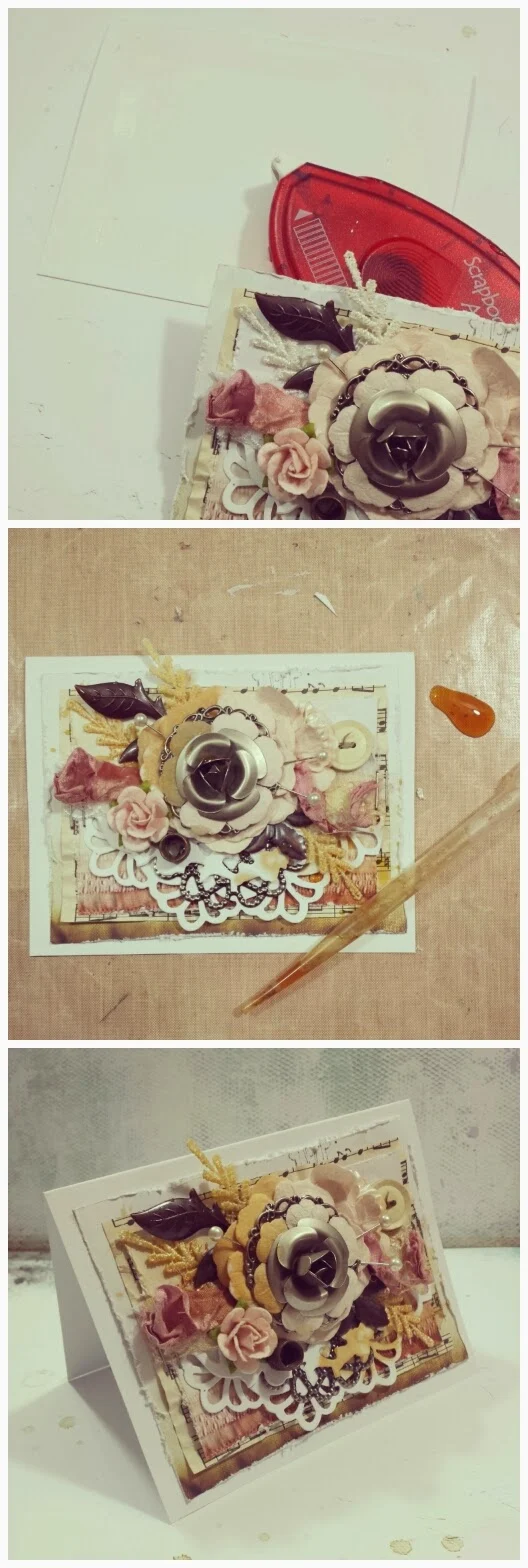
Shortie: Autumn Greeting Card


 If you are wondering where you can get the supplies designed by me - all in one place - as well as some exciting paints, pastes, gels and sprays - jump into our Mixed Media Place - "Prima" shelves are almost full now and more other stuff is coming :)


Supplies - click for links:
Prima Marketing: Vintage Vanity A4 Journaling Pad, Mechanicals - Pendants, Roses, Leaves, Large Flowers. Paper roses. Sizzix dies (click here for more info). Scrapbook Adhesives by 3L: E-Z Runner, 3D Foam Squares. Lace, trim, staples, some findings such as buttons, pins, metal elements. Craft Glue. Card Base - cream paper.
Prima Marketing: Vintage Vanity A4 Journaling Pad, Mechanicals - Pendants, Roses, Leaves, Large Flowers. Paper roses. Sizzix dies (click here for more info). Scrapbook Adhesives by 3L: E-Z Runner, 3D Foam Squares. Lace, trim, staples, some findings such as buttons, pins, metal elements. Craft Glue. Card Base - cream paper.
So here we go!

First we need to start with gathering the supplies - a mixture of Mechanicals, vintage buttons, lace, pins and paper flowers was perfect for me. I distressed my papers (Vintage Vanity Collection) and chose some bigger and smaller flowers.

Time for cutting and tearing into pieces - it's my favorite technique of altering things, you know... Next I started to glue the layers together and creating the biggest element - the "mechanical" flower.

Now a lot of gluing and adding more layers... "More is more" in most of my projects - I am sure i can always one or 2 small pieces, no matter what I do!

Finally - time to glue the paper on the base and add some "finishing touches" - a bit of tea stain here and the won't hurt, right?
If you are wondering where you can get the supplies designed by me - all in one place - as well as some exciting paints, pastes, gels and sprays - jump into our Mixed Media Place - "Prima" shelves are almost full now and more other stuff is coming :)
I hope you like the project - and If so - feel free to share it wherever you like (linking to my page, if possible). I'd love to see your creations based on this "Shortie" too! Any wishes for the next one? ;))
hugs!

Stunning card, and the tea stain adds the final touch! I must try that, thanks for the inspiration.
ReplyDeleteSo eye-catching I hot-footed it over here to see more!!!
ReplyDeleteAmazing Autumnal creation and thanks for the mini tute too xoxo
Huggles
Kassa
xoxo
WOW Stunning! Thank you for the mini tutorial.
ReplyDeleteHugs
Linda xxx
just love it
ReplyDeleteIt's wonderful xx Jan
ReplyDeleteGreat! as always... I love all your works
ReplyDeleteLove this shortie & great tip using the pipette for the alcohol ink!
ReplyDeleteOutstanding, and fabulous tutorial, thank you for sharing xxx
ReplyDeleteGreat Tutorial Great card Hugs Sandra xx
ReplyDeleteAbsolutely stunning, thank you for the tutorial :) xx
ReplyDeleteYou are a master of layering! Very nice. I have a request...I would love to see a winter project using various shades of white, no color. Wouldn't that be fun?
ReplyDeleteLovely! Very well balanced and just gorgeous!
ReplyDelete