Strony

Saturday, 30 November 2013

Farewell...

No, no... don't worry, I'm not going anywhere! ;)
I just wanted to say goodbye to autumn.
With all its beautiful colours that have been inspiring me so much lately, with all its scents and moody atmosphere.
So let's have a farewell in style. :)
I created a couple of cards for Sizzix and you can join me by going to {this page} and signing up for free project sheet downloads.

celebrate

birthday butterfly

green birthday

birthday rose

As you can see, they are very easy to make - I took Sizzix dies and combined them with some vintage dictionary pages, paper doilies, papers from Sunrise Sunset line and a touch of Mechanicals that go so perfectly with delicate textures and shapes.

Have you said goodbye to autumn yet?
Are you ready for the next ARTful season? :)
Hugs,


Monday, 25 November 2013

Horse Mania Continues! :)

Hello, Friends!
As you already know, I'm obsessed with horses...
And I'm happy to say that this obsession of mine turns out to be contagious. :)
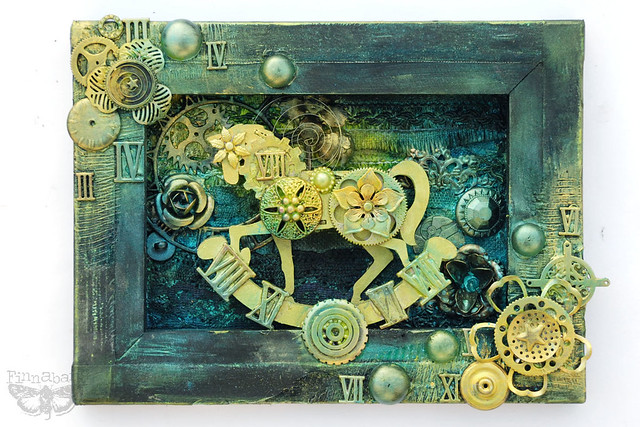
Here's another one of my altered horsies that proved to be a real hit among my Everyday Treasures class students.

And the good news is that very soon such chipboard horses will appear in our shop so that you can create your own magical altered creatures.

horse

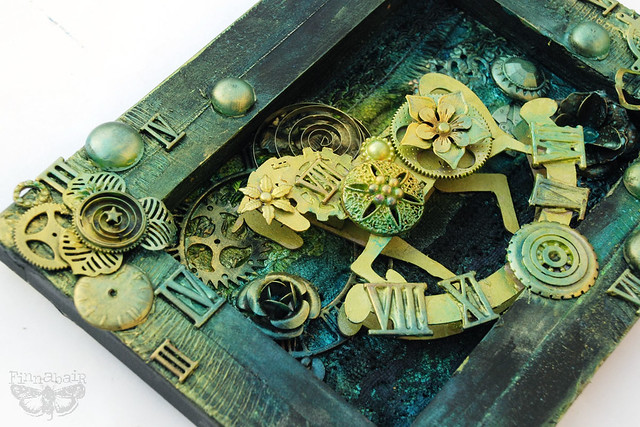
This time my little horse comes in lime & turquoise tones in a traditional company of extra heavy gel medium, delicious Primary Elements pigments, lots and lots of Silks and a generous array of my beloved Mechanicals. All the ingredients were put together on the other side of a stretched canvas.

horse detail 1

How about you?
Do you have your own favourite totem animal?
Don't be to shy to share! :)

Hugs,


Thursday, 21 November 2013

Early Fall - with tutorial :)

Hi, everyone!
I know, I know, autumn is almost over and the world starts thinking reindeer and snowflakes but let me share with you this layout that was inspired by early fall weather and colours...

early fall

And here's some great news for you - you can folow the whole creative process + a detailed tutorial in {this post} I prepared for LuminArte Department on Scrapbooking.com

early fall {detail}

I decided to have fun with the layers but keep the whole composition really light.

early fall {detail}

early fall {detail}

Using 3D Foam squares (Scrapbook Adhesives by 3L) as embellishments has been one of my favourite tricks recently.
Don't you just love the effect?!

You can find the complete supply list in this article, I'll just mention quickly delicious Primary Elements pigments, papers from Messy Head and Sunrise Sunset collections, resist canvas, and all sorts of lovely embellishments.

Wishing you a creative weekend!
Hugs

Tuesday, 19 November 2013

Splashing, dripping, watercoloring - Time Just for Me

Don't get me wrong: I LOVE teaching. I like travelling and I just love meeting people - they give me the biggest kick and loads of inspiration. But...
I do need some time "just for me", when I can play, experiment, create carelessly, not thinking about deadlines, guidelines, expectations. I guess this is what the layout below is about...

Time just for me

I had my best time ever experimenting with Ranger Distress Inks (As far as I remember - Pumice Stone and Broken China), some gesso, my Prima Doily stencil (well, yes, they are addictive!) stamps and scraps of Vintage Vanity papers, and whatever was on the table including old lace, doily, 3D Foam Squrares and piece  from E-Z Runner (Scrapbook Adhesives by 3L).


Again - I was exploring the possibilities of free hand writing and doodling - I love, love soft pencils. There's nothing I can do about it! I'm really tempted to start to draw again, as I did at school during the boring lessons and moments when I should been studying...

Anyway - here is something in more-less the same colour palette, layout made as a sample during one of my "Splash!" classes. What can I say - a bit of Prima  MechanicalsElementals, Vintage Vanity - all in one. And a lot of tea and Ranger Distress Stains :)

Ira - Splash class

These projects - as many others were posted on Sizzix.uk blog - check this blog from time to time to find loads of paper crafting, scrapbooking and quilting inspirations!
See you soon again!

Saturday, 16 November 2013

There are days...

Sometimes there are days when words simply can't express certain things...

Alan Alda once said: "The creative is the place where no one else has ever been. You have to leave the city of your comfort and go into the wilderness of your intuition."

Exactly.

intuition

As you can see, I used all sorts of elements from my favorite "junk" collection.
I added delicious colors with Glimmer Mists and acrylic paints plus some gesso.

How about you?
Do you sometimes listen to that little voice in your head?
Don't you think we should be doing it more often?

Hugs, dear friends...

Wednesday, 13 November 2013

Hot pink? Yes please!

Last week I posted project inspired by my visit in Avoca Woolen Mills and my new blanket - it's colors to be exact :) When I started thinking on this project I didn't expect it will stay on my mind that long - but it did! After the first layout came one more and one more... And then I realized this hot pink color was probably the reason. Can you believe?
Well - this is number 3: mostly painted with Distress Inks, finished with pencil and stamping. Full of leftovers of leftovers from my desk. What can I say? I had wicked time creating it!

Yes, please

Supplies: 

Here are the details, if you want a closer look - more info you will also find here, on Sizzix.uk blog! 


Thank you so much for coming back to my blog and all the comments here and on my FB page. I aprecciate it - you really make my heart sing!
Wishing you a great creative time


Friday, 8 November 2013

Imagine the Sea...

Hello, friends.
Everything you can imagine is real...they say...
I totally agree. That's why I love my Imagine class so much!
Today, let's sit down and imagine the deep blue sea...

Imagine the Sea

Imagine the Sea (detail)

The materials I used on this canvas are of course my beloved Mechanicals, Sunrise Sunset epoxy stickers, gesso and Luminarte's Primary Elements pigments.

So...can you hear the waves? ;)
What will you Imagine this week?

Hugs, dear Friends


Monday, 4 November 2013

Inspiration: Avoca Blanket - woolen beauty and small challenge!

There are some places you love to visit and there are some things on the "wishlist" you are very happy to tick off. When I was the very first time in Ireland 8 years ago we were visiting Avoca Woolen Mills - which were smaller and less commercial than now. I loved this place: colours, buildings, smell of wool which for me is the essence of ultimate cosiness. I promised myself one day I will buy one of these insanely colourful blankets for my home.
In September my parents were visiting us and we've decided to visit Avoca Mills again. The experience was slightly different from the first time, but I loved it anyway. Again - the magic of colour and smell worked for me:) I took tons of photos - this place was literally asking for it!


Ok, enough...
This time I bought a blanket of course - now way I could resist for a second time! I took it home and after a few days looking at the pattern and color scheme ideas started coming to my mind... For a few days i got slightly obsessed with olive green, brown, turquoise and hot fuchsia pink...


Uhmm, the smell of woolen blanket...
Ok, anyway:
I was looking for the right color palette and elements - finally I decided to play with Distress Ink Pads - luckly I had all the needed colors at home (ehm... what a surprise) and I was ready to create my own, colorful, Avoca-blanket inspired background for my layout! It didn't take me long, really - some old labels, some pieces of the Avoca leaflet, and some hot pink yarn I got from one of my lovely students - and here it was, done!

avoca

I started with Distress Inks, then I continued with layers of paper - Vintage Vanity A4 Pad and Messy Head Collection - some doilies, labels, tags, veil, buttons, even some 3D Foam Squares from Scrapbook Adhesives...


Finishing touches were done with Ecolines, Archival Ink and Threading Stamp followed with a bit pencil doodles. I'm not a master of doodling for sure - but who cares? :)


Can you see this cute little woolen heart in a bottle cap? This is also a gift from my student - Lucky me! It was just perfect for this project!

If only the story ended here. But no!
The same night, using almost the same supplies I created another layout - and - heaven forgive! - I had the will to do far more! These colours and yarn and layers made something bad to my head, really!

you keep me warm


And some details - this time with "Seamstress" stamp from my new collection and more of Checkered Resist Canvas Sheet from Elementals...

Seriously, it was hard to stop.
I have to admit there is one more waiting in a row - but I want you to have a deeper breath after this colour explosion on the blog today:) I will leave you with adorable video about Avoca Mills - enjoy! I hope now you will understand my small woolen madness;)

And maybe you want to try this color palette too? I'd love to see your interpretation!
The colours I used for my Project were: Broken China, Brushed Corduroy, Shabby Shutters and Picked Raspberry. Feel free to leave me a link if you will decide to try - maybe I will have a small surprise for you?
Waiting for your projects!

Friday, 1 November 2013

Shortie: Autumn Greeting Card - mini tutorial:)

Today I've posted Autumn Greeting Card here, on Sizzix blog. It is one of these projects where I have to really challenge myself - I don't feel confident working on small projects, as you know. I have the feeling there is not enough space for all my layers so instead of spreading I always try to compensate it with dimension... Is it practical? Probably not, but most of my life is unpractical, random and surprising - even for myself!

Autumn Greeting Card

You will find an idea like this and some more - from me and fellow bloggers - everyday on Sizzix blog, so if you are not familiar with this place - be sure to visit us :)

And now - something I was working on secretly, especially for you - new "Shortie"!

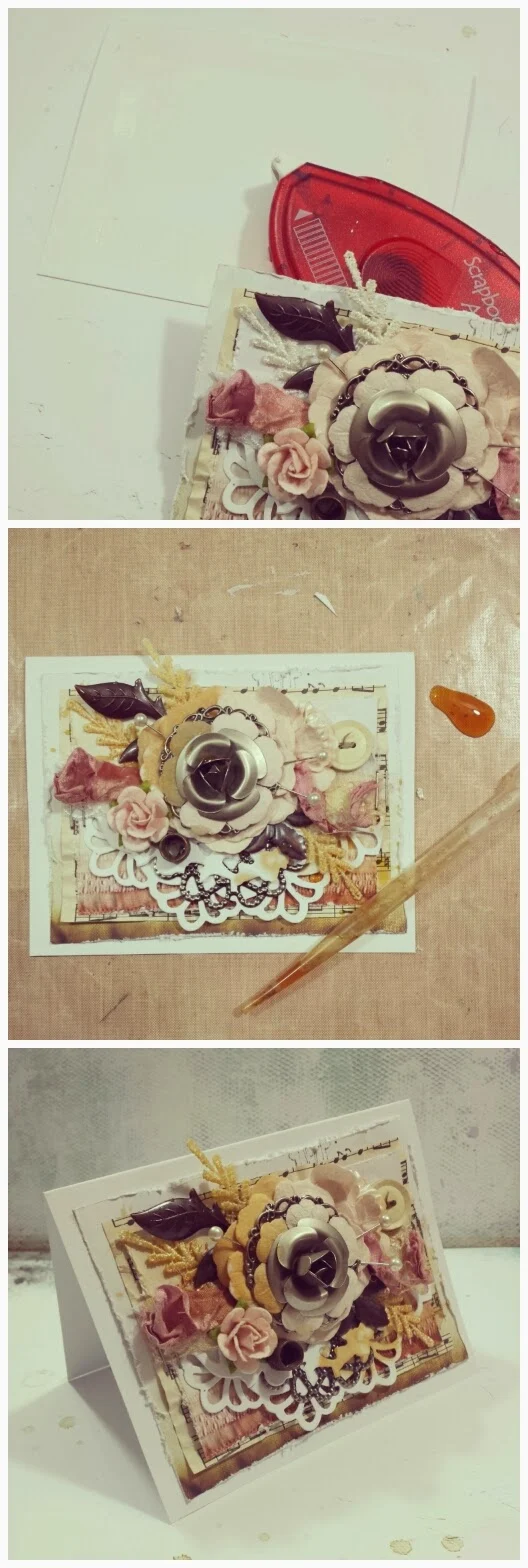
Shortie: Autumn Greeting Card


Supplies - click for links:
Prima Marketing:
Vintage Vanity A4 Journaling Pad, Mechanicals - Pendants, Roses, Leaves, Large Flowers. Paper roses. Sizzix dies (click here for more info). Scrapbook Adhesives by 3L: E-Z Runner, 3D Foam Squares. Lace, trim, staples, some findings such as buttons, pins, metal elements. Craft Glue. Card Base - cream paper.


So here we go!


First we need to start with gathering the supplies - a mixture of Mechanicals, vintage buttons, lace, pins and paper flowers was perfect for me. I distressed my papers (Vintage Vanity Collection) and chose some bigger and smaller flowers.


Time for cutting and tearing into pieces - it's my favorite technique of altering things, you know... Next I started  to glue the layers together and creating the biggest element - the "mechanical" flower.


Now a lot of gluing and adding more layers... "More is more" in most of my projects - I am sure i can always one or 2 small pieces, no matter what I do!


Finally - time to glue the paper on the base and add some "finishing touches" - a bit of tea stain here and the won't hurt, right?

If  you are wondering where you can get the supplies designed by me - all in one place - as well as some exciting paints, pastes, gels and sprays - jump into our Mixed Media Place - "Prima" shelves are almost full now and more other stuff is coming :)

I hope you like  the project - and If so - feel free to share it wherever you like (linking to my page, if possible). I'd love to see your creations based on this "Shortie" too! Any wishes for the next one? ;))
hugs!