Strony

Saturday, 31 January 2015

Now Is The Time... To Color

Hi, everyone! Are you having a creative weekend?
Today I'd like to suggest a little bit of watercolor fun. :)
First, we have something really really simple so I hope you will try making one yourselves - an ordinary paper bag, ladies and gentlemen...


If you'd like to know more, go straight to this post on Prima blog where I share 2 tutorials and some tips & techniques having a blast with brand new Prima watercolor pencils and brushes.

There are really no super secret advanced techniques involved here - stamping and coloring - that's it! :)


My second project is about something really close to my heart - altering vintage cabinet cards...


You can also find a detailed tutorial how I created this canvas on Prima blog.

As you can see, I played with my new line of stamps - so excited to finally be playing with my new "art babies". :)


I also have 2 important reminders for you today.
The first one - an exciting event that is coming soon - the FIRST ever Mixed Media Education Day for European Retailers! More information HERE.


And secondly, we are getting so many amazing entries to our Sparkle & Shine challenge!
It's open 'till February 8th so if you feel like sharing your sparkly creations, don't hesitate and join us!

http://tworzysko.blogspot.com/2015/01/sparkle-shine-blog-hop-challenge.html

As you can see, there is a lot going on (me on the road again) and I hope I managed to get your creative juices flowing. ;)
Hugs,


Friday, 30 January 2015

Create The Symphony

Hello, Friends!
We have a stunning layout for you today... It will surely inspire all those of you longing for some sun and flowers.
Carole takes us for a beautiful walk in a poppy field...


Today I'd like to show you my January layout called "Create The Symphony" with a little sneak peek of my daughter last year in a poppy field.
I love poppies! This shot reminds me of spring... I hope it arrives soon!


And here is my creative process.

I chose one paper from Vintage Vanity collection.
Strips of Sunrise/Sunset papers were layered randomly on the front. To adhere them to the paper, Soft Matte Gel was used.


I covered everything with Clear Gesso

It is no secret that I love Art Extravagance Texture Paste in platinium and white crackle. If you have not used these products yet, you really must as they are amazing!
 
I applied a fairly chunky layer of texture paste. You can use your heating tool of course, but personally, every time I use crackle pastes, I prefer to wait patiently, knowing that the effect will be even more stunning!
To create the vibrant colors, I applied Color Bloom sprays.


I layered some papers behind the photo before gluing everything on my background.

I wanted to add some texture to my piece so I used Texture Paste with crackle and white sand around my photo.


Then I applied a mixture of white acrylic and Color Blooms to simulate the poppy field out of the picture. 


Here's a detail shot so that you can see the final effect of all the pastes and paints:


It only remains to create the poppies that I used as my embellishments. They were drawn with Gelatos, Dylusions Ink and Indian Ink. Then stamped and cut by hand following the outlines.
 
I attached them to the page with mini brads embossed in black.


Here's how my poppies turned out:


I painted some simple flower stems and I wrote my title and the rest of the text - all with Indian ink.


That's all for today!
Hope you'll feel as excited and inspired as I am!

Materials used:
 

Wednesday, 28 January 2015

Art Recipe Wednesday: Textures and Pastels - mini collage

Hi guys, how are you today?
I had a great response to CHA demo videos I was publishing earlier - thank you so much for your interest in my new products and techniques based on mixing and creating custom textures! Encouraged by that I decided to create simple home decor project based on my recipe of  mixing Micro Beads into 3D Gloss Gel - to show you real, finished artwork, not just simple tag.


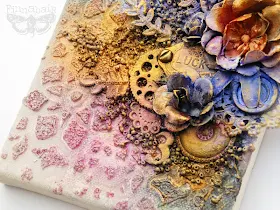
I was trying to create something rich, detailed but not too complex - and having more optimistic color palette than my usual blacks, blues and greens... it's good to have a challenge from time to time, right? So, here is the effect of my experiment, small mixed-media canvas with loads of texture and shine!


I love the mosaic effect you can get using lace stencil and dimensional texture gel. It adds so much interest to the background and catches the light beautifully... or adds lovely grain if you will cover it a bit with gesso, like i did!


You can use almost any kind of embellishment or found object for this kind of creation. Possibilities are endless as you are adding the colors of your choice in the very end of the process.


Those of you who are coming to Creative World Show in Frankfurt this weekend will have a chance to see my demos at Notions Marketing booth. I promise to have this piece with me - so you can see and touch all the details :) I hope to see you there!


Here is the full Art Recipe and some step-by-step info for you! :)


Here we go - short step-by-step for you!

1. I started with making my own texture gel based on Art Basics 3D Gloss Gel and Art Ingredients Micro Beads in selected colour. I decided to go for purple - and I simply mixed the beads into my 3D Gel. When the custom gel was ready I picked one of my favorite stencils and applied it on a small canvas using just a palette knife.


2. I dried the texture for a moment with heating tool to avoid "accidents" when decorating the project. After a minute or two 3D Gel created film on the top and it was quite safe to work on it. Now I used more of 3D Gloss Gel as an adhesive for all my metal and paper embellishments. I created a pretty complex cluster and dried it again with heating tool to make sure it will stay in place!


3. To add more texture I added more of Art Ingredients - Glass Beads (Licorice, Cobalt Blue) using 3D Gel as my glue again. I simply applied the gel in the desired places and sprinkled the beads on it. I dried everything again - and left it for a moment to "rest". After a couple of minutes I dabbed a bit of Art Basics - Heavy White Gesso on the top of my embellishments and beads.


4. When gesso was dry I added the colors. I put my Art Ingredients - Mica Powder into spray bottles and added water to create shimmering sprays in gold and pink. I did the same with Primary Elements Pigments in shades of purple and violet. When the sprays were ready I sprayed the projects focusing mostly on the embellishments. I added a touch of black for more depth (Lindy's Stamp Gang Spray) and when the project was dry I added some gold highlights with a bit of Silks Acrylic Glaze - Solar Gold. Little canvas was ready!


I hope you enjoyed this technique - it is great to apply it to many home decor and altered projects too and I'm sure you will come with many wonderful ideas!


Here is the list of products from put Mixed Media Place Shop for your convenience 
(new Art Ingredients should be available in late February!)


Sending lots of love - and see you in Frankfurt!