Strony

Wednesday, 30 October 2013

Altered Steampunk Horse - my way :)

I'm probably obsessed with horses. I really suspected it happened somewhere in the past, maybe in the moment when my parents politely explained to 4-year-old me I won't get a pony. Ever. Ponies won't live in the apartment, neither int he bathroom or on balcony. Yes...I think it could be it...
Fact is fact - hoses were always on my mind and no wonder when i was in Sweden I was going crazy to buy one or 2 nice Dala Horses - for display, for altering. I couldn't resist!
Speaking about horses - in Stockholm I was also horse-focused collage class: "Everyday Treasures" where we try different ways of altering using a lot of Primary Elements and Silks, Heavy Gel Medium and of course my favorite Mechanicals.
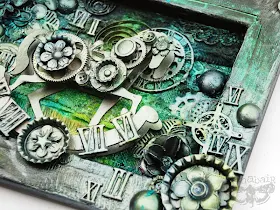
Here is the final effect - my class sample in black, turquoise, key lime and silver. I LOVE this color set!

Altered Silver Horse - collage

Supply list:
Prima Marketing: selection of Mechanicals: Small Roman Numbers, Mini Flowers, Roses, Gear, Clock Face Small, Leaves, Large Flowers, Clock Elements. Luminarte: Primary Elements - pigments, Silks Acrylic Glazes, Chipboard Horse from Scrap Matrix,  Heavy Gel - Gloss, texture tools.

Here are some close-ups:
I love the texture of all kinds of fabric layered in the background - the effect is just amazing...


Silks on chipboard, wood and metal - you can't go wrong, right?


Most of the supplies for creating similar project you can find in Mixed Media Place - online store with exciting range of paints, gels, pastes and tools... and "Everything Finnabair" including my 7 Dots Studio and Prima products.
As I was posting not long ago - the shop moved from Poland to Ireland but the range of product didn't change much:) We  are working on adding new ones and re-filling the stock for you now - starting with Prima Vintage Vanity Stamps, Journals and papers, Elementals - Canvases and Stencils and new range of Mechanicals. For specific products used in this collage - please see supply list below the main photo!
I wish you a great, creative day... now off to unpacking!


Monday, 28 October 2013

Edgar Allan

Hi, everyone!
November is just around the corner. So is Halloween and gloomy early evenings.
It makes just perfect timing and excellent inspiration for my new art journal pages.

This journal is a round robin one belonging to my friend Belladonna who had us all create pages inspired by the writings of Edgar Allan Poe.

So get ready for The Fall of the Usher House by Finnabair... ;)

The Fall of the House of Usher


I really love some dramatic atmosphere and totally enjoyed conveying the complex nature of the main character.

The Fall of the House of Usher (detail)

The Fall of the House of Usher (detail)

The stamps I used come from my Vintage Vanity collection.

Well, autumn is here to stay so let's make it a creative one!
Sending you hugs!

Saturday, 26 October 2013

My Art Journey

Hi, everyone!
If I were to write about my art journey, it would take a reaaally long post... ;)
So today let me just show you my visual take on the theme.


art journey

This layout is a project made for Harsh & Soft class from my Industrial Baroque series of workshops.
I love this class because that's when I can convince you that grunge can be feminine, eclectic and a little wild. :)


art journey (detail)


Supplies I used here are: my Mechanicals embellishments (including metal labels), pieces of various resist canvas from my Elementals collection, gesso and LuminArte paints.


art journey (detail)

Harsh & Soft class is also about looking at embellishments and everyday objects with a fresh eye.
Which is exactly what I did here.
And here's a question for you - who doesn't like a good guessing game, right? ;) -
When you look closer at the plastic gear right between my photo and the "journey" label - can you guess where it came from?
Hint, hint: it's a part from one of well-known and widely used craft tools...
Any ideas, dear friends? :)


[EDIT]: So, yes - you guessed! The gear came from the inside of E-Z Runner by Scrapbook Adhesives. Well-done guessing! ;)

Have an artful weekend!
Hugs

p.s. In case you missed this week's big news, hop over and read why Andrew and I are so thrilled! ;)

Thursday, 24 October 2013

Our new "baby": Mixed Media Place - online store has arrived!


Hi friends!
I was quiet last days for a good reason again... I've got a wonderful news to share with you!
We've decided to take another challenge in our life and start running an online store - one with all my favorite products, my own designs and anything that can be related with the classes I teach for my and my students convenience :)
And you know what - the dream came true again- my husband decided to join me on this trip and our friend Tusia gave us a hand - and this way Mixed Media Place - European Mixed-Media online store opened again - in Ireland. We are so very happy and excited - you can only imagine!


So, first of all - let me introduce you to the team:
it's my husband Andrew, who will take care of the store and orders, me, Finn,  - the one for supplying the store in new, inspiring products and helping a bit and last but not least our great DT - Agnieszka Anna, Anai, Czekoczyna, Justi and Tusia. All the girls will as always post their great posts on the Mixed Media Place Blog - make sure you will visit us from time to time to have a peek on the new arrivals, projects and regular challenges or just to say hi to us all!:)

And what else? Those of you who already know Mixed Media Place will only see few changes - there are as always our facebook page, twitter and pinterest waiting for you - all are worth visiting - with lots of inspirations and information there.

Of course there are some changes - the main one will be shipping method and prices. You can always find the estimated shipping price for your orders here - in Delivery Information which shows estimated prices with shipping by Irish Post - An Post. All the international shippings will have a tracking option for your safety and convenience and as we discovered - it is cheaper to break the heavy orders into smaller ones, under 2kg, so we will be happy to do it for you - if possible:)
All the other functions of the shop including ways of payment, changing languages, currencies, weight-based shipping costs remain the same - if you want to learn more have a look into our FAQ section!

We've also prepared a lot of new products in the store - and we can promise there is more coming!
So far you can find a large number of my new Prima products from Vintage Vanity Collection: clear stamps,  Small Mixed-Media Journal and A4 Journaling Pad. There are Elementals - Stencils and Resist Canvases ( strips and 12x12 sheets) and finally - more of my beloved Mechanicals! :)
Here is a small teaser for you...


Of course - please keep your fingers and toes crossed for us - as as always with new projects we will need it for sure!
Take a minute and peek into the store - and if you are looking for a product and would like to find it there - send us a message and we will see what we can do for you!
hug hugs from excited as hell or two...

Monday, 21 October 2013

Andrew in Wonderland

Hi, everyone!
Are you having a good Monday?
Today I thought I would show you how I sent my hubby to Wonderland. ;)


Andrew in Wonderland

I usually prefer to use the light and "empty" side of papers for my LOs but from time to time I think it's fun to play with rich colors and patterns.


Andrew in Wonderland (detail)

Andrew in Wonderland (detail)

This layout was created on my old Wonderland collection. I used a little bit of Prima embellishments, some chipboards, Silks paints, gel medium and of course - my beloved found ephemera.

Have a creative week, folks!

Saturday, 19 October 2013

Shhhh... I have a secret... :)

Hi, there!
Today I'm being a fairy with a Halloween twist! ;)


a secret

I created this canvas during CHA having fun collaging all day in Prima booth.


a secret {detail}

When visiting Canada last year, I spotted this cute skeleton lying on the floor in one of the shops. When I saw it, I just knew it HAD TO come with me and appear in one of my creations. :)


a secret {detail}

The materials I used are mainly my Mechanicals + LuminArte paints and gesso.


And how about you?
What are your secrets? ;)
Have a great weekend!

Wednesday, 16 October 2013

Shortie: Halloween Headband - Steampunk Style - tutorial :)

Hi again friends!
Halloween is coming and some of you are probably already thinking about suitable costumes and decorations. I have to admit, I'm not very familiar with this celebration - mostly because of my nationality and different traditions celebrated in our country - but I'm very curious what will be going on here, in Ireland. I don't have any specific expectations - just wondering... Maybe you will tell me how should I prepare for this day? Pretty please? :)

Anyway, today I've got new "Shortie" for you - and I thought it might be inspirational for those of you who are more into "steampunk" and similar styles, it is fast, it is easy to assemble and easy to rip-off and restyle - which makes it a perfect last-minute project or seasonal hairpiece you can alter to suit your needs.  I've made a similar one for me to wear during CHA in Anaheim, January 2013 and enjoyed it so much I decided to recreate the project for you:)
Here it goes! It's me, trying to pose professionally, LOL!


Supplies:
Prima Marketing: Mechanicals (trinkets, caps, 3D roses, washers), Sunrise-Sunset Collection - Zipper Flower, fabric flower, paper leaves, velvet headband. Others: sprays, hot glue gun or any other suitable glue, piece of veil, found objects (light bulb, old buttons, pen nibs, bottle cap and a piece of lace). 


Here  you can see it done, step-by-step:


First  - gather the elements you want to add, including embellishments and found objects - and don't worry if you don't have the right color of veil... I didn't get any black so I recycled a piece of my old wedding dress painting it with black permanent spray (I'd suggest doing this step outdoors). I knew I kept it for some good reasons!


Time for cutting, ripping, repainting and gluing together the elements we want to attach to our headband. This time standard water-based sprays should be enough.


When you've got your embellishments layered, glued or fastened with brads it is time to embellish the headband. Start with gluing the veil, then add the biggest elements in desired places. Move to smaller ones and finally to the smallest! Watch your fingers - the glue is really hot!


Attach all the elements (paint, maybe?) and make sure you get a nice, dimensional effect. It helps if you add your elements really close to each other! Restyle the veil, cut it if needed and wear your cool hairpiece with pride! :)

I hope you like my idea:)
I'm going to keep my headband for sure and wear it from time to time, not only for Halloween... and if I decide it is time - I can always restyle it or rip into pieces and use my embellishments again on other project, right? And that's why I love creating so much!!!
Sending warm hugs!

Monday, 14 October 2013

Why so serious?


Hi there!
I bet you're wondering what's inside the journal I showed you last Friday. :)
Wanna take a peak inside?

But before you do...
...the whole idea behind these pages is something I do both during my classes and at home for myself - simply let go and play! There are no fancy supplies - just some masking tape, pencil, stamps & inks. Which only proves that you can create something special even with limited supplies.


Why so serious?

Why so serious? (detail)

These pages might remind you of the ones I made for Creative Jump Start 2013.
If you go back to this post, you will also find my video showing the whole fun process.


And one more spread that is all about stretching my creative muscle...

Search for your style

The words on the card I'm holding in Polish mean: "Search for your own style. Be the original, not a copy.

Search for your style (detail)

Search for your style (detail)

Have you guessed what the tiny squares are next to my photo? Yes, indeed - they are 3D foam squares. I simply grabbed whatever was on the table and it turned out they make great embellishments! :)

So what are you waiting for?! Grab whatever's at hand and just enjoy! And...why be so serious all the time?! ;)
Have a great creative week!